Book Image

OmniGraffle 5 Diagramming Essentials

Book Image

OmniGraffle 5 Diagramming Essentials

Overview of this book

If a picture is worth a thousand words, why settle for anything less? Creating good visualizations to substantiate your ideas is essential in today's corporate environment. Use OmniGraffle's remarkably powerful and flexible features to get your diagrams right. Although fun to use, it can get cumbersome to find out exactly how to get what you want.This book will teach you how to make stunning diagrams without spending much time and energy. No matter if you have never used OmniGraffle, or if you are using it on a daily basis, this book will teach you how to get the most out of this splendid diagramming tool. It will first teach you the basics of the program and then extend your knowledge to a higher level.The book will teach you to make eye-popping visuals using a lot of useful, step-by-step examples. It begins with covering concepts that beef up your basics of using OmniGraffle. The earlier chapters will teach you to prepare dazzling diagrams from scratch with the many stencils, shapes, and fonts that are included in OmniGraffle. As your understanding of OmniGraffle broadens, the book will go even deeper to explain the less understood features of the software. It also covers some handy time-saving techniques such as workspaces and keyboard shortcuts.By the time you reach the end of this book, you will have mastered OmniGraffle to turn your ideas into diagrams.
Table of Contents (16 chapters)
OmniGraffle 5 Diagramming Essentials
Credits
About the Author
Acknowledgement
About the Reviewers
Preface
9
OmniGraffle workspaces
Index

Your first stencil-based diagram


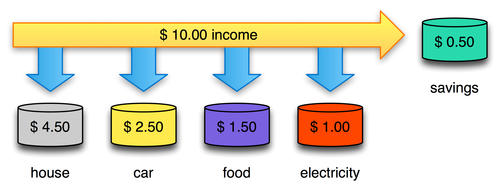
Let's create a very simple flow type of diagram by using the stencils library. The diagram will explain how your income should be used.

These kinds of diagrams may be ideal to use when trying to explain to your kid that a financial goal is to save money.

Start with a blank canvas—either using the File | New menu command, or simply using the ⌘+N keyboard shortcut combination.

A helping guide

Before you start, you'll need to make sure that your canvas has rulers enabled. Use the menu command View | Rulers to enable canvas rulers. You should now see both a horizontal and a vertical ruler on the top, and to the left, of your canvas.

The reason why you need these rulers, is that they will enable you to easily add some visual guides to your canvas.

You can add guides by using the Arrange | Guides | Add Horizontal/Vertical Guide, and then moving the guide around.

Place your guide in the middle of the canvas.

You can also use the Arrange | Guides | Clear Manual Guides...