

Adobe Story has a variety of tools that make it much more than a simple script writing program. Story is considered to be a production management program. Not only will it allow you to develop all sorts of screenplays, but it will give you the necessary tools to keep track of your entire project. We will go through the basics of Adobe Story so that you can jump right into putting your project together. We will touch on the layout of Story, how to create a document, and even the key terminology used in the industry today, as well as other vital information!
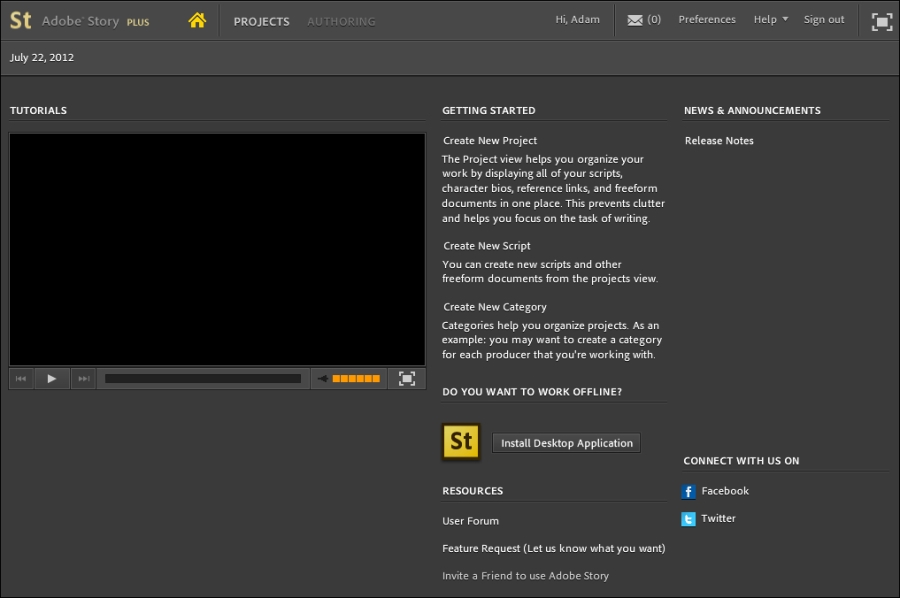
Now that you are set up and ready to move forward with Adobe Story, we can look at the layout offered by Adobe. When you initially sign into the program, you are greeted with the home page. Adobe offers video tutorials and any news in regards to Story, as shown here:

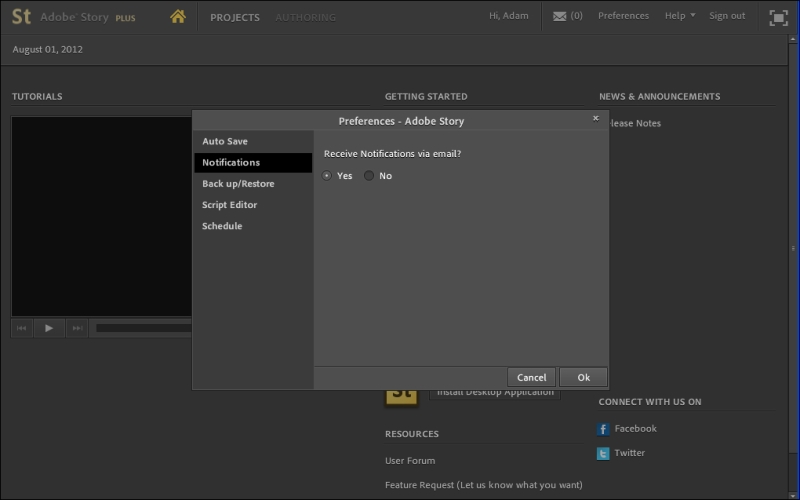
On the top bar are your options in how you would like to proceed. Next to your name is an envelope icon which holds all your notifications. If you are working with editors and reviewers, any action performed on a project that they may take will be shown to you via the notification system. It's a simple way to keep everyone working on the same script informed and up-to-date.
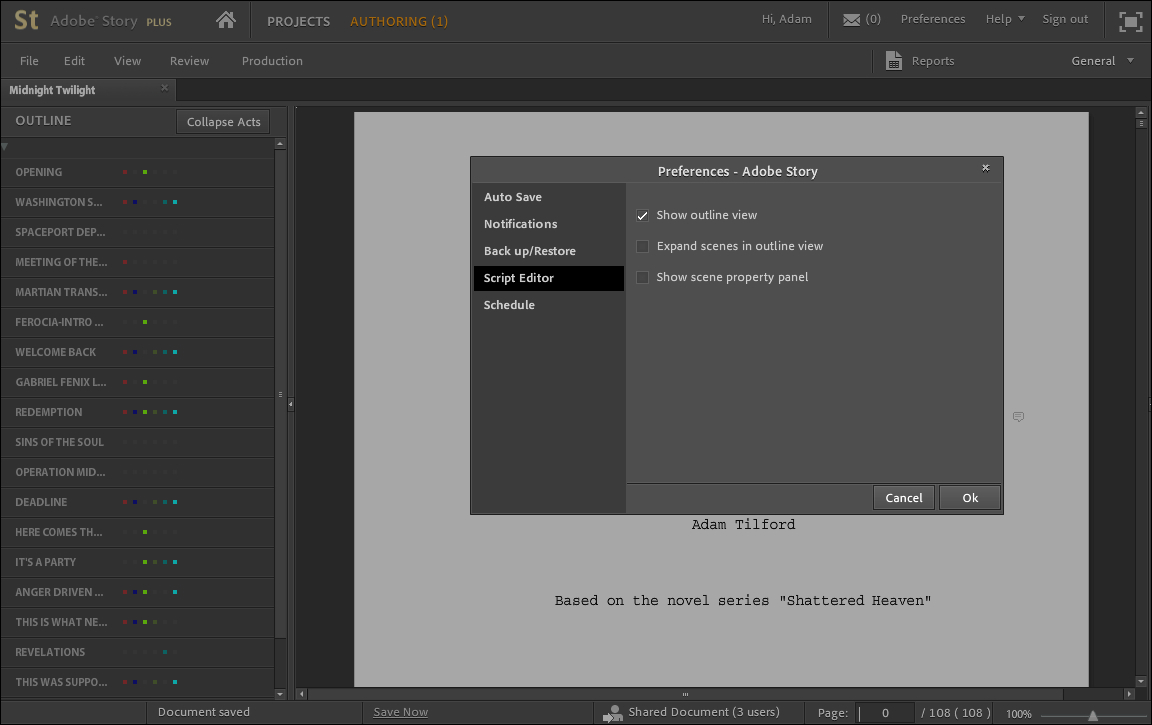
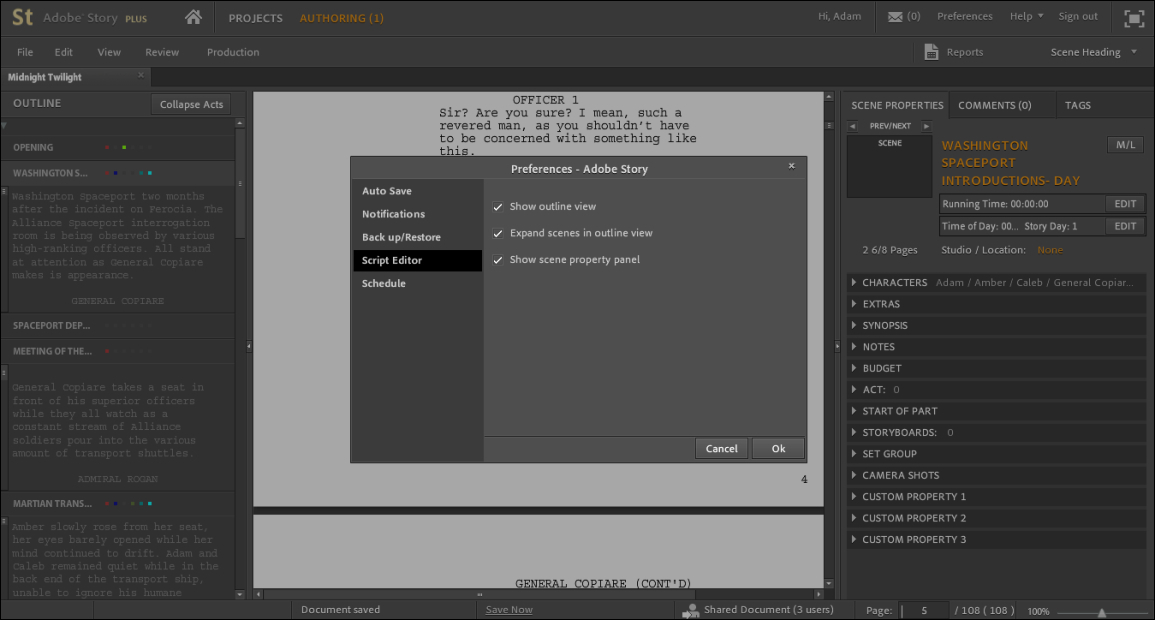
Through the Preferences option you are able to set up beneficial features such as Auto Save, Notifications, Back up/Restore, Script Editor, and Schedule; as shown in the following screenshot:
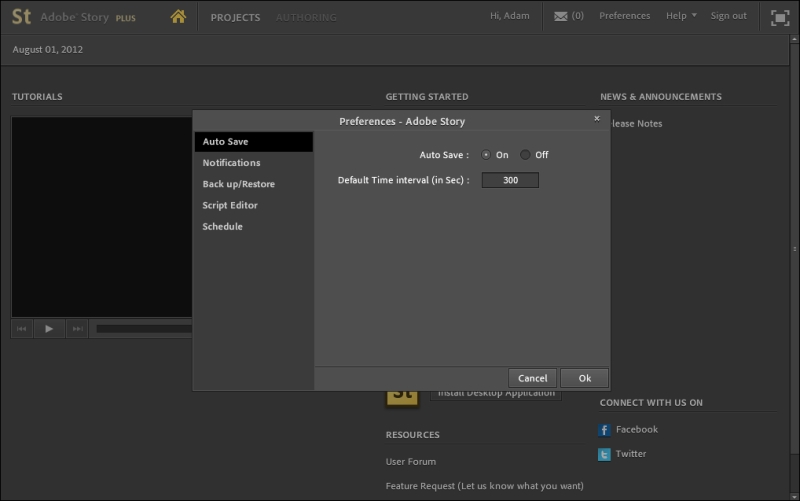
Either turn it on or off. When it is on, you can control how often Story saves your document. It is recommended to keep this enabled, you never know when something may happen to cause you to lose work that hasn't been saved.
Available only for Adobe Story Plus (categories, projects, scripts, and so on) onto a FTP or SFTP server, providing you have the required permissions that server may require. If needed, you will be able to use the backup file that is created on the server to restore all data.
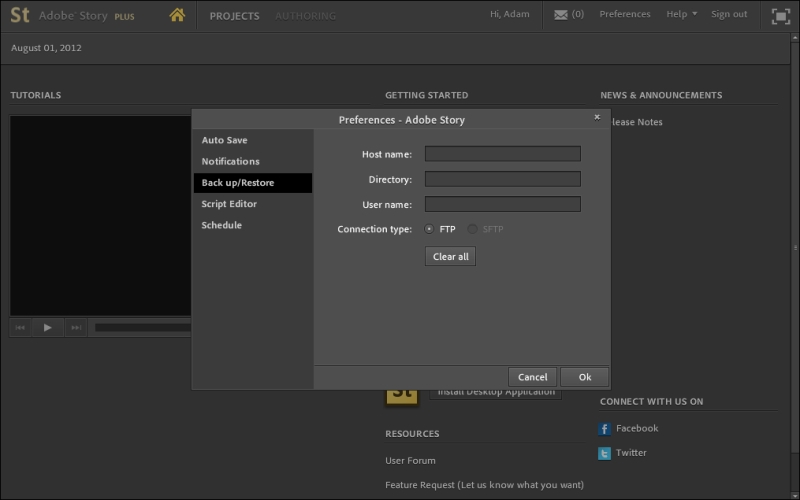
If you have access to a web server, Adobe Story allows you to connect to it through either an FTP or SFTP connection. Story will send backups of your documents to the server just in case something may go wrong.
The different parameters that need to be filled in—also shown in the previous screenshot—are explained as follows:
Host name: Usually is the domain name connected to the FTP account. For example, shatteredheaven.com.
Directory: Only relevant if you have a specific folder you would like to send the backups to. For example,
/backup.User name: The username you use to access your FTP server.
Along with the documents backed up, all of their organizational information is saved as well. Everything will be restored to its original location.
A notification will appear after every backup or restore operation that occurs. The success or failure of this process will be displayed in the notification.
The steps to set up the Back up or the Restore option are as follows:
In the Projects view, click Projects.
Select the Back up/Restore options, as shown in the following screenshot:

In the Back up/Restore account data, fill in your information.
Select either the Back up or Restore option.
To back up projects, select Back up
To restore a project that has already been backed up, select Restore
Enter the address for the server that you either intend to back up the projects to, or that has the recovery data of a previously backed up project.
Specify the location of the directory on the server (optional).
If you are creating a backup, you can choose to change the default name of the backup file. The default backup name is
your first name_Date of initiation of the backup_Time of initiation of the backup. When restoring data, enter the name of the backup file to restore.Enter your login details for the server.
Select the connection type, FTP or SFTP.
Click Ok to back up or restore data.
The Script Editor option allows you to control the layout when editing a document.
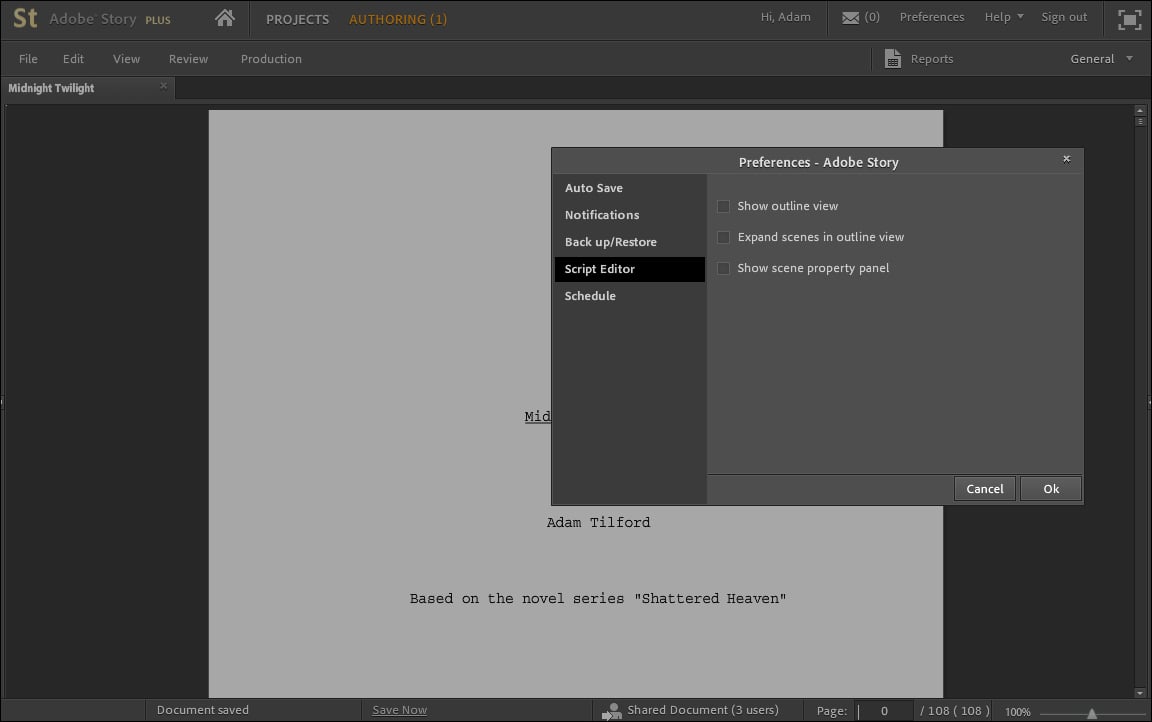
The previous screenshot is an example without any of the options enabled.
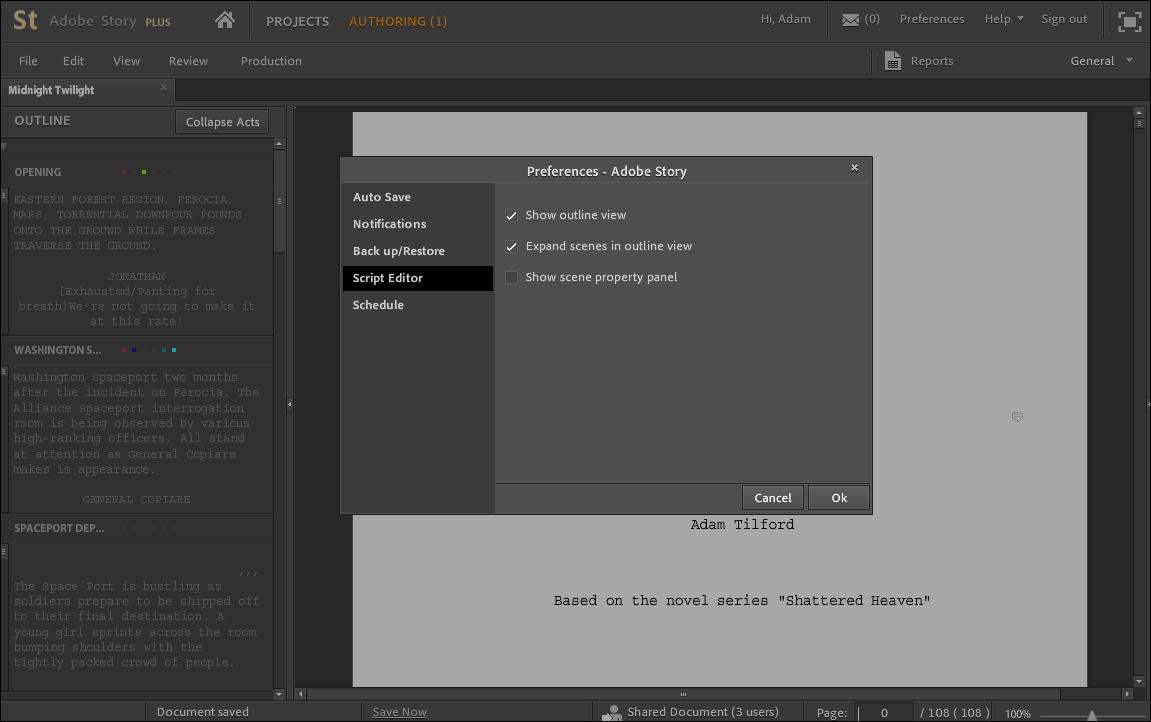
The same script, but with the Show outline view checkbox enabled is shown in the following screenshot.
The outline view creates a column on the left-hand side of the screen which lists all of the Scenes within the full script. By double-clicking on a specific scene, you will be brought to that exact location in the script (shown in the following screenshot). It makes editing much more organized and easier to access.
We have now enabled the Expand scenes in outline view checkbox. By turning this feature on, you are able to preview the content of each individual scene in the outline column. A new scrollbar appears on the far left-hand side, allowing you to scroll through the entire scene without having to move from your current position in the script.
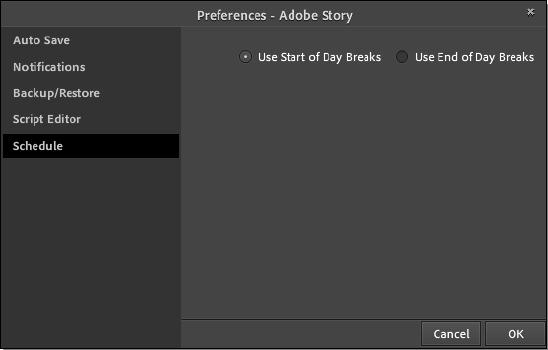
You can either choose to utilize the Use Start of Day Breaks option, which points out the start of a day's worth of shooting for visual projects, or the Use End of Day Break option, which marks the end of a day's worth of shooting. These options are used for noting how much work you intend to cover during that day. These are not for lunch breaks within a full scheduled day of work.
With your preferences set you are ready to create a project! When you click the Projects tab, located next to the icon of a house, you will be brought to the following screen. This screen is known as the Projects View.
There are three different views in Adobe Story: Home, PROJECTS, and AUTHORING.
The following screen is what is considered the Home screen, it is the initial screen that you are greeted with upon logging into Adobe Story. From here you can view video tutorials and access community resources:
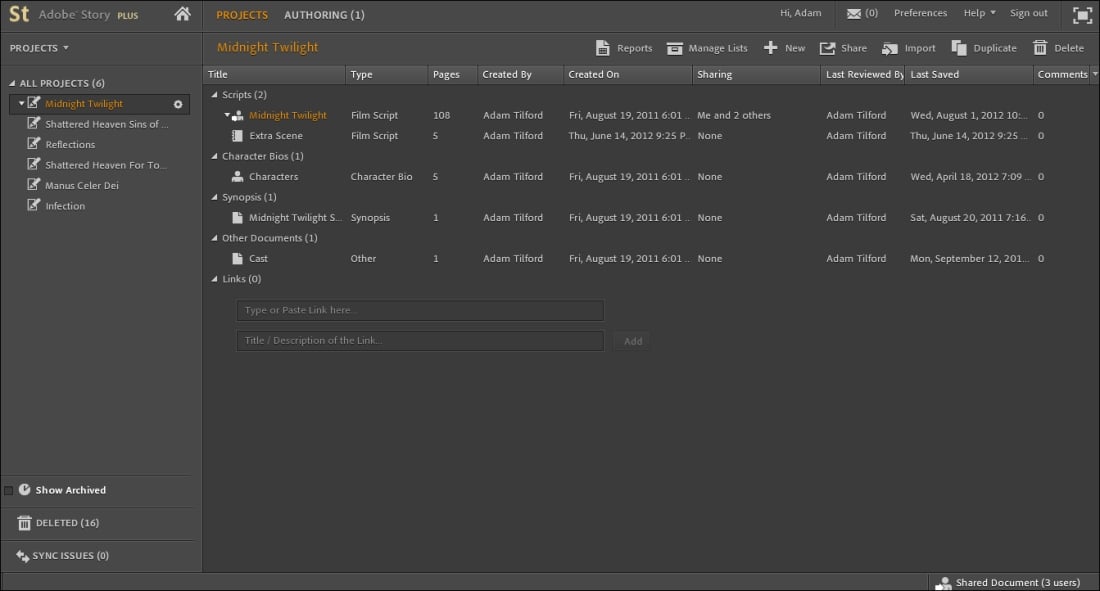
The PROJECTS screen is shown in the following screenshot. This serves as the outline home for all of your created projects. Here you can access and create documents that are integral to your overall project:
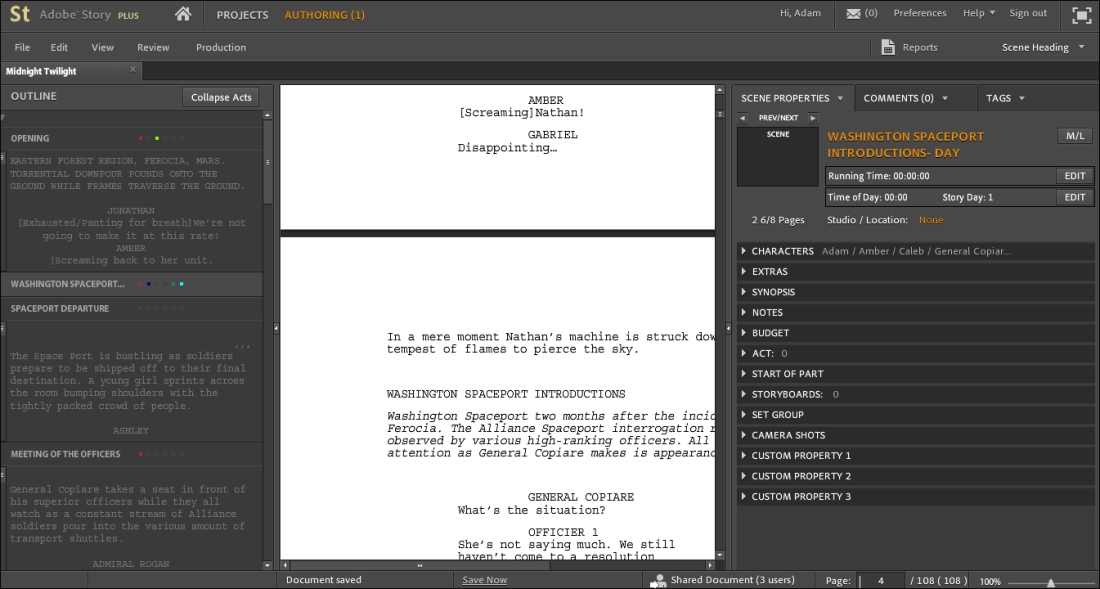
The AUTHORING view, as shown here, is where all the content for a script is created. Think of it as the word processor portion of Adobe Story.
In the following screenshot, you can see the icons for each of the different view points shown previously:

In order to travel between the three different viewing options, refer to the menu bar on the upper-left corner of the screen. AUTHORING is initially disabled. In order to enable it, when you're in the PROJECTS view, double-click on a script in order to bring up the AUTHORING view. When a script is open, a number will appear in a parenthesis next to AUTHORING. The number will change depending on the amount of scripts that are currently open.
When you're in the PROJECTS view, you can perform the following tasks.
Create new projects
Add new scripts
Import scripts into projects
Add scripts to projects
Add projects to categories
Add other documents, such as character biographies, synopsis, pitch, or other to a project
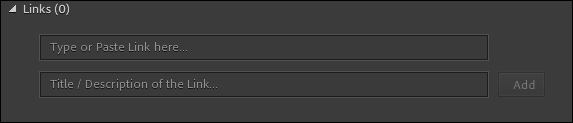
Add links that you frequently utilize
Get information about a script and who it may be shared with
Refer to the preceding screenshot and follow the explanation given in the following table:
|
Identification |
Description |
|---|---|
|
A |
The PROJECTS menu |
|
B |
List of projects |
|
C |
Option to add links |
|
D |
Option to view archived projects |
|
E |
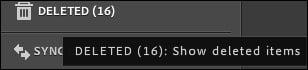
Deleted items |
|
F |
Sync issues |
|
G |
Generate production reports |
|
H |
Manage lists |
|
I |
Create new document |
|
J |
Add sharing to a document |
|
K |
Toggle full screen |
|
L |
Import, duplicate, and delete |
|
M |
Information columns showing information on specific documents |
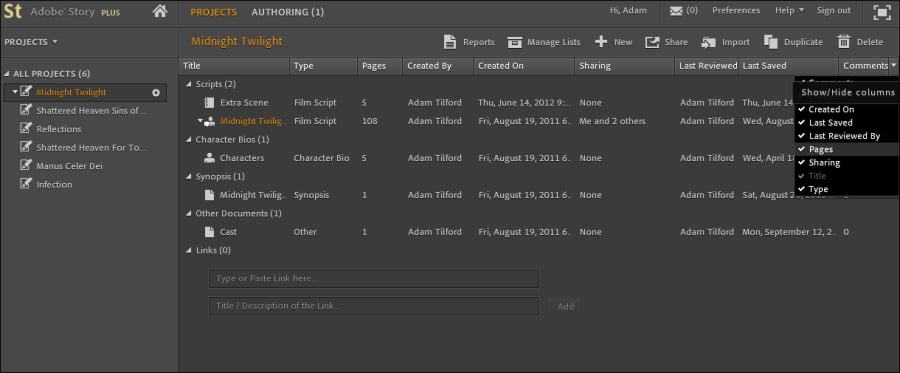
You have the option to customize the columns that are displayed. On the right-hand side of the screen, after the last column, there is an arrow. Click the arrow and a checklist relating to all the columns appear. You can choose to toggle on/off which ever information you may or may not want to view when in the PROJECTS view. This is shown here:
The AUTHORING view is disabled by default. In order to open it, open a script/document from the PROJECTS view.
When you're in the AUTHORING view, you can perform the following tasks:
Create, edit, review, and share scripts/documents
Create shooting scripts
Tag scripts
Import and export scripts in different formats, such as PDF, Txt, CSV, and FDX SEX
Print scripts
Generate breakdown reports (Adobe Plus)

Refer to the preceding screenshot and follow the explanation given in the following table to better understand this view:
|
Identification |
Description |
|---|---|
|
A |
Menu bar |
|
B |
Tabbed script panel |
|
C |
Scene outline panel |
|
D |
Colored dots that indicate certain character elements |
|
E |
Find options |
|
F |
Scene properties panel |
|
G |
Link to access recently shared scripts |
|
H |
Reports |
|
I |
Comments |
|
J |
Toggle Full screen |
|
K |
Scene elements |
|
L |
Tagging pane |
|
M |
Editing panel |
The scene properties panel can be accessed when you're in the AUTHORING view. When you enable the Show scene property panel checkbox, a new column appears on the right-hand side of the screen. When you select a scene from the outline column, all of its information will appear in the property column. Adobe Story gives you a wide variety of options to help organize each scene to the best of your ability.
You can view the SCENE PROPERTIES, COMMENTS, and TAGS options when you enable this checkbox.
The SCENE PROPERTIES option is shown in the following screenshot:
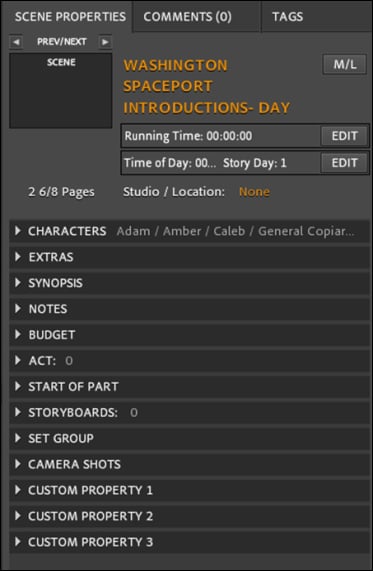
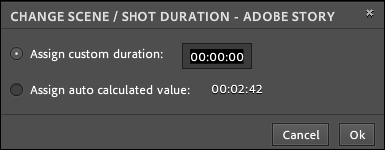
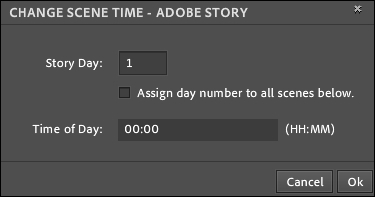
You can manually choose the time or Story will automatically set it.
In the previous screenshot, Running Time is selected. Auto set is based on the page length, going by the assumption of a single page equals 1 minute of play.
You can also set the time of day in which the scene takes place by using the Time of Day field shown in the following screenshot:
This panel contains the following features or options:
|
Option |
Description |
|---|---|
|
CHARACTERS |
Lists all the characters that have dialog in the current scene, as well as detects and lists all non-speaking characters |
|
EXTRAS |
Lists any and all "extra" roles that are in the scene |
|
SYNOPSIS |
A brief summary of the events that take place in the scene |
|
NOTES |
Any notes you may have for the scene |
|
BUDGET |
The finances set for the scene |
|
ACT |
Shows any acts that you may have set up for the scene |
|
START OF PART |
Relates to the act in the scene |
|
STORYBOARDS |
Shows any drawn up storyboards that you may have for the specific scene |
|
SET GROUP |
Any groups connected to the script will appear here |
|
CAMERA SHOTS |
All designated camera shots will be listed |
|
CUSTOM PROPERTIES |
This is just an open area where you can put any other scene notes or information that do not fit anywhere specific |
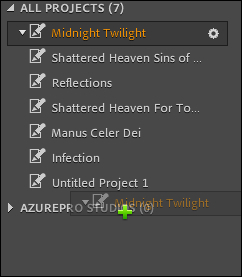
All documents and scripts are contained within the specific projects that you create. This is similar to folders on your computer. Before beginning, you must create a new project, otherwise, any and all documents and scripts you create will be held in the sample projects section that comes as default with Adobe Story. You can create new projects in two ways.
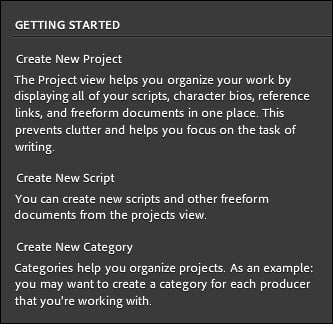
The first being from the home screen under GETTING STARTED; as shown here:
On the left-hand side of the screen, you can create a new project from the PROJECTS work screen, as shown in this screenshot:
You are taken directly to your new project once it is created. When naming a project, do not include any special characters. The following screen will display when a new project is created:

If at a later date you wish to change the name of your project, you are able to do that as well; here are the steps:
Select the project in the PROJECTS view.
Click the arrow to the left of the project
Select Rename; as shown here:

Enter the new name
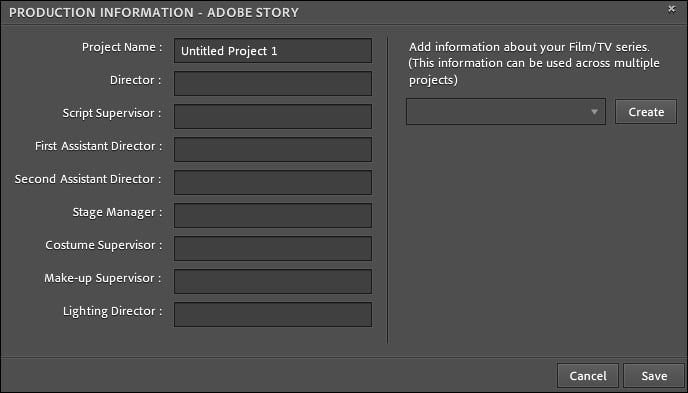
You can adjust the specific information in regards to your project as well. There is a gear-like icon on the right-hand side of your highlighted project; this is only available in Story Plus.

When this icon is clicked, the following window is opened, where we can fill in all our production information:
Once you delete a project, it is removed permanently. However, all of its contents are then placed in the DELETED section.
Once you delete contents within the DELETED section, they are removed forever.
After deleting a project, you may wish to restore those contents and move them to a newer one. But you must create a new project with the same name as the one that was originally deleted. Follow these steps to restore a project:
In the PROJECT view, click DELETED on the left-hand side panel.
Select the document you wish to restore.
Click the arrow to the left of the document.
Select Restore To Project
Select the project you wish to restore the document to.
You can efficiently organize your documents and projects when using categories. If certain clients have multiple projects running, you can place all of those projects into a specific category to keep them from being mixed in with any other projects.
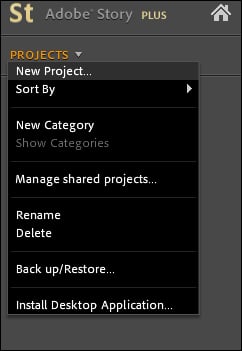
To create a new category, in the PROJECTS view, select Projects | New Category and enter the name for the category.
To add projects to the category, you can simply drag the project from the project menu to the category you wish to add it to as shown here:
Follows these steps to remove projects from categories:
Select the project that you want to remove.
Click the arrow on the left.
Select Remove From Category.
Archive projects are typically ones that are not used frequently and therefore do not need to be present in view. All projects that are archived are hidden from view. Select the project in the PROJECTS view, click the arrow on the left-hand side and select Archive. If you want to view what you have archived, on the left-bottom corner of the screen you will see a clock icon and next to it will be the words Show Archived; select this.
If you want to restore an archived project, make sure the Show Archived option is selected and then select the project. Click the arrow to the left of the project to bring up a drop-down menu and select Restore.
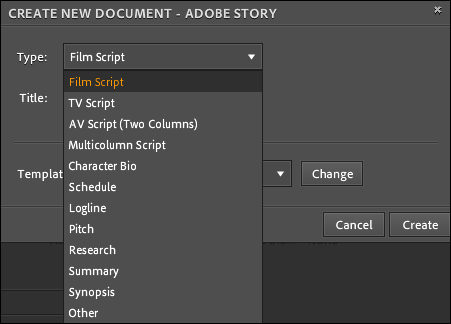
Before you begin, you should be aware of the different types of documents you are able to create in Adobe Story. These are as follows:
Film Script: Standard industry screenplay format for film
TV Script: Standard industry screenplay format for TV
AV Script: A two-column script for audio and video correspondence
Multicolumn Script: A three-column script that includes Shot Number Visual, and Audio
Character Bio: Character information
Schedule: Outline your schedule
Logline: A brief summary of a program that usually provides both the synopsis and some sort of emotional hook to gain interest
Pitch: The short description of your project that would gain interest
Research: Collect all of your project research
Summary: Similar to a synopsis, it serves as a condensed version of the story
Synopsis: A brief summary of the major points of a project
Other: Use for whatever else you may think of, that doesn't fit in with the other options
To create a new document, simply click the New icon, and the following menu will be brought up:
All scripts in Adobe Story contain the industry standard formatting to provide assistance. Each element within the script automatically is applied by the format of the script chosen to create. In addition to this, you are also able to create Free Form documents, documents that are not bound to specific types of formatting.
Scenes are subdivisions of a screenplay/script. An individual scene describes a series of actions set to a specific location, time, and characters involved. Breaking a single script into multiple scenes is necessary to keep proper organization for the overall project.
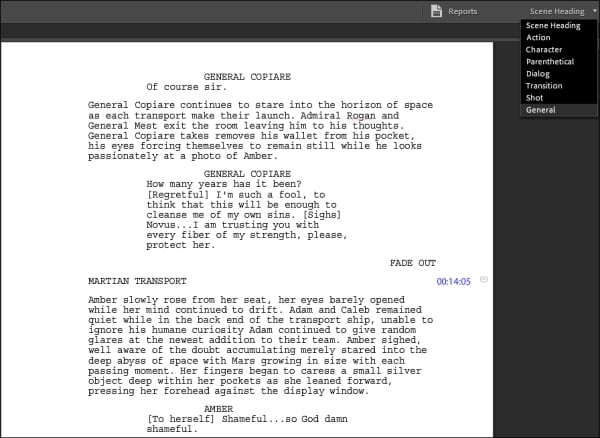
There are standard "elements" that are used when it comes to script writing; these are:
|
Element |
Description |
|---|---|
|
Scene heading |
This element usually opens the scene. For example, |
|
Action |
Is an introduction to the scene, or any action that is being described. |
|
Character |
The name of the character involved in the action, or speaking the dialog. |
|
Parenthetical |
The tone/direction the actor uses when speaking the dialogue. For example, sarcastic, upset, angry, and so on. |
|
Dialog |
The character's dialog. |
|
Transition |
This indicates the end of the scene. |
|
General |
This element is for use if the text you are writing does not fit any of the other classifications. |
The OUTLINE panel on the right-hand side in the AUTHORING view displays all of the different scenes in the entire script. The scene heading represents the scene in the script and when you click on the heading, the contents of that particular scene will be displayed below. You are able to copy content from the outline to the main editing panel.
Whenever you complete a scene, it is added to this panel without any additional work from you. If you wish to go to a specific scene in the script, you can simply double-click the desired scene in the OUTLINE view and the editor will jump to the required area in the document.
It is also possible to reorder scenes by dragging a header title and moving it to a desired location.
If you want to delete a scene, you can just click the X icon for that scene in this view.
The colored dots shown after the header represent the characters that participate in that scene. The six most frequently appearing characters in the script are listed here. The first dot represents the character that appears the most across all the scenes. If you want to display the name of the character the dot represents, just move your cursor over the dot. The OUTLINE panel is shown here:

In Adobe Story, moving between scenes is simple and can be done without having to scroll through the entire document just to arrive at your desired destination. Here are the steps to navigate to and fro among the scenes:
Select Edit | Jump | Next Scene.
Select Edit | Jump | Prev Scene.
In normal word processors, you would have to set up the margins and layout based on the industry-standard format, manually. In Adobe Story, the program does it for you. In order to implement a particular element of a script, all you have to do is hit Enter to move to the next line and a small window will appear on the editor, like so:
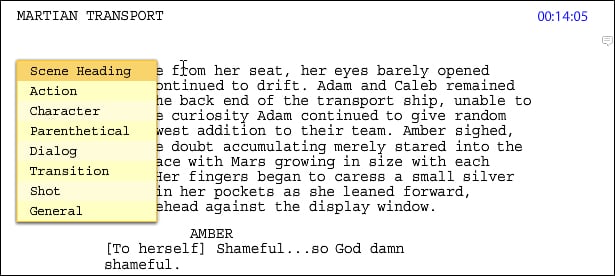
From here you can choose which element you would like to use. When you do, the document will automatically format it to the correct position.
You can also choose an element manually from the drop-down menu on the upper-right corner of the editor; as shown in the following screenshot:
In the following screenshot, a sample scene is shown where some elements are used:
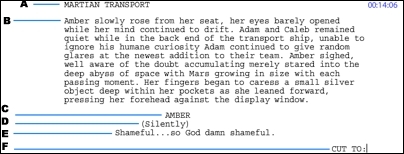
Refer to the following table where the elements used in the previous screenshot are described:
|
Identification |
Element |
|---|---|
|
A |
Scene heading |
|
B |
Action |
|
C |
Character |
|
D |
Parenthetical |
|
E |
Dialog |
|
F |
Transition |
Similar to how you can jump between scenes in a script, you are able to jump between elements. Follow these steps to do so:
Select Edit | Jump | Next Element to move to the next scene element of the same type in the document. Shortcut: Ctrl/Cmd + J.
Select Edit | Jump | Prev Element to move to the previous scene element of the same type in the document. Shortcut: Ctrl/Cmd+ K.
Storyboards are drawn representations of how scenes play out. They are the outline for visual direction, working alongside the script to produce the desired result.
You can view and manage storyboards from the Scene Properties panel. You can add one or more storyboard images for each individual scene.
Follow these steps to add storyboard images:
In the Scene Properties panel, under the Storyboard button, click Add Image Link inside the square placeholder.

Or, you can also select a string of text or scene that you would like to add storyboard images to. Right-click and select Storyboard. The Manage Images dialog appears with the selected text string added as the caption.

In the Manage Image dialog, click Add Image Link and paste a link from an online image and click OK.
You can type in a caption for the storyboard if there is no specific string of text already attached.
To add more images, simply click Add Image Link at the bottom of the Manage Images dialog.
With all of this, you are ready to begin creating scripts and other sorts of documents using Adobe Story. But it is only a small part of what Adobe Story has to offer; there are many features that the program is prepared with, all of which to create a more effective and organized project for you to work with. We've discussed the three different view setups, how to prepare your own preferences, making projects and categories, and how to start making industry-standard scripts that utilize elements.