

Adobe Story has a variety of features that have been built in for your script writing convenience. There are seven features that can be considered more helpful than others. Knowledge of these will streamline your script writing process with the overall production of a project. It is vital to be aware of them.
It is important to keep track of any changes you or someone else may make to a document. It's easy to save over the previous version with the new one, but what if you want to compare the previous and current versions to one another? You are able to track any and all revisions through this feature. Called revision styles, all revisions become associated with a unique style for easier identification.
Before moving to revisions, we need to be able to know how to insert and track changes made to a document. This is how it is done:
When in the AUTHORING view, in the document, go to the Review tab in the top tool bar. Check Start Tracking Changes to enable it, and uncheck it to disable:

When it is checked, any new content you add will be in red text and highlighted:

There is a speech bubble on the right-hand side of the addition, which allows for the person making the change to add a comment. Click on the icon to open the comment window:

When you place the cursor over the inserted change, a new bubble will appear telling you who made the change and when. On the far right-hand side, you can either accept or reject the change:

You have to be in the Authoring view in order to make a revision. Production revisions highlight certain pages where changes have been made. The script becomes locked and all changes are highlighted in the revision style you choose. On the title page, a note is inserted on the bottom-right corner giving the date of the last revision. This is also done on the footer of every page where there is a change. The color changes and borders will not be exported in a PDF.
Before starting a revision, make sure that you have done the following:
Act on all tracked changes in your document by accepting or rejecting them.
Disable track changes after completing accepting/rejecting tracked changes.
Now, after completing the preceding steps, follow these steps:
Select Production | Start Revision.

In the Active Revision drop-down, choose a revision style:

Click Start Revision.
Follow these steps to create your revision style:
Select Production | Manage Revisions.
Click on the + icon.
Enter a name for the style
The following options can be tailored according to your needs:
Revision Color: Used to choose a color from the color menu. This color will then be applied to all the revised text and the border of the individual pages that contain the revisions. The border color will not be displayed in a printed or exported document.
Mark: The default mark is displayed on the right of the revised content. You can change this mark by choosing any symbol of your liking.
Date: The revision date.
Revision Text Style: The chosen formatting option is used to display revised text.
Click Done and your new style will be available from now on.
Let's take a look at how we can delete or modify already existing revisions:
Select the style that you want to delete or modify.
You can do either of the following:
Click on the - sign to delete the style
To modify, simply edit its values and click Done
Adobe Story also provides some display options for revisions, here's how we can set them up:
Select Production | Manage Revisions.
In Viewing Options, the following display options can be personalized according to your needs:
Show Markup For: The options are Select All or Active. This will let you choose whether you want to have all the markups shown for all revisions or just the active ones.
Mark Position: The mark you set in Revision Style is set to the right-hand side by default; you can also change its position.
Show Date In Script Header and Footer: If you do not want to display the date, disable this option.
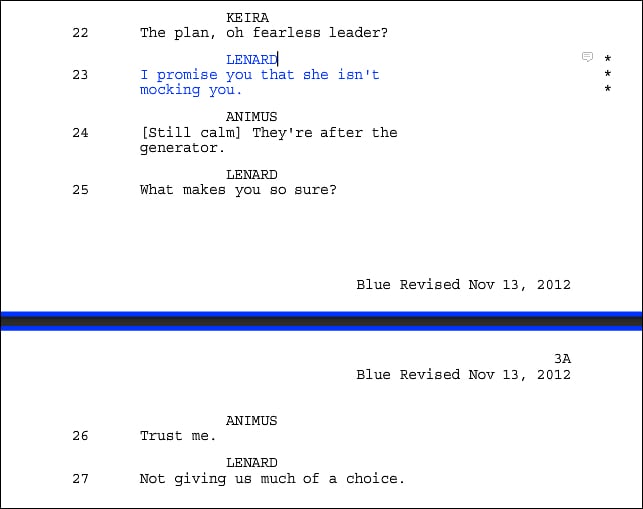
When you lock scene numbers, you prevent the renumbering of existing scenes whenever a new scene is added during production revisions.
When you do insert a new scene, Adobe Story will apply a number to the scene preceding it. For example, if you add a new scene in between scene 4 and 5, it will be numbered 4A. Here's how we can lock and unlock scene numbers:
Select Production | Manage Scene Numbers.
Select the Keep Existing Scene Number option to lock all current scenes. To unlock, deselect Keep Existing Scene Number.
Adobe Story allows you to remove a scene without affecting the scene numbers remaining in the script. The word OMITTED will appear at the location of the scene you've chosen to omit. You can, at a later date, unomit the scene if you chose and recover the content.
To omit a scene, simply place your cursor on the scene and then select Production | Omit Scene. To unomit a scene, place your cursor on the omitted scene and then select Production | Unomit Scene.
If you want to print your revisions, it is easy to do so; just follow these steps:
Select File | Print.
Choose any one of the following option:
Entire Script
All ChangedPages
Revision
To print in color, select the Print Revised Text In Color option.
Along with the advent of the "cloud" concept, tagging individual words to content has become something of a norm in today's online society. Adobe Story has incorporated a similar system. With tagging, you can tag words and phrases in your scripts automatically, or manually by using the Tagging Panel option. For example, "boom" can be tagged as "sound effect".
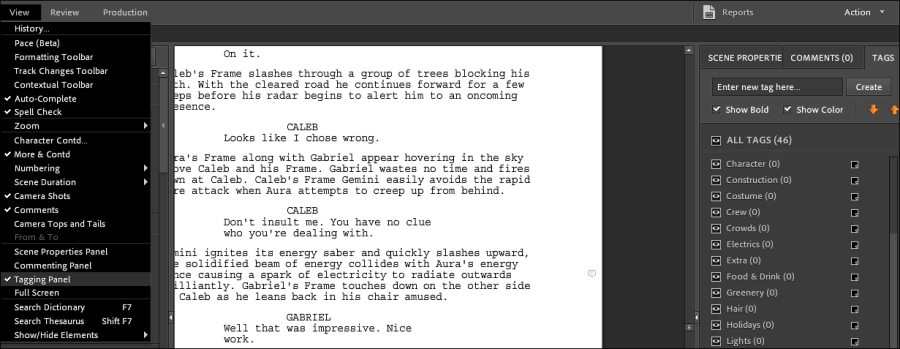
To open the panel, you must be first in the AUTHORING view.
Select View | Tagging Panel.
The panel will open on the right-hand side of the document.
To add tags to the panel, enter the name of the tag in the field next to the Create button:

To delete a tag from the tagging panel, select the tag and then click on the Delete this Tag link:

You must be in the online mode for the Autotagging feature to work. It will not work in the offline mode.
This is how it's done:
Select File | Tagging | Start Autotagging. Or select it from the drop-down menu option in the Tagging panel:

Once you enable Autotagging, the script will be locked. You will have to wait until the process has completed before being able to edit the document; the following screenshot shows the message being displayed:

Select View | Tagging Panel.
Choose the word or phrase you would like to tag. If what you're choosing has already been tagged, it will be appended to the tag list for the word or phrase.
Select a tag from Taglist in the Tagging panel.
Do either of the following:
Select the Show In Bold option if you want the tagged words or phrases to be displayed in bold.
Select the Show Color option if you would prefer Story to display the selected color (you can choose a color for each tag with a color palette on the right-hand of the tag in the Taglist panel) to the tag:

Follow these steps to search for words or phrases with a specific tag:
Disable visibility for all tags. Enable visibility for the tag that you want to search. To do this, simply click on the eye icon on the left-hand side of the tagged word:

Use the arrow icons in the Tagging panel in order to navigate through the tags in the script. Only the visible tags will be shown.
To view tags associated with a word or a phrase, you can do either of the following:
Select the word/phrase. The tags associated with the word/phrase will be highlighted in the Tagging panel. Scroll through the panel in order to view the tags associated with it:

Move your mouse over the word/phrase. The information will be displayed in the tool tip:

Hold Ctrl (Cmd on Mac) and double-click to view the associated tags:

Over the word you wish to edit, hold Ctrl (Cmd on Mac) and double-click to bring up the Applied Tags panel.
Click on the Remove This Tag icon for the chosen tag.
Click Close.
To remove all the tags, select File | Tagging | Remove All Tags.
To remove all the manual tags, select File | Tagging | Remove All Manual Tags.
To remove all the auto tags, select File | Tagging | Remove Auto Tags.
Adobe Story has an application for iOS-based devices. This application is available currently only in English. It allows you to read and review Adobe Story scripts and documents. It does not support AV (Audio Visual) scripts, Multicolumn scripts, and TV scripts as of yet.
Before you start, make sure you have registered yourself with Adobe Story using the web or desktop application.
Use the same combination of e-mail address and password used on the full application with the iOS version. Accept the TOU before attempting to log in.
If you want to log out, select Account and then select Log Out.
The ten most recently read files will be displayed upon logging in to the Adobe Story application.
To view all the documents, click Categories.
To view the scene outline, select the script in the Recent Files or Categories view.
To view the contents of a scene, select the scene in the scene outline. Use the arrow icons to move among the scenes.
To view Notifications, in the Recent Files view, select Notifications. A list of notifications is displayed. Highlighted notifications are for new ones.
As long as you have author, co-author, or reviewer permissions, you will be able to review a script.
Open the script and navigate to the scene.
Do one of the following:
Double-click to select the content that you want to comment on. Click on Comment, or on the Add Comment button.
To comment on the content that has already been commented on, enter your comment in the Write New Comment textbox.
To navigate comments, use the arrow icons.
Click Post.
Like most Adobe products, integration is integral to streamlining a full project. Adobe Story's script-to-screen workflow with Adobe Production Premium Suite CS5 and later helps turn plans into a more organized production.
All information within the script is transformed into metadata automatically upon exporting it as an ASTX file. This data helps to produce shot lists in Adobe OnLocation and in Premiere Pro; it can find relevant content, thus improving the accuracy of speech-to-text. In Encore and Media Encoder, it can be used to create searchable experiences for the audience.
Metadata is something you hear about often when it comes to web design. In HTML, metadata is used to help convey proper information of content to search engines such as Google, Bing, and Yahoo. The data consists of content written in plain text that contains keywords that relate to the overall content of the page. In video production and with Adobe Story, it is more or less the same concept.
Any text content that transcripts from the script and text descriptions are utilized as metadata. These textual elements (words) are essential in the script's formatting. Scenes, characters, dialogue, actions, and so on are all identified through the use of metadata. Character names or specific actions such as "slap" are examples of metadata. If you search for the word "slap" in a program such as Premiere Pro, all scenes containing this word (element) will be brought up. This data is captured only when the script is exported as an ASTX file.
Metadata can be added either automatically or manually by other software in the Adobe Production Premium suite.
Metadata helps automate a number of time-consuming, yet important processes in the script-to-screen workflow.
In the production process, you are able to use metadata for the following reasons:
Manage and locate your media assets throughout the process of production. For example, when you search for the word "fight" in Premiere Pro, all the movie clips that contain the word "fight" in their metadata are displayed.
You can track crucial details, such as where a clip was shot and even the actors that were in the scene.
By using metadata you can locate words in spoken dialogue using speech search in Premiere Pro. This allows you to locate and jump instantly to keywords in the spoken dialogue. This feature can only work for languages supported by Adobe Story.
Your exported scripts from Adobe Story can be brought into Adobe OnLocation:
Export scripts in Adobe Story as an ASTX file.
Import the ASTX file into OnLocation.
OnLocation is a direct-to-disk recording, logging, and monitoring solution. The software captures all metadata information from the Adobe Story document once it is imported.
Shot lists are created automatically thanks to the imported metadata. These lists will be available in the Project panel.
The shot list matches the scenes in the imported Adobe Story script. Link movie clips to shot placeholders.
In OnLocation, drag a movie clip onto a shot placeholder in order to merge the Adobe Story metadata with the actual video. Adobe Story metadata is supported in the following formats:
MPEG-2 DV, MPEG-2 HDV, DVCPRO 50, DVCPRO 25, H264 DV (.mp4), XDCAM, and XDCAM EX
Metadata that has been merged with the video clips are all carried over during the import process.
The benefits from this import process help tremendously with the post-production process becoming more efficient.
Locate media assets using details such as, filename, date, time, and camera setting.
Speech Search in Premiere Pro helps search within media assets to locate and jump to keywords in spoken dialogue. The search is made more accurate due to the embedded Adobe Story script.
Metadata speeds up normally time-consuming processes. It helps to quickly locate all the clips in a project that contains a particular word.
Rough cuts can be created based on speech-analysis text in Premiere Pro. Add In and Out points directly in the Speech Analysis section of the Metadata panel. It is faster to mark In and Out points in text as opposed to doing it in the actual movie clip.
You can use Adobe Media Encoder to batch encode multiple versions of source content to a variety of video formats across various media. Media assets retain all metadata captured from Adobe Story scripts.
By using Adobe Media Encoder to create web video formats such as F4V, the metadata makes it easier for users to search its content. Users can even look for scenes that were shot at specific locations.
In Encore, the metadata can be used as the basis of DVD and Blu-ray subtitles and chapter titles. It creates a database for searching by using the metadata from speech analysis text in Premiere Pro. The interface from Web DVD will allow users to search within the DVD using keywords.
This is available only in Adobe Story Plus.
When your script is completed, breakdown reports can give you a full overview of all the elements and characters required for specific scenes. Breakdown reports are generated through elements such as character, dialog, and location. These reports are all automated. Each report is exported in the standard spreadsheet format of CSV.
The types of breakdown reports that Adobe Story can generate are as follows:
|
Report name |
Report elements |
|---|---|
|
Scene |
Scene number, heading, location, time of day, setting, scene duration, page number, and characters |
|
Location |
Location, scene number, shot number, setting, time of day, scene duration, shot duration, characters, and page numbers |
|
Character |
Character, scene number, heading, and dialog |
|
Cast |
Character, total dialogs, and speaking scenes |
|
Statistics |
Elements, number of occurrences (of the element), total scenes, total words, and total pages |
|
Comments |
Comment number, comment, commenter, scene number, and page number |
|
Shot |
Shot number, scene number, setting, location, shot type, camera number, camera movement, shot duration (in seconds), time of day, character, and page number |
|
Tag |
Tag occurrences, tags, page number, scene number, tagged item, and scene heading |
|
Custom Report |
Select the elements that you want listed in your report |
Scene numbers, shot numbers, and shot duration are only displayed if they are enabled in the script.
Select Production | Breakdown Reports:

Select a specific report from the menu.
Save the report to a location on your computer.
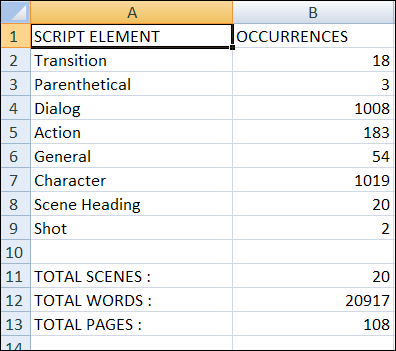
An example of a Statistics breakdown report in Excel is shown here:
To further increase the efficiency on a project, Story gives you the option to generate reports to distribute script breakdown information with cast and crew. Unlike breakdown reports, production reports open up directly in Adobe Story.
The different types of production reports are as follows:
|
Type |
Description |
|---|---|
|
Artiste Crossplot |
This lists all the sets where an artist/actor is needed across one or all the selected scripts. NA signifies that a particular scene is not assigned a studio/location. A dash (-) next to an artist's name in a scene suggests that the character is not present in the scene. |
|
Cast Address List |
It shows the cast list and their addresses. |
|
Character Crossplot |
Shows the presence of characters in scenes per script. |
|
Colorist |
It shows the day and time details for the scene in story order. |
|
Costume Continuity |
Lists the scenes in which a character is present in the script. Used for costume and makeup for production. |
|
Running Order |
Lists the script/project in story mode. |
|
Sets and Locations |
Lists the scenes based on whether it is a studio or a location shot. |
|
Timings |
This creates a table which lists scenes in story order, against, which you can enter the shooting duration details for each scene. |
You can generate the following reports from a schedule:
|
Report type |
Description |
|---|---|
|
Calls |
Call sheets contain schedules for actor/artists required for the production. |
|
Camera Cards |
This lists all the shots. It is in shooting order for each cameraman to shoot. If the shot number is disabled in the script, the shot will show up without a number. |
|
Schedule Dates Crossplot |
This lists the number of scenes for each actor/artist on a shooting day. |
|
Shooting Order Script |
It is a compilation of scenes in the order they were displayed in a schedule. Once this is created and sorted, you can create a script in shooting order. |
|
Shooting Schedule |
This lists all the scenes to be shot per day. |
|
Studio Recording Order |
This lists all the details of studio scenes in shooting order as well as shot information. |
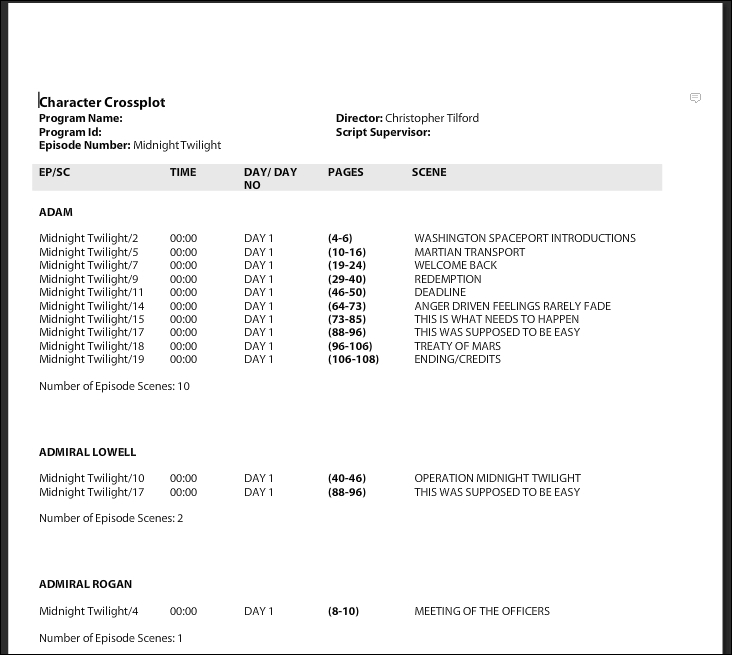
An example of a Character Crossplot production report:
In the Projects or the Authoring view, select Reports.
In the Reports dialog, do the following and click Generate.
Select the type of report.
If you are doing this from the Projects view, select the scripts you wish to include.
To display the report, select View report on creation.
You can include the following when wanting to generate a report from multiple documents:
One or more scripts for a scripting report
One schedule for a scheduling report
To create a report from multiple documents do the following:
Select Reports from either in a schedule, in a script, or in the Projects view:

Select the type of report.
From a schedule, select Location or Studio. Select Location only to include the strips that have a location specified for them. Select Studio if you only want to include strips that are shot in a studio. Select Location and Studio to include all strips.
Select View report on creation if you want to display it.
First, either in Projects view or in Schedule view, click Reports.
Specify whether you want the report to be created for all cameras or a specific one.
If you want to include videotape element occurrences in the report, select Include VTs.
When generating a report from the Project view, select Select All Documents or one of the schedules. A report cannot be created from more than one schedule.
In the latest edition of Adobe Story, the feature of scheduling was added as a way to further improve the time management needed for a production.
Follow these steps to create a schedule:
In the Projects view, click New.
In the Authoring view, select File | New.
Select Schedule from the Type menu:

Give it a title and click Create.
Choose the category and project first and then select one or more scripts that you want to create the schedule with. Use Shift + click to select scripts in a sequence or Ctrl + click (Cmd + click in Mac) to select multiple scripts that are not in a row:

If you have selected a single script, then you can select the scenes that you want to schedule. If you select multiple scripts, Story will create the schedule for all the scenes in the elected scripts:

Click OK to generate the schedule.
An example of what a schedule for a script looks like in Adobe Story:
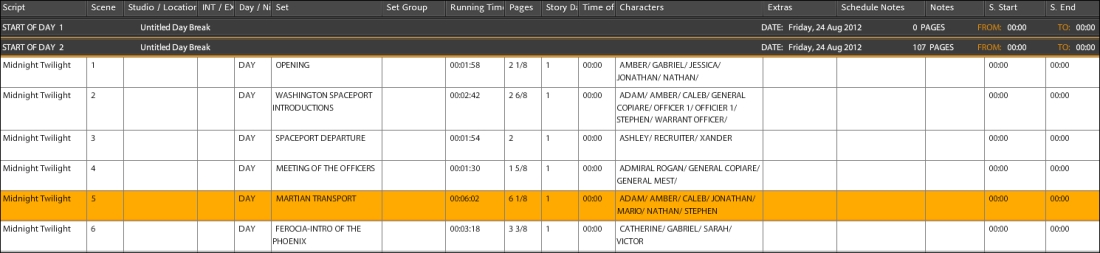
You have the ability to choose to have either end-of-day breaks or start-of-day-breaks. A day break is what marks the end of the day or start of one in a schedule. It also displays the total number of pages in the scenes for a specific day. By doing this, you get an idea of just what you will be trying to cover in a span of a day.
A banner is what is referred to as any sort of break away from an end-of-day break. An example of this would be a lunch break.
In a schedule, do one of the following:
Select a row and click Add Break | Day Break. Story will insert a day break below the row that is selected.
Select a row and click Add Break | Break. A break is inserted below the selected row. Edit the title and duration of the break. The start time of the break is the same as the end time of the previous scene before.
Select a row and click Break | Banner. A banner will then be inserted below the selected row.
From the Projects view, select Preferences.
In the Preferences box, select Schedule. Choose either Use Start of Day Breaks or End of Day Breaks.
Open the schedule.
Select Edit | Add Scenes/Scripts.
Select the category and the project.
Choose the script or scene that you want to add to the schedule.
Click OK.
When in the schedule, select Edit | Remove Scripts.
Select one or more scripts that are to be removed.
Click OK.
If a scene is going to be split up throughout multiple days, Story gives you the option to split a scene in the schedule:
Right-click on a scene, from the pop-up menu, select Split Scene. The strip is split into two.
When you enter the scene's start time (S. Start) and scene's duration (S. Dur) for a strip, Story calculates and shows the following:
The end time of the strip (S. End)
Start time and end time of the strips in the schedule until a day's break
There are many advantages of using Adobe Story as your scriptwriting software. Story does a wonderful job of pulling in all the different, varying aspects that go hand in hand with developing a project and throws them all into one program.