

All right, you've been patient long enough; it's time we take your Pi out for a spin! For this first voyage, it is recommended that you go easy on the peripherals until we have properly configured the Pi and verified a basic stable operation. Connect a USB keyboard, a monitor or TV, and a Wi-Fi dongle or an Ethernet cable plugged into your home router. Finally, insert your SD card and attach the power cable.
Within seconds you should see text scroll by on your display. Those are status messages from the booting Linux kernel.
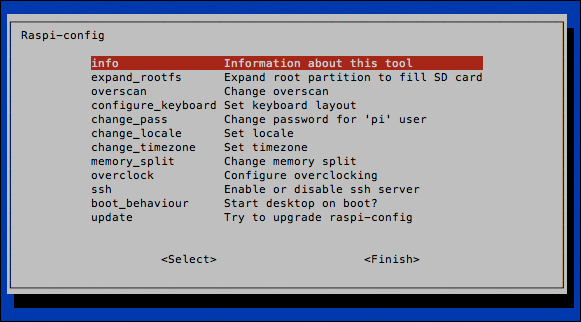
Raspi-config application running on first boot
The output will come to a halt in a minute and you'll be presented with a menu-type application called Raspi-config. Use your arrow keys to navigate and press the Enter key to select menu options.
expand_rootfs: This important option will resize the filesystem to fit the storage capacity of your SD card. You'll want to do this once, or you'll soon run out of disk space! The filesystem will be resized the next time you boot the Pi.
overscan: If you see thick black borders around the blue background on your monitor, select this option and disable to make them go away the next time you boot the Pi.
configure_keyboard: Select this option to reconfigure your keyboard. Usually there is no need to do this unless some keys on your keyboard are not working properly.
change_pass: Select this option to change the password for the default user pi. This is strongly recommended. Just in case you forget, the default password is raspberry.
change_locale: This option allows you to add non-English languages to the system. You can also select what language the applications should display by default.
change_timezone: It's important that you set the correct time zone, because any scheduling we do in the later chapters depends on this. It's also nice to have the correct time in logfiles.
memory_split: This option lets you change how much of your Pi's memory the Graphics Processing Unit (GPU) is allowed to use. To play HD movies or output fancy graphics, the GPU needs 64–128 MB of the RAM. Since we'll use the Pi mostly for recording, you can leave this at the default 64 MB of RAM.
overclock: This option allows you to add some turbo boost to the Pi. Only experiment with overclocking once you have established that your system runs stable at default speed. Also note that while overclocking will not void the warranty of the Pi, it could reduce its lifetime.
ssh: Select this option to enable or disable the Secure Shell service. SSH is a very important part of our setup and allows us to login remotely to the Pi from another computer. It is active and enabled by default, so leave this option alone for now.
boot_behaviour: This option allows you to change whether the graphical desktop environment should be started automatically each time you boot the Pi. Since we will mostly work on the command line in this book, it's recommended that you leave this option as is.
update: This option will try to upgrade the Raspi-config application itself to the latest version. You can leave this option alone for now as we will make sure all the software is up-to-date later in this chapter.
Once you're happy with the configuration, select Finish and Yes to reboot the Pi. After the Linux kernel boots again, your filesystem will be resized. This can take quite a while depending on the size of your SD card—please be patient and don't disturb the little guy.
At the raspberrypi login prompt, enter pi as the user name and the password you chose.
Now that you're logged in, let's have a look at a handful, out of the several hundred possible commands, that you can type at the command line. When a command is run prepended with sudo it'll start with the super user or root privileges. That's the equivalent of the Administrator user in the Windows world.