
There are some design rules and basic ideas that will be true regardless of the modeling software used.
3D printing has come a long way in terms of technology and cost allowing home 3D printers to be a reality. In this process there have been choices that will limit what can be printed. Seeing a 3D printer in action is the best way to learn about the process. Fortunately there are many 3D printing time lapse videos online of printers in action that can be found with a simple search.
3D printers build an object layer-by-layer from the bottom to the top. Plastic filament is heated and extruded, and each layer is built upon the last one. Usually the outside of the object is drawn and sometimes additional shells are added for strength. Then the inside is usually filled with a lattice to save plastic and provide some support for higher layers, however the inside is mostly air. This continues until the object is complete as shown in the following screenshot:

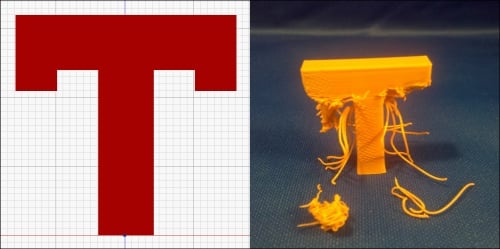
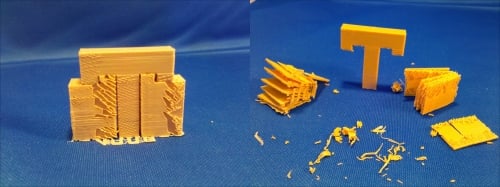
Because of this layer-by-layer process, if a design is made so that any part has nothing underneath it, dangling in the air, then the printer will still extrude some plastic to try to print the part which will just dangle from the nozzle and be dragged into the next area where it will build up an ugly mess and ruin the print:
One way of fixing the dangling object problem is to configure the preparing software to build the model "with supports". This means the slicer will automatically build a support lattice of plastic, up to the dangling part so that it has something to print on. Higher-end printers can actually print with a different material that can be dissolved away, but so far most home printers only use break-away supports. Either way after the print is complete it is left to the user to clean up this support material to extract the desired part.
While supports do allow the creation of objects that would be impossible any other way, the supports themselves are a waste of material and often don't remove cleanly leading to a messy bottom surface where they contact the print. If a part is designed needing supports that are hard to remove, such as if they're internal and partially obscured, it can be difficult and frustrating to completely remove the support material (this can be true for even the higher-end 3D printers). The process of removing it may actually damage the print.
It is possible and very easy with just the slightest application of cleverness to make designs that are printable without the need for any supports. So the blueprints in this book focus on making designs that print without supports. The limitations imposed by this demands just a little more effort but allow for the teaching of principles that are generally good to know.
Some models of Makerbot and other 3D printers have the ability to print in multiple colors at once using two different extruder heads feeding plastic from two different spools. There are some fun prints that come from this process. But as most Makerbots and other brands of home 3D printers do not have dual extruders at this time this book will not explore this process in detail. The basic idea of the process is creating two files that are aligned to print in the same space and combining them in the slicer.
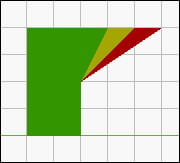
When designing for supportless printing the rules are simple: Y prints, H prints okay, T does not print well.
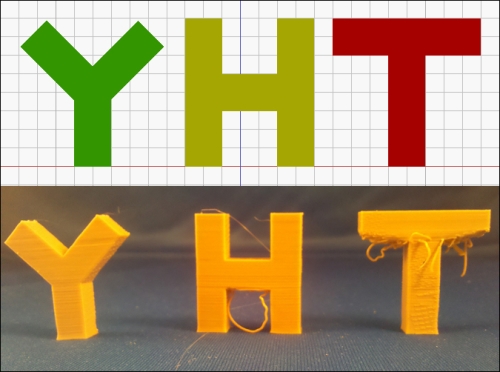
It is possible to have the current layer slightly larger than the previous layer provided the overhang is not more than 45 degrees. This is because the current layer will have enough of the previous layer to stick to. Hence a shape like the capital letter Y will successfully print standing up.
However, if the overhang is too great or too abrupt the new layer will droop causing a print fail, hence a shape like the capital letter T does not print. (If the T is serif and thus has downward dangling bits, it will fail even worse, as illustrated previously.) So it is important to try to keep overhangs within a 45 degree cone as they go upwards.
If a part of the print has nothing above it, but has something on either side that it can attach to, then it may be able to bridge the gap. But use caution. The printer makes no special effort in making bridges; they are drawn like any other layer: outline first, then infill. As long as the outline has something to attach to on both sides it should be fine. But if that outline is too complex or contains parts that will print in mid-air, it may not succeed. Being aware of bridges in the design and keeping them simple is the key to successful bridging. Even with a simple bridge some 3D printers need a little bit more calibration to print it well. Hence a shape like the capital letter H will successfully print most of the time.
Of course this discussion is purely illustrative of the way overhangs work or fail. In real life if a Y, H, or T needed to be printed the best way to do it would be to lay them down. But for purposes of illustration it still stands that Y prints, H prints okay, T does not.