
This recipe will detail some of the advanced plugins that can be utilized with Edublogs Pro accounts.
Several times in this book, there have been certain limitations put on Edublogs free users. This and the remaining recipes deal with advanced features that are only available to Edublogs Pro customers. If you want to upgrade any of your Edublogs blogs to Pro, simply go to https://edublogs.org/pro-upgrade/. It is about $5 per month, although purchasing in greater blocks of time reduces the per month cost. It is perfectly fine to peruse these next recipes, but if you want to follow along on your own blog, you will need to upgrade for at least 1 month ($4.95 at the time of this writing). As an added bonus, there are tons of features that have been mentioned previously that will also become available to you, such as premium themes, extra space for media uploads, and more.
So, what exactly is a plugin? Edublogs is based on the extremely powerful WordPress blogging platform. WordPress is itself open source, which means that the source code that makes the program work is free for anyone to look at or modify. Edublogs is one of a number of sites that have customized WordPress to offer services that it was not designed for. Edublogs has made changes specific to the educational market, by adding features such as creating classes or Wikis.
Modifying the core of WordPress, as Edublogs has, is only one of the ways that we, as authors, benefit from WordPress being open source. Another way that developers have improved on WordPress is by adding or changing specific features; they do this through custom code called a plugin. Edublogs has taken some of the best plugins and made them available to Pro users. Some are relatively simple and superficial, while others add a lot more power and customizability to a blog.
Plugins can be complex and powerful; most, though, were created to fill a specific need. This recipe will look at several plugins, but it is not exhaustive. Edublogs can also add more at any time as they determine others would be useful for their users.
To access the list of plugins, click on the Installed Plugins button from the Plugins menu on the left-hand side.
Following is a screenshot of the plugins that Edublogs offers at the time of this writing. Not included in the image is the extremely popular Akismet plugin, which blocks spam, and which Edublogs has automatically turned on by default on all blogs, premium or not.

The other plugins available at the time of this writing are shown in the following screenshot:

Notice that in the screenshots each plugin, depending on whether it is already in use, has a link that says either Activate or Deactivate. You simply click on the Activate button to turn a plugin on.
Plugins can affect any area of Edublogs. Some change the way your dashboard works by adding functionality, and others change what readers see or the way that they interact with the blog.
Clicking on Activate for some plugins turns them on and sets them up completely; for others, it enables them so that you can customize them or use them when you need them. To help illustrate how different types of plugins work, the following looks at a few:
3D Rotating Tag Cloud: Clicking on Activate enables a new type of widget that you can add to your sidebar. It takes all the tags you use and, instead of the normal list layout, shows them in an aesthetically pleasing 3D image.
Accept Paypal Donations: If you want, it is possible to ask your readers to support what you do via PayPal. If you do so, make sure you are providing real value. Asking for donations can offend some readers. Clicking on Activate adds a new entry in the Settings menu—WP PayPal Payment. From this page, you can customize your donation message and payment options. This would add a widget to your blog's sidebar. The following screenshot shows the settings to the plugin:

MCE Table Buttons: This is different than the preceding; instead of affecting the widgets, this adds buttons to the sidebar. Specifically, it adds a set of buttons and a menu to the text editor, to make working with tables much easier, as shown in the following screenshot:

Supreme Google Webfonts: Google has a repository of several hundred fonts. Activating this allows you to choose them from the text editor when typing. Use caution, though, as the developer admits it may add a few seconds to the time it takes to load the page.
The plugins range in complexity from the simple (for example, the Webfonts plugin mentioned in the previous section simply adds a font drop-down menu) to much more complicated. The Contact Form plugin is somewhat more complicated and involved.
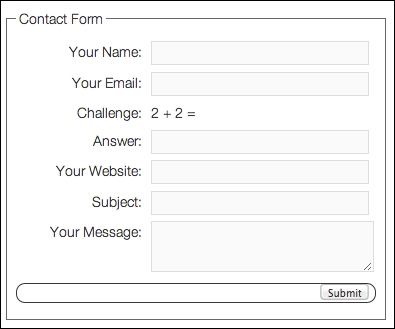
After activating the plugin, go to the Settings menu and click on the Contact Form entry. Let's create a simple contact form, so that readers can get in touch with us outside of just through comments. If readers have questions about a topic that would not be relevant in a comment, it is helpful to provide another avenue for them to contact.
Add your e-mail address (this is not viewable to the readers). I also like to change the message that readers receive after filling out the form. Instead of the default Thanks for your comments! message, I would change it to something more specific, such as Thank you! I will send a reply in 2-3 days. The following screenshot shows the configuration options for the plugin:

After customizing the form, we need to create a page to put it on. So that it is clear, simply name the page Contact Form or something similar. To activate the contact form on this specific form, type in the following code: %%wpcontactform%%. This is a specific trigger set up by the plugin. Doing this adds the form to the page. It has a challenge question to prevent automated programs from sending you spam. It collects demographic information as well, so that you can properly respond. The information will be sent to the e-mail address you provided. The following screenshot shows the way the Contact Form will display on the pages: