
Now that you have configured your software settings, it's time to set up our first document that we will be working on in Anime Studio. Setting up your document parameters early on is important, especially when you consider how the frame rate and resolution can greatly alter the final outcome. Changing either of these settings when you have animation and assets on screen can greatly alter the performance of your animation. So be sure to set your parameters first!
You can create a document at any time by going to the File menu and choosing New. If you have a project file currently open, a tab will be created for the new document. The same applies if you are opening existing project files. You can jump back and forth between these documents by simply clicking on the corresponding tabs.
You can close a project file at anytime by clicking on X next to the document's tab. When closing a tab, you may be asked to save any changes before exiting. As a general rule, it's important to save often! Create a new document now so that we can adjust the settings.
Tip
Downloading the example code
You can download the example code files for all Packt books you have purchased from your account at http://www.packtpub.com. If you purchased this book elsewhere, you can visit http://www.packtpub.com/support and register to have the files e-mailed directly to you.
With your new document now open, go to File and choose Project Settings. This will open up the settings panel for your current document, as shown in the following screenshot:
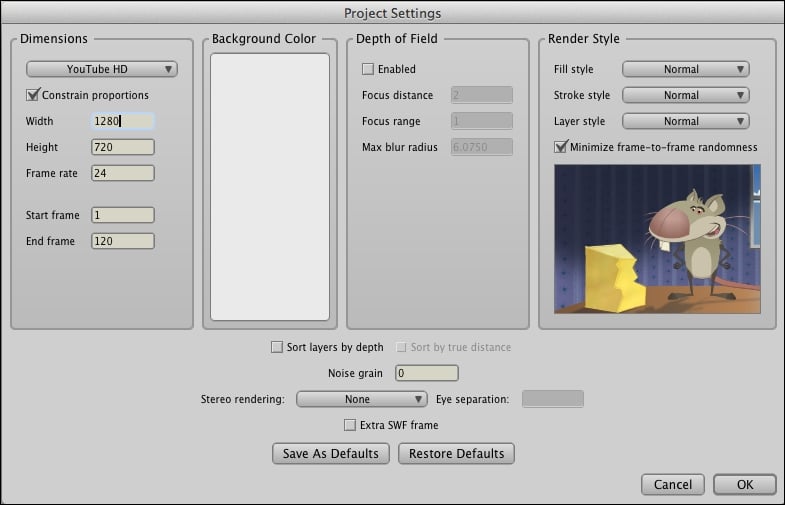
There are a few considerations to make when looking at this panel. These settings will change depending on your project's needs. In the case of this book, the following is what we will be doing:
The Dimensions section dictates the size of our document or what we anticipate the resolution of the video to be at export. You can adjust the dimensions manually if you wish (by inputting numbers in the Width and Height fields). However, Anime Studio has some built-in presets that are useful when wanting to conform a project to an industry standard resolution. For the case of the cartoon we will be making, let's choose YouTube HD from the drop-down menu. This will give us a resolution of 1280 x 720. This is a good resolution for Internet distribution. You can go higher with this resolution if you wish, but this size should keep things manageable for most computers running Anime Studio.
The Frame rate option, which is also adjusted when choosing a resolution template, dictates how many frames per second our animation will contain. It's very important to decide on your frame rate early because if you change it when animation is in place on your timeline, it can disrupt the flow, audio syncing, and more. The higher the frame rate, the smoother your cartoon is going to look. Of course, this also means you will need to animate more frames per second to compensate. A good rule of thumb is animations made for cinema run at 24 frames per second. Animations made for television run at 30 frames per second (usually converted from 24 or 12 frames per second). Nowadays, you may even find videos that push 60 frames per second. While in the end this will come down to personal preference, we will be using 24 frames per second for our project. This should already be set if you chose the YouTube HD preset from the drop-down menu.
The Start frame and End frame fields allow you to control what part of your animation will be included when it's time to export. It's usually hard to determine this in the beginning as animated scenes can vary in length. These numbers can also be adjusted before you decide to export out a scene. For right now, leave the numbers as they are. These options are shown in the following screenshot:

The Background Color section adjusts the color of your background when you export out an animation. This will not adjust the color in the editor, so the changes are not apparent until you render out a frame or sequence. The background color can also be useful if you plan to export out separate elements of your animation and compile them in another program. This is referred to as keying or matting. We will be leaving the background color to the default setting for this book.
The Depth of Field section allows us to simulate a camera lens and blur out certain objects, depending on their distance from our Anime Studio virtual camera. Sometimes, it's easier to create the depth of field effect manually, either through blurring layers in Anime Studio or through a video editor. For this book, we will be leaving this option off.
Choosing options in the Render Style section can adjust the way your cartoon looks through various style filters. This can generate some interesting results if you're trying to spice up the look of your cartoon. Choosing a type of Fill style will alter all the fills of your objects while Stroke style will change the look of the lines. Layer style will apply the chosen effects to all your layers. We won't be using any of these styles for the cartoon in this book, but they may be useful for you in future projects.
The Save as Defaults button, which is located at the bottom of the Project Settings panel will allow you to save the settings you just changed, so that for future documents you don't have to worry about adjusting the resolution and frame rate. Click on this button; that way you won't have to worry about adjusting these settings again as you move through this book. If you ever decide you want to have the default settings back, simply click on the Restore Defaults button, as shown in the following screenshot:
