
Our next task is to turn our brainstorm into a useful mind map. In this process, we need to structure our information, get rid of the information we don't need, and decide which topics will be our main topics. When we limit the number of main topics to three, we'll reach the core of our information.
First, we will mark our starting point in our brainstorm (the first idea and our temporary title) and the main topics. We'll use the Prezi text styles for this.
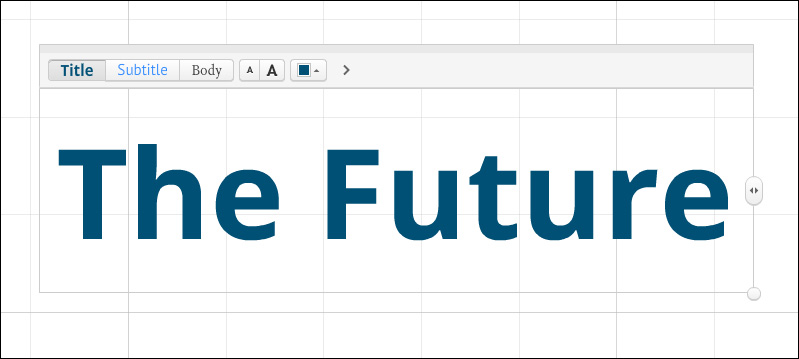
Double-click on the first idea The Future, choose the text style Title, and make this text big (if it's not already big enough). Use the bigger A in the menu to enlarge the text or click on the small circle in the bottom-right corner of the text box as shown in the following screenshot:
Tip
Resizing text
You have two options to resize text: inside the text box (editing mode) or via the transformation tool. If you are inside the text box (by double-clicking on the text), you can resize the text by using the small or bigger A or the small circle in the bottom-right corner of the text box. Click on the text box once and use the transformation tool to resize the text. The plus sign is used to enlarge the text and the minus sign is used to minimize the text. You can also click-and-drag the small blue squares at the corner of the text box to resize text.
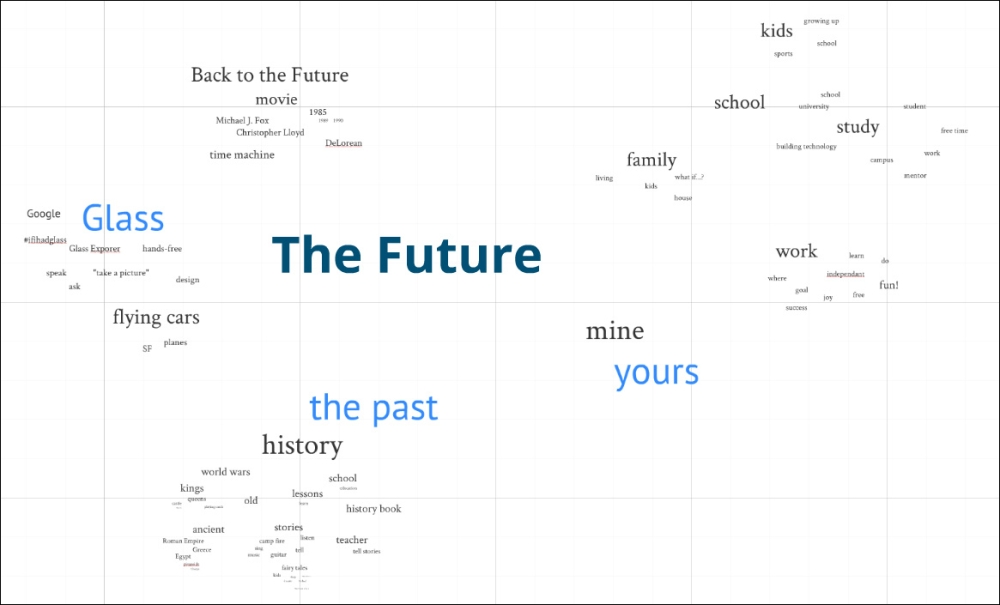
Now, choose your three most important words from all the words on the canvas. These will become your main topics. Double-click on these words and choose the text style Subtitle for them. Make these words bigger, but not as big as the title. This is shown in the following screenshot:
The next step is the most interesting one. For every other word on the canvas, decide whether it should be part of one of our main topics or remove the word. If a word is part of a main topic, move the word to that main topic. If new words pop up in your mind, it's okay to add them to the canvas.
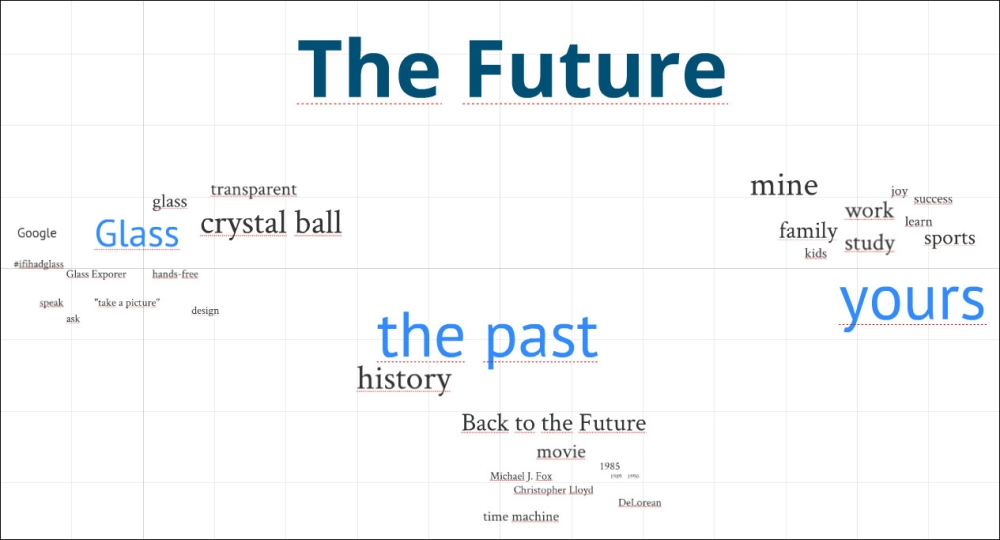
When you finish this process, your canvas will look like the following screenshot. This is the information structure (or mind map) that will be the basis of your presentation.
To show relations or to emphasize information, you can add arrows and lines or use the highlighter. This helps you to structure the information further and determine the objects on which you want to focus. It can also help you think about the flow of the information during your presentation.
Arrows and lines are for when you want to show relationships and associations. The highlighter is suitable when you want to emphasize any information. You can even make small drawings with the highlighter. Finally, for extra accentuation, you can also use an arrow that will point at the information, just like the red arrow that is shown in the following screenshot.
Tip
Creating a double-sided arrow is not a standard option in Prezi. So, if you need it, you have to create it yourself by using two separate arrows and putting them next to each other.

In this task, you learned how to turn your brainstorm into a mind map. You used Title for the subject and Subtitle for the three main topics. Our subject is The Future, our main topics are metaphor, the past, and yours.
Then, you decided for every other word whether it's a part of a main topic or it should be removed. It's an interesting process and a few new words might pop up in your mind. In our case, the word metaphor popped up during our process. A metaphor is a way of describing a subject as something else to make a stronger visual. We will be using a crystal ball as a metaphor for The Future.
The result of this process is a mind map for your presentation. You can use arrows, lines, and a highlighter to create relationships or emphasize information.
You can take your information structure a step further by using frames. Frames are a great way to visualize a structure. You can use frames to group content, so that if you move a frame, the entire content will move as well. This will enable you to rearrange the information really fast just by moving the frames. Not on paper and not even with post-its can you move information this easily. Use frames in frames to show subtopics and more detailed information.
Frames do not have to be of the same size. You can resize them in the same way as you resize text. The bigger a frame, the more important the information.
Our mind map would look like the following screenshot if we use frames:
