
A useful set of editing tools is available in 123D Catch. They provide us with the ability to remove all the unwanted 3D material that surrounds the model. In the following screenshot, we can see that a large portion of the 3D scene contains the newspaper surrounding the toy block:

In this recipe, we will learn how to use these tools to remove the unwanted 3D material from around our model.
Choose a scene with the mesh resolution you desire. Keep in mind that once you make changes to the scene, they will be permanent.
Open 123D Catch and sign in. Open an existing capture and proceed as follows:
-
First, we will clear the camera track from our view so that we can see our model better. We will do this by clicking on the Display Settings icon [
 ] on the toolbar and deselecting the Cameras button. This will give us a clear view of the model.
-
While in Display Settings, switch over to Wireframe Only by selecting the cube icon on the left-hand side [
 ].
].
-
We need to be able to move around the model. We'll do this by selecting the Orbit tool icon [
 ].
].
-
By left-clicking and holding on the model, we can move around it. By selecting the Pan tool icon [
 ], we can left-click and hold on the model and adjust its position on the workspace. Using the middle track on the mouse, we can zoom in and out of the model.
-
Select the Rectangle Selection tool icon [
 ] and drag it out on a large area of the background. When you release the mouse, the selected area will turn red. If you don't like the area or a part of the model has been accidentally selected, clicking on the red area will deselect it.
When you have finished selecting it, press Delete on the keyboard. The selected area is removed. Keep in mind that once an area is removed, it's permanent. There isn't an undo function.
Continue doing this, cleaning all the space around the model.
-
Select the Lasso Selection tool icon [
 ].
].
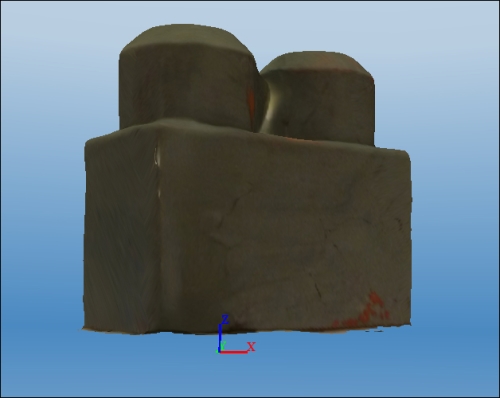
The tool works in a manner that is similar to the rectangle select tool. Use the lasso to clean up close to the model's base, as shown in the following screenshot:
Save the mesh. Go to the menu and select File. Scroll down and select Export Capture As. Choose
.objand click on Save.
The editing tools in 123D Catch are similar in function to their counterpart tools in many 2D graphics programs, and therefore, they should be intuitive in their use. Care must be exercised, however, when selecting areas in the image. Unlike a 2D image, where the selection is clearly seen on a flat surface, a selection in a 3D scene is what you see and what you don't see on the back side of the model.
Cleaning up the model with these tools can be done offline, but the results can only be saved using the Autodesk .3dp file format. The ability to export as an .obj file can only be attained when you are online.