
The hardware is ready, now you can access all this functionality from Raspberry Pi. First, install the library associated with the control board, found at http://www.monkmakes.com/?page_id=698. Perform the following steps:
Run the command
wget https://github.com/simonmonk/raspirobotboard2/raw/master/python/dist/rrb2-1.1.tar.gz—this will retrieve the library.Then run
tar -xzf rrb2-1.1.tar.gz—this will unarchive the files.Type
cd rrb2-1.1—this will change the directory to the location of the files.Type
sudo python setup.py install—this will install the files.
Now you'll create some Python code that will allow you to access both the drive motor and the steering motor. The code will look similar to the following:
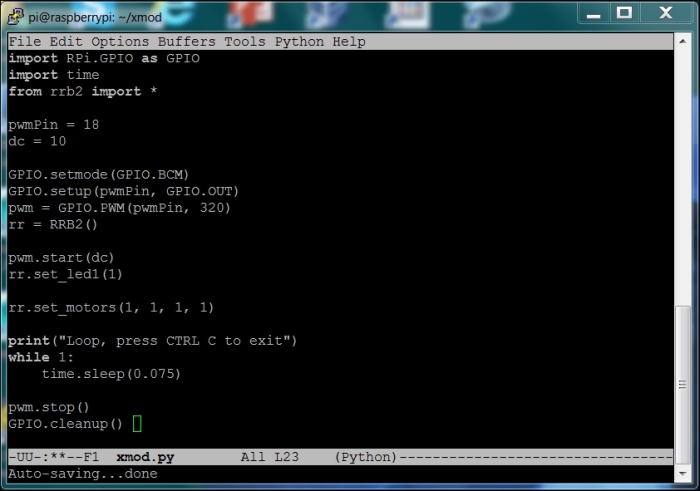
The specifics on the code are as follows:
import RPi.GPIO as GPIO: This will import theRPi.GPIOlibrary, allowing you to send out a PWM signal to the front steering mechanism.import time: This will import thetimelibrary, allowing you to use thetime.sleep(number_of_milliseconds), which causes a fixed delay.from rrb2 import *: This will import therrb2library, allowing you to control the two DC motors. Therrb2is the library you just downloaded from GitHub.pwmPin = 18: This will set the PWM pin to GPIO Pin 18, which is physically Pin 12 on the Raspberry Pi.dc = 10: This will set the duty cycle to 10 percent on the PWM signal.GPIO.setmode(GPIO.BCM): This will set the definition mode in theRPi.GPIOlibrary to the BCM mode, allowing you to specify the physical pin of the PWM signal.GPIO.setup(pwmPin, GPIO.OUT): This will set the PWM pin to an output so that you can drive the control circuitry on the steering.pwm = GPIO.PWM(pwmPin, 320): This will initialize the PWM signal on the proper pin and set the PWM signal to 320 Hz.rr = RRB2(): This will instantiate an instance of the motor controller.pwm.start(dc): This will start the PWM signal.rr.set_led1(1): This will light LED 1 on the motor controller board.rr.set_motors(1, 1, 1, 1): This will set both the motors to move so that the vehicle goes in the forward direction. This command will allow you to set the motors to forward or reverse and set it at a specific speed. The first number is the speed of motor one and it goes from 0 to 1. The second numbers is the direction of motor one,1is forward and0is reverse. The third number is the speed of motor two, which also goes from0to1, and the fourth number is the reverse and forward setting of the second motor, either1or0.print("Loop, press CTRL C to exit"): This will instruct the user how to stop the program.while 1: This will keep looping until Ctrl + C is pressed.time.sleep(0.075): Causes the program to wait 0.075 seconds.pwm.stop(): This will stop the PWM signal.GPIO.cleanup(): This will cleanup the GPIO driver and prepare for shutdown.
Now you can run the program by typing sudo python xmod.py. LED 1 on the control board should turn on, the rear wheels should move in the forward direction, and the steering should turn. This confirms that you have connected everything correctly. To make this a bit more interesting, you can add more dynamic control of the motors by adding some control code. The following is the first part of the python code:
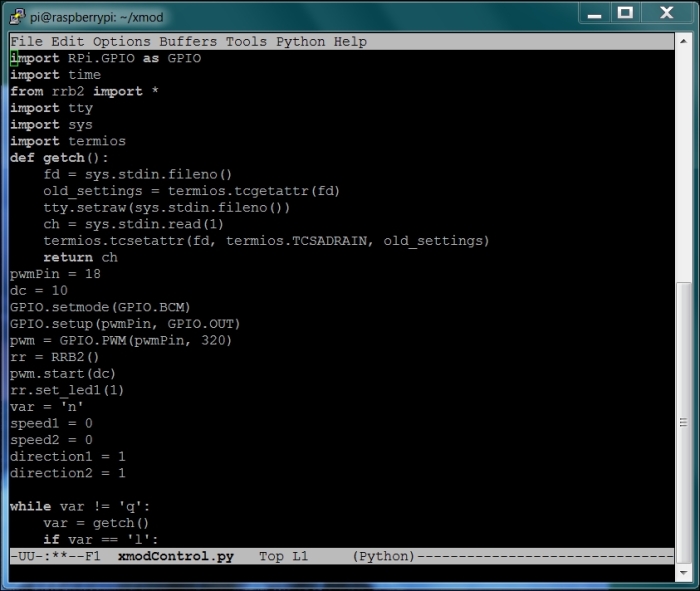
Before you start, you may want to copy your python code in a new file, you can call it xmodControl.py. In this code you'll have some additional import statements, which will allow you to sense key presses from the keyboard without hitting the enter key. This will make the real-time interface seem more real time. The getch() function senses the actual key press.
The rest of this code will look similar to the previous program. Now the second part of this code is as follows:
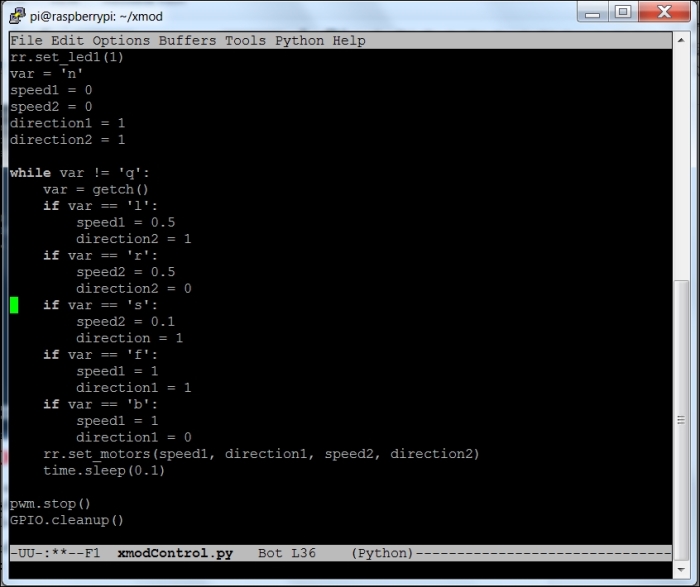
The second part of the code is a while loop that takes the input and translates it into commands for your RC car, going forward and backward and turning right and left. This program is quite simple, you'll almost certainly want to add more commands that provide more ways to control the speed and direction.