Book Image

Internet of Things with Arduino Cookbook

By : Marco Schwartz
Book Image

Internet of Things with Arduino Cookbook

By: Marco Schwartz

Overview of this book

Arduino is a powerful and very versatile platform used by millions of people around the world to create DIY electronics projects. It can be connected to a wide variety of sensors and other components, making it the ideal platform to build amazing Internet of Things (IoT) projects on—the next wave in the era of computing. This book takes a recipe-based approach, giving you precise examples on how to build IoT projects of all types using the Arduino platform. You will come across projects from several fields, including the popular robotics and home automation domains. Along with being introduced to several forms of interactions within IoT, including projects that directly interact with well-known web services such as Twitter, Facebook, and Dropbox we will also focus on Machine-to-Machine (M2M) interactions, where Arduino projects interact without any human intervention. You will learn to build a few quick and easy-to-make fun projects that will really expand your horizons in the world of IoT and Arduino. Each chapter ends with a troubleshooting recipe that will help you overcome any problems faced while building these projects. By the end of this book, you will not only know how to build these projects, but also have the skills necessary to build your own IoT projects in the future.
Table of Contents (14 chapters)
Internet of Things with Arduino Cookbook
Credits
About the Author
About the Reviewer
www.PacktPub.com
Preface
Index

Interacting with basic sensors


In this recipe, we are going to see how to measure data coming from sensors connected to the MKR1000 board. This will really teach us the very basics of the Arduino language. As an example, we'll use a simple photocell to measure the ambient light level around the project.

Getting ready

For this project, you will need a few extra components in addition to the Arduino MKR1000 board and the usual breadboard and jumper wires:

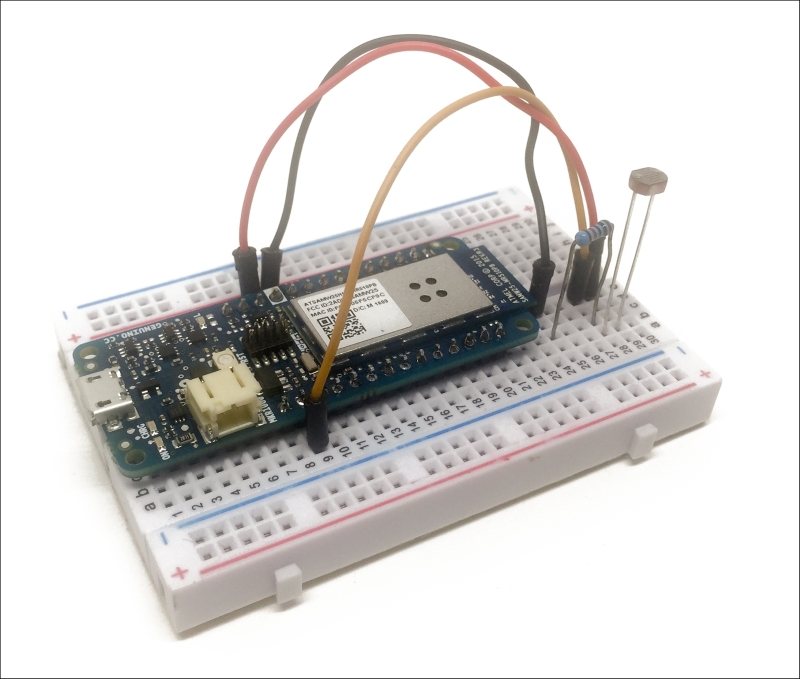
We are now going to assemble the project. First, place the resistor in series with the photocell on the breadboard, next to the MKR1000 board.

Now, connect the other end of the resistor to GND on the MKR1000 board, and the other end of the photocell to the VCC pin of the Arduino board. Finally, connect the middle pin between the resistor and the photocell to analog pin A0 of the MKR1000.

This is the final result:

How to do it...

  1. We are now going to configure the board to read data coming from the photocell. The sketch for this part will be really simple, as we will simply print the readings of analog pin A0 on the serial port. This is the complete sketch for this part:

    // Pins
    int sensorPin = A0;
    
    void setup() {
    
      // Serial
      Serial.begin(115200);
    }
    
    void loop() {
      // Reading 
      int sensorValue = analogRead(sensorPin);
      // Display
      Serial.print("Sensor reading: ");
      Serial.println(sensorValue);
      // Wait
      delay(500);
    }

    Tip

    You can now simply copy this sketch and paste it inside your Arduino IDE. Make sure that you connected the board to your computer via USB, and select the right board and Serial port inside the Arduino IDE. Then, upload the sketch to the board.

  2. Once you have finished uploading, open the Serial monitor. You should immediately see the readings from the sensor:

  3. Now, simply try to put your hand on top of the sensor. You should immediately see the value measured by the sensor coming down, meaning the sensor is working correctly.

How it works...

This project was really simple, and illustrated how to read data from an analog pin on the MKR1000 board. In this project, we simply read data on analog pin A0, and printed the readings on the Serial monitor. As the photocell is acting as a variable resistor (depending on the ambient light level), we are directly reading a signal that changes depending on the ambient light level.

See also

You can now move on to the next recipe that will show you how to control outputs on the board, or even to the recipes. After that, you will learn how to send measurement data on the cloud.