Book Image

Internet of Things with Arduino Cookbook

By : Marco Schwartz
Book Image

Internet of Things with Arduino Cookbook

By: Marco Schwartz

Overview of this book

Arduino is a powerful and very versatile platform used by millions of people around the world to create DIY electronics projects. It can be connected to a wide variety of sensors and other components, making it the ideal platform to build amazing Internet of Things (IoT) projects on—the next wave in the era of computing. This book takes a recipe-based approach, giving you precise examples on how to build IoT projects of all types using the Arduino platform. You will come across projects from several fields, including the popular robotics and home automation domains. Along with being introduced to several forms of interactions within IoT, including projects that directly interact with well-known web services such as Twitter, Facebook, and Dropbox we will also focus on Machine-to-Machine (M2M) interactions, where Arduino projects interact without any human intervention. You will learn to build a few quick and easy-to-make fun projects that will really expand your horizons in the world of IoT and Arduino. Each chapter ends with a troubleshooting recipe that will help you overcome any problems faced while building these projects. By the end of this book, you will not only know how to build these projects, but also have the skills necessary to build your own IoT projects in the future.
Table of Contents (14 chapters)
Internet of Things with Arduino Cookbook
Credits
About the Author
About the Reviewer
www.PacktPub.com
Preface
Index

Making a simple Arduino clock


As the first project of this chapter, we are going to build a simple clock that gets the time from a cloud server, using Arduino. The time itself will actually be displayed on an OLED screen, also controlled by the Arduino board.

Getting ready

For this project, you will need an OLED screen to display the time that can be controlled via Arduino. I recommend using the 128x64 OLED screen from Adafruit (https://www.adafruit.com/products/938).

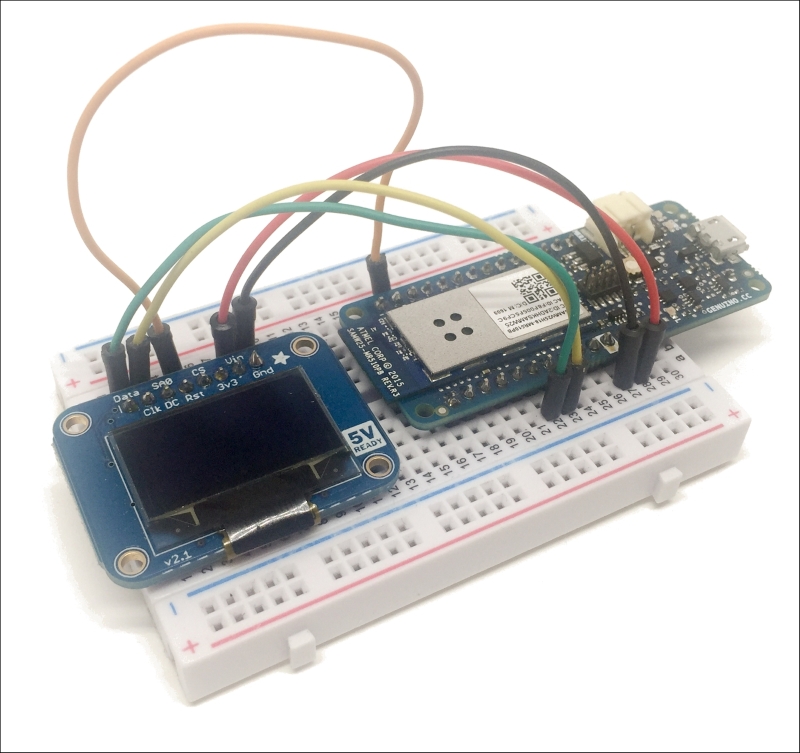
We can now assemble the project, which basically consists of simply connecting the Arduino board to the OLED screen. First, place both boards on a breadboard. Then, connect the VIN pin of the OLED board to the VCC of the Arduino board, and GND to GND. After that, connect the data and clock pins: data goes to the SDA of the Arduino board, and CLK goes to the SCL of the Arduino board. Finally, connect the RST pin of the OLED screen to pin 4 of the Arduino board.

This is the final result:

On the software side, you will need to download...