

There are many ways to wire up the Raspberry Pi and use the various interfaces to view and control content. For typical use, most users will require power, display (with audio), and a method of input such as keyboard and mouse. To access the Internet, refer to the Networking and connecting your Raspberry Pi to the Internet via the LAN connector or Using built-in Wi-Fi and Bluetooth on the Raspberry Pi recipes.
Before you can use your Raspberry Pi, you will need an SD card with an operating system installed or with the New Out Of Box System (NOOBS) on it, as discussed in the Using NOOBS to set up your Raspberry Pi SD card recipe.
The following section will detail the types of devices you can connect to the Raspberry Pi and, importantly, how and where to plug them in.
As you will discover later, once you have your Raspberry Pi set up, you may decide to connect remotely and use it through a network link, in which case you only need power and a network connection. Refer to the following sections: Connecting remotely to the Raspberry Pi over the network using VNC and Connecting remotely to the Raspberry Pi over the network using SSH (and X11 Forwarding).
The layout of the Raspberry Pi is shown in the following figure:
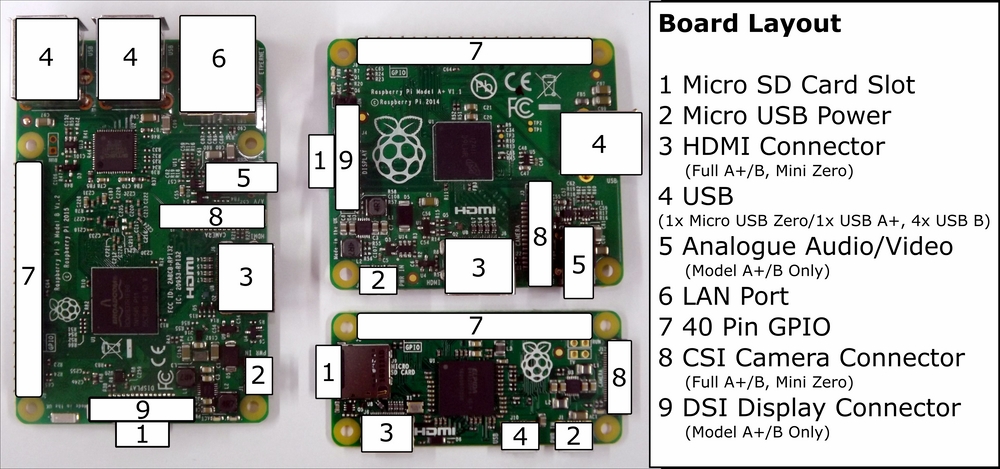
The Raspberry Pi connection layout (Model 3 B, Model A+, and Pi Zero)
The description of the preceding figure is as follows:
Display: The Raspberry Pi supports the following three main display connections; if both HDMI and Composite video are connected, it will default to HDMI only.
HDMI
For best results, use a TV or monitor that has an HDMI connection, thus allowing the best resolution display (1080p) and also digital audio output. If your display has a DVI connection, you may be able to use an adapter to connect through the HDMI. There are several types of DVI connections; some support analogue (DVI-A), some digital (DVI-D), and some both (DVI-I). The Raspberry Pi is only able to provide a digital signal through the HDMI, so an HDMI-to-DVI-D adapter is recommended (shown with a tick mark in the following screenshot). This lacks the four extra analogue pins (shown with a cross mark in the following screenshot), thus allowing it to fit into both DVI-D and DVI-I type sockets:

HDMI-to-DVI connection (DVI-D adaptor)
If you wish to use an older monitor (with a VGA connection), an additional HDMI-to-VGA converter is required. The Raspberry Pi also supports a rudimentary VGA adaptor (VGA Gert666 Adaptor), which is driven directly off of the GPIO pins. However, this does use up all but 4 pins of the 40-pin header (older 26-pin models will not support the VGA output).
Analogue
An alternative display method is to use the analogue composite video connection (via the phono socket); this can also be attached to an S-Video or European SCART adapter. However, the analogue video output has a maximum resolution of 640 x 480 pixels, so it is not ideal for general use.

3.5mm phono analogue connections
When using the RCA connection or a DVI input, audio has to be provided separately by the analogue audio connection. To simplify the manufacturing process (by avoiding through-hole components), the Pi Zero does not have analogue audio or an RCA socket for analogue video (although they can be added with some modifications).
Direct Display DSI
A touch display produced by the Raspberry Pi Foundation will connect directly into the DSI socket. This can be connected and used at the same time as the HDMI or analogue video output to create a dual display setup.
Stereo Analogue Audio (all except Pi Zero): This provides an analogue audio output for headphones or amplified speakers. The audio can be switched via the Raspberry Pi configuration tool on the desktop between analog (Stereo Socket) and digital (HDMI), or via the command line using
amixeroralsamixer.Network (excluding models A and Pi Zero): The network connection is discussed in the Networking and connecting your Raspberry Pi to the Internet via the LAN connector recipe later in this chapter. If we use the Model A Raspberry Pi, it is possible to add a USB network adapter to add wired or even wireless networking (refer to the Networking and connecting your Raspberry Pi to the Internet via a USB Wi-Fi dongle recipe).
Onboard Wi-Fi and Bluetooth (Model 3 B only):
The Model 3 B has built-in 802.11n Wi-Fi and Bluetooth 4.1; see the Using the built-in Wi-Fi and Bluetooth on the Raspberry Pi recipe.
USB (x1 Model A/Zero, x2 Model 1 B, x4 Model 2 B and 3 B)—using a keyboard and mouse:
The Raspberry Pi should work with most USB keyboards and mice available. You can also use wireless mice and keyboards, which use RF Dongles. However, additional configuration is required for items that use the Bluetooth dongles.
If there is a lack of power supplied by your power supply or the devices are drawing too much current, you may experience the keyboard keys appearing to stick, and in severe cases, corruption of the SD card.
Note
USB power can be more of an issue with the early Model B revision 1 boards that were available prior to October 2012. They included additional Polyfuses on the USB output and tripped if an excess of 140 mA was drawn. The Polyfuses can take several hours or days to recover completely, thus causing unpredictable behavior to remain even when the power is improved.
You can identify a revision 1 board as it lacks the four mounting holes that are present the later models.
Debian Linux (upon which Raspbian is based) supports many common USB devices, such as flash storage drives, hard disk drives (external power may be required), cameras, printers, Bluetooth, and Wi-Fi adapters. Some devices will be detected automatically while others will require drivers to be installed.
Micro USB Power: The Raspberry Pi requires a 5V power supply that can comfortably supply at least 1000 mA (1,500 mA or more is recommended, particularly with the more power-hungry Model 2 and 3) with a micro USB connection. It is possible to power the unit using portable battery packs, such as the ones suitable for powering or recharging tablets. Again, ensure that they can supply 5V at 1000 mA or over.
You should aim to make all other connections to the Raspberry Pi before connecting the power. However, USB devices, audio, and network may be connected and removed while it is running without problems.
In addition to the standard primary connections you would expect to see on a computer, the Raspberry Pi also has a number of other connections.
Each of the following connections provides additional interfaces for the Raspberry Pi:
20 x 2 GPIO pin header (Model A+, B+, 2 B, 3 B, and Pi Zero): This is the main 40-pin GPIO header of the Raspberry Pi used for interfacing directly with hardware components. We use this connection in Chapters 6, 7, 9, and 10. The recipes in this book are also compatible with older models of the Raspberry Pi that have a 13 x 2 GPIO pin header.
P5 8 x 2 GPIO pin header (Model 1 B revision 2.0 only): We do not use this in the book.
Reset connection: This is present on later models (no pins fitted). A reset is triggered when Pin 1 (reset) and Pin 2 (GND) are connected together. We use this in the A controlled shutdown button recipe in Chapter 6, Using Python to Drive Hardware.
GPU/LAN JTAG: The Joint Test Action Group (JTAG) is a programming and debugging interface used to configure and test processors. These are present on newer models as surface pads. A specialist JTAG device is required to use this interface. We do not use this in the book.
Direct camera CSI: This connection supports the Raspberry Pi Camera module (as used in Chapter 8, Creating Projects with the Raspberry Pi Camera Module). Note that the Pi Zero has a smaller CSI connector than the other models, so it requires a different ribbon connector.
Direct display DSI: This connection supports a directly connected display, a 7-inch 800 x 600 capacitive touch screen.