

Sometimes, the original firmware included in the board is the latest one available for Intel Galileo Gen 2. However, in some cases, we might need a firmware update, and therefore it is always convenient to make sure that we are working with the latest available version for the onboard firmware.
Tip
Firmware updates solve bugs and compatibility issues. Thus, it is always convenient to work with the latest firmware. However, in case you don't feel sure about following the procedure to update the firmware, it is convenient to keep the version that came with the board. A wrong procedure while updating the firmware or a power loss during the process might damage the board, that is, it might transform the board into a bricked one. You definitely don't want this to happen to your board.
If you want to check the current firmware version and check whether it is necessary to upgrade the board's firmware, you must follow the following steps:
Go to the Intel Galileo Firmware and Drivers download page at http://downloadcenter.intel.com/download/24748/Intel-Galileo-Firmware-and-Drivers-1-0-4. The URL is for the latest firmware version at the time this book has been written: 1.0.4. However, always make sure that you are downloading the latest available version from Intel Drivers & Software Download Center. In case the version is higher than 1.0.4, the procedure will be the same but you just need to replace 1.0.4 with the new version numbers.
The Web browser will display the available downloads for the supported operating systems. The Web page doesn't detect the operating system you are using, and therefore, it offers the downloads for all the supported operating systems: Windows, Mac OS X, and Linux. The following image shows the contents for the Web page:
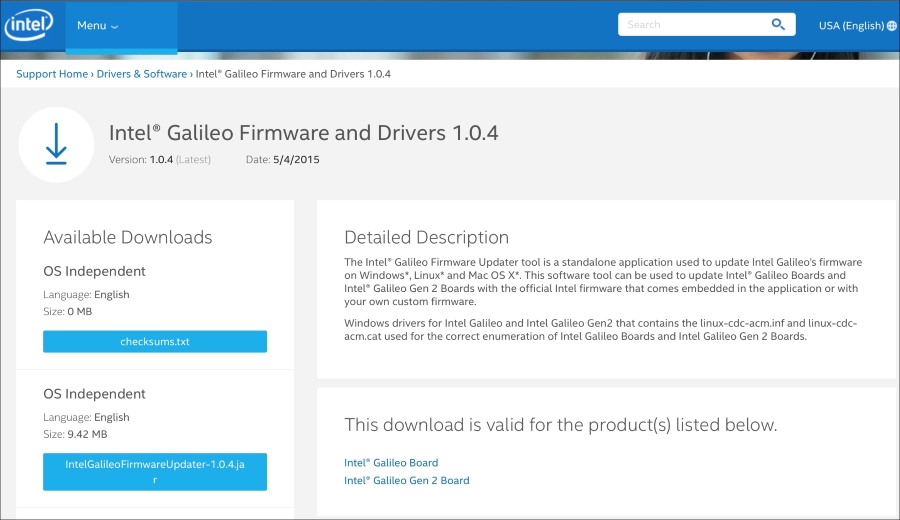
You will find a PDF user guide under OS Independent: IntelGalileoFirmwareUpdaterUserGuide-1.0.4.pdf. Click on the button, read and accept the Intel Software License Agreement, and read the Intel Galileo Firmware Updater Tool documentation. The documentation includes all the necessary steps to install the drivers in Windows and Linux. The Mac OS X doesn't require any driver installation.
Before you install the drivers or start the process to check the firmware version in your board, remove all the connections from the board, such as the microUSB cable and any USB device plugged into the USB 2.0 host connector. Remove any sketches and also the microSD card. Your Intel Galileo Gen 2 board should be empty just as when you unboxed it.
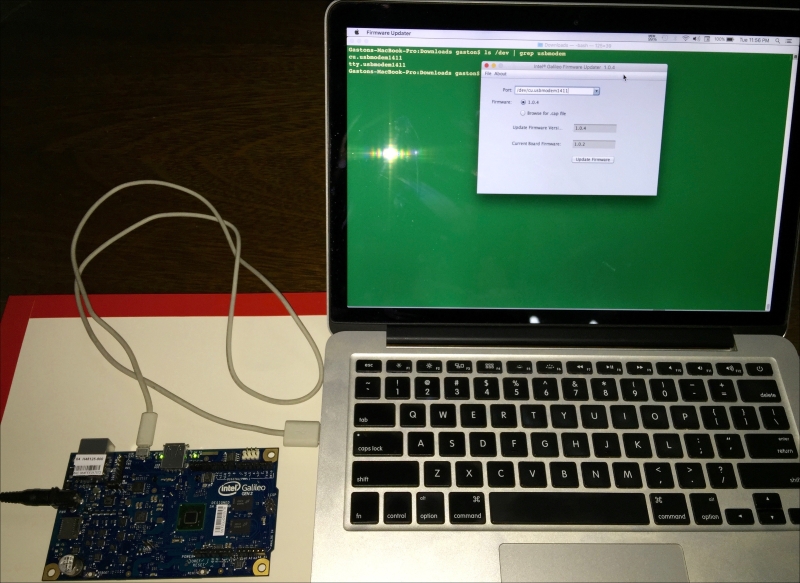
Connect the power supply to the board and wait a few seconds until the rectangular LED labeled USB turns on. Once this LED is turned on, the boot process has already finished and it is safe to connect a USB Type A to Micro-B USB cable from your computer to the micro USB connector labeled USB CLIENT in the board. Unluckily, the cable isn't included within the board's box. The following image shows an Intel Galileo Gen 2 board with the connections done and the firmware updater tool running on Mac OS X.
In case you are working with either Windows or Linux, follow the procedure to install the necessary drivers as explained in the IntelGalileoFirmwareUpdaterUserGuide-1.0.4.pdf document.
Tip
You already have the board connected to your computer, and therefore, you can skip this step in the document. In fact, many versions of this document didn't explain that you had to wait for the USB LED to turn on before you can connect the board to a computer through the micro USB connector and that caused many boards to have unexpected problems.
Once you have the drivers installed in your computer and your board is connected to it, you can download and execute the ZIP file of the Intel Galileo Firmware Updater for your operating system. For Windows, the file is IntelGalileoFirmwareUpdater-1.0.4-Windows.zip. For Mac OS X, the file is IntelGalileoFirmwareUpdater-1.0.4-OSX.zip. You usually have to scroll down the Web page to find the appropriate file for your operating system. Once you click on the desired file button, it is necessary to read and accept the Intel Software License Agreement before you can download the zip file.
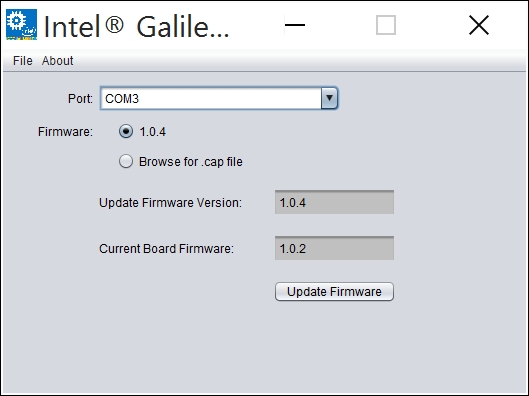
In Windows, download the IntelGalileoFirmwareUpdater-1.0.4-Windows.zip file, open it, and execute the firmware-updater-1.0.4.exe application included in the zip file. The Intel Galileo Firmware Updater Tool window will appear and it will automatically select the virtual COM port number, such as COM3, generated by the previously installed driver in the Port dropdown. The application will communicate with the board and then display the firmware version included with the tool in Update Firmware Version and the current board's firmware version in Current Board Firmware.
The following image shows the Intel Galileo Firmware Updater Tool running on Windows 10. In this case, the tool has the newest version for the firmware because it offers version 1.0.4 and the current board's firmware is 1.0.2.
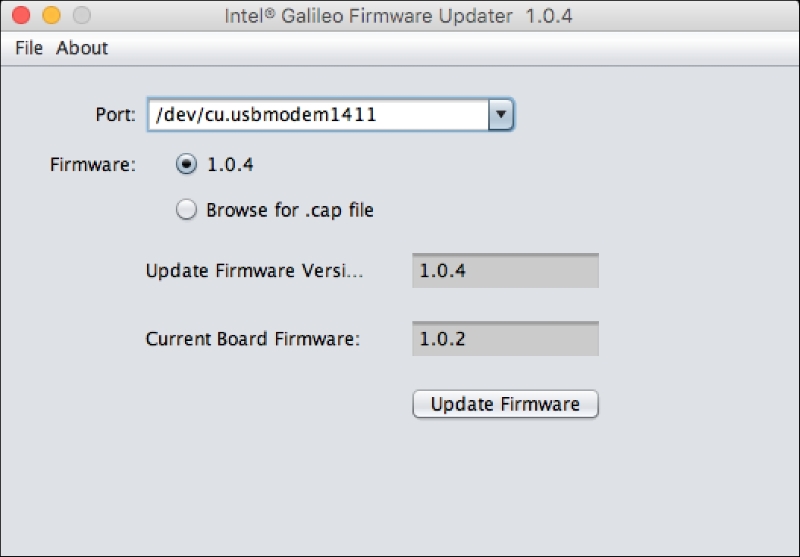
In Mac OS X, download the IntelGalileoFirmwareUpdater-1.0.4- OSX.zip file and then execute the downloaded Firmware Updater application. Take into account that you might need to authorize the operating system to run the application based on your security settings and your OS X version. The Intel Galileo Firmware Updater Tool window will appear and it will automatically select the generated USB modem device for the connected board, such as /dev/cu.usbmodem1411, in the Port dropdown. The application will communicate with the board and then it will display the firmware version included with the tool in Update Firmware Version and the current board's firmware version in Current Board Firmware.
The following image shows the Intel Galileo Firmware Updater Tool running on OS X El Capitan. In this case, the tool has the newest version for the firmware because it offers version 1.0.4 and the current board's firmware is 1.0.2, as it happened with the Windows version.
In case you decide that you need and want to update the firmware, considering the previously explained risks, you just need to click on the Update Firmware button and wait for the tool to indicate that the process has finished. The procedure is the same for either Windows or Mac OS X.
Tip
Don't unplug the USB cable from your computer connected to the board, don't disconnect the power supply from the board, and don't close the application until the tool indicates that the firmware update has finished. The safest way to perform a firmware update is to plug the power supply to a UPS (Uninterruptible Power Supply) to protect it from a power failure during the firmware update process.
Once the firmware update process has finished and the tool displays that you have the same firmware version on the board that the firmware version that the tool offers, you can close the application and disconnect the USB cable from your computer and the board. Make sure that you don't leave the USB cable connected to your board and then unplug the power supply.