Book Image

Arduino for Kids

By : Rishi Gaurav Bhatnagar, Vijay Varada
Book Image

Arduino for Kids

By: Rishi Gaurav Bhatnagar, Vijay Varada

Overview of this book

The mission of this book is to integrate technology with the tools that children already use for crafts so that they feel that the technology is an extension of their playtime. We use coding, sensors, and micro-controllers integrated with art and craft supplies, origami, and Playdough. There are 10 fun-filled chapters that talk to children directly, and give clear instructions for non-technical parents too. We use Arduino as the controller of choice due to its easy availability and large community. By the end of the book, children will comfortably be able to set up their Arduino, read and understand code, manipulate code, and ultimately write their own code for projects. They will also be able to use basic sensors and know how components connect to each other. All the learning takes place with lots of colorful pictures and the circuits are neatly presented using wiring.
Table of Contents (18 chapters)
Arduino for Kids
Credits
Foreword
About the Authors
About the Reviewers
www.PacktPub.com
Customer Feedback
Preface

Testing an external influence on LEDs - pushbutton switch


We all know what a switch is don't we. We just read about it in the previous chapter. We know how it works conceptually. Let's see how it works practically and in circuits.

In this project, we will use a push button switch. This is how it looks.

Image source: https://www.sparkfun.com/products/97

The working principle of the switch is rather simple. You press it, circuit connection is formed hence the circuit works, if you release it, the circuit breaks, so the circuit doesn't work.

At the stage when the pushbutton is un-pressed, we will call the state of pushbutton to be open. When the pushbutton is pressed, we will call that state as closed.

We will use the following components:

  • Resistor - 10KOhm

  • Push button switch

  • Breadboard

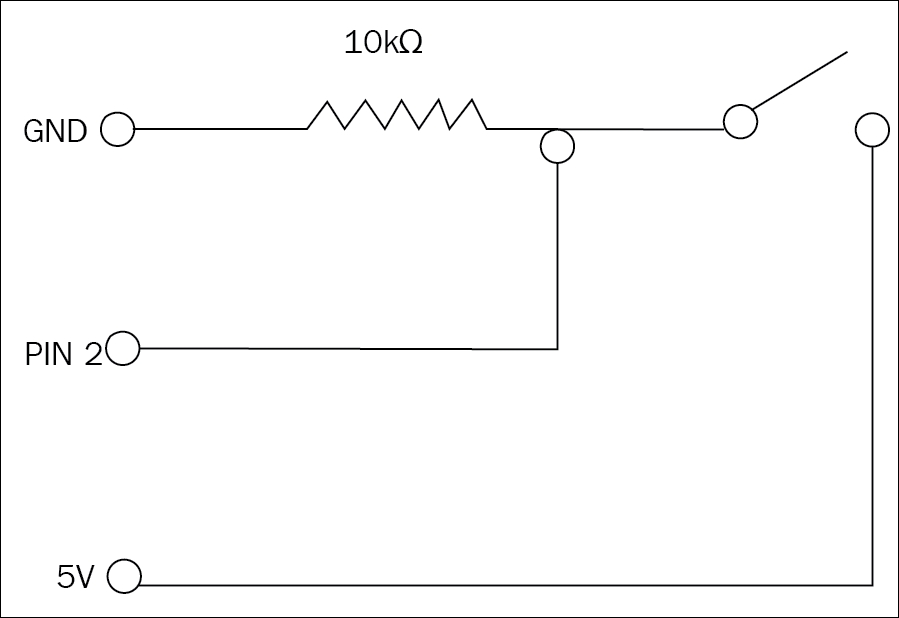
The following diagram explains how the circuit looks:

To make the above circuit connections, we are going to use a breadboard.

Note

Do you know what a breadboard is? Find out what a breadboard is how it works using...