
FreeCAD is designed to be flexible, extensible, and task oriented.
The core functionality is divided into workbenches. Each workbench gathers the most frequently used tools for a particular task. This recipe will guide you through the FreeCAD user interface and introduce some concepts that are common across all workbenches.
Launch FreeCAD and orient yourself with the screenshot and the names of the major parts of the interface. The images and examples in this book are from a 0.13 development snapshot.
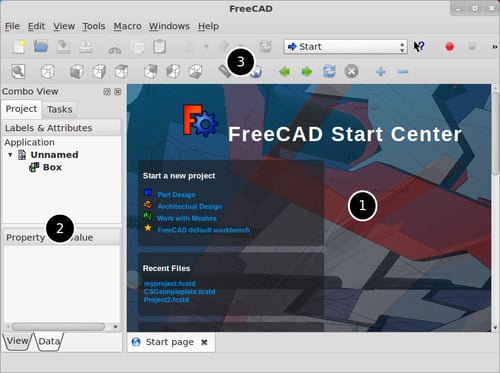
The default view is Start page—an embedded browser showing interesting video links, examples, and other news.
The user interface is divided into three main areas:
The 3D area allows you to see and navigate around your design in space.
The combo view shows a hierarchical view of the project or the state of the current task.
The tool bars and workbench switcher gives access to the various tools.
Open a new document by clicking on the menu File | New. The 3D view will switch to show an empty space. In the default orientation the camera position is looking down onto a plane defined by the X and Y axes. The Z axis is pointed directly at the camera. A coordinate indicator in the corner helps you orient yourself in the 3D space.

Click on the workbench switcher and select the Part workbench. Then click on the Create a box solid icon to insert a cube into the project.
You can have multiple projects open at the same time. You can also open multiple views of the same project. Open a second view of the project by clicking on the menu View | Create new view. You can switch views with the tabs below the 3D window or you can tile the views to have multiple perspectives at once. In this following screenshot, two projects are open, each with two views:

You can change the view of your project by panning, rotating, and zooming. Select objects by clicking on them to change their properties. The specific mouse and keyboard commands for doing this are called "navigation styles". FreeCAD supports four styles by default: Inventor, CAD, Blender, and Touchpad.
You can change the style used in the current view by right-clicking on the 3D canvas.

Changing the style through the Edit | Preferences menu will change the style for all views currently open and set the selection as the default for new views. The default style, CAD navigation, is unintuitive for some users since it requires clicking both the left and center mouse buttons at the same time to rotate. The Mouse... button in the Display preferences will show which button combinations perform each action.
Select the box and tap the space bar to toggle the object visibility property. Visibility is one of many properties of any object on screen. With the box still selected, examine the lower part of the combo-view. The properties of the selected object are shown on the two tabs (View and Data).
Click on the Measure distance icon, and then click two points on the box in the 3D window. A dimension will be shown and a distance object will be added to the tree.

You can select the distance object in the tree and explore its properties.
As the project complexity grows, you may need to perform an action on multiple objects at the same time. Select multiple objects by holding the Ctrl key while selecting with the mouse.
The View/Data tabs reflect a deep design characteristic of FreeCAD. The data necessary to construct the object (size, type, placement, and rotation) is separated from the data needed to show it on screen (color, line style, visibility, and transparency).
Most operations in FreeCAD are non-destructive and result in new objects being added to the project tree. Each new object has its own View and Data tabs and preserves its relationship to its simple precursor. This makes it possible to delete the later objects and revert to the simpler object if needed.
As objects are added and modified, they are organized in the combo-view tree in a hierarchical way. Generally, the last child object is displayed and parent objects are hidden automatically.
FreeCAD uses the term "view" to refer to several related concepts.
Eight default views are provided with icons in the tool bar to make it easy to position the project on the screen. These views are actually orientations of your work and shouldn't be confused with the view windows described previously.
The term view also refers to the camera projection type: orthographic or perspective.
You can preserve a favorite orientation of your work by freezing it (Shift+F). This adds a menu item for the frozen view to let you easily return to this orientation later.