Book Image

3D Printing Blueprints

By : Joe Larson
Book Image

3D Printing Blueprints

By: Joe Larson

Overview of this book

A new industrial age is here. Machines designed to build useful and interesting objects have moved from the factory to the home. Whether you have a 3D printer or not, learning how to design your first 3D models is the best way to become part of the 3D printing movement. 3D Printing Blueprints will teach you, step by step, the tools and techniques of using Blender, a free 3D modelling program, to build 3D models for printing with simple and fun hands-on projects.3D Printing Blueprints uses engaging and fun projects that teach Blender modeling for 3D printing through hands-on lessons. First you'll learn basic modeling and make a small simple object. Then each new project brings with it new tools and techniques as well as teaching the rules of 3D printing design. Eventually you'll be building objects designed to repair or replace everyday objects. Finally you'll be able to even tackle other people's models and fix them to be 3D printable. Through the course of doing the blueprints you will custom build one-of-a-kind objects that you can call your own. Starting from a custom vase formed from a picture, lessons will progress to a multi-part modular robot toy. Then simple machines will be designed with custom gears and functions. Eventually you'll learn how to download models from the Internet and make custom objects. Finally you'll be able to build models with near real life specifications and make a print that can be used for small object repair. 3D Printing Blueprints will teach you everything you need to know about building custom 3D models to print successfully on modern home 3D printers.
Table of Contents (17 chapters)
3D Printing Blueprints
Credits
About the Author
About the Reviewers
www.PacktPub.com
Preface
Index

Adding the SD holder to the ring


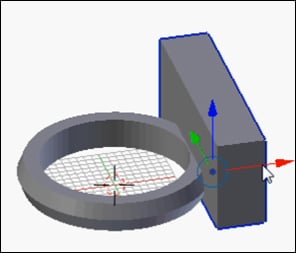
Unhide the ring by clicking its eye icon in the Outline panel. Select SD Holder and Grab/Move (G) it in the x axis (X) until it is at the front of the ring. Depending on the view when the last operation was done, a problem may have been observed:

What happened to the hole for the SD card? Because the Boolean modifier was not applied, the hole stayed right where it was where the hidden SD Card object resides:

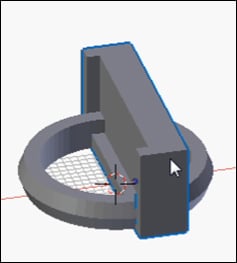
As amusing as this can be, this is an undesired behavior. There are two options. Either the Boolean operation can be applied before moving, or both objects can be moved together. As the stated goal of this project was to not use the Apply button, the choice is clear. Undo (Ctrl + Z) the move operators until the hole is where it belongs, in SD Holder. Then unhide the SD Card object by clicking on its eye icon in the Outliner view. Select both SD Holder and SD Card by right-clicking on one, then holding Shift and right-clicking on the other. Then Grab/Move...