

Once you have finished setting up the RasPi, it's time to connect it to the Internet. Basically, there are two very common ways of connecting the RasPi to Internet: the first (and easiest way) is via Wi-Fi connection using a Wi-Fi dongle, or transceiver; the second is somewhat tricky but it's the most economical and practical way to utilize everything you have and without an additional Wi-Fi dongle. This will require a laptop/desktop computer (a PC) and an Ethernet cable. We will see how to follow each of the ways.
You can purchase the dongle for the RasPi from any leading online store or an electronics store near you. It ranges from 10 to 20 USD at the time of writing this book. While in the process of purchasing, read about the power requirements of the dongle. You can purchase the miniature Wi-Fi dongle available on Adafruit, or a dongle from brand names: PiFi or Edimax. If you are thinking of giving a try to Ethernet Internet connection sharing, then this section can be skipped. The basic steps for enabling the Wi-Fi network connection are introduced here.
Tip
It is advisable to use either of the methods at once. If you choose to use the Wi-Fi dongle, then you can skip the section of Ethernet sharing and vice versa.
In the CLI of the RasPi, enter the following command to note down the gateway and netmask of the Ethernet connection so that you can add a static IP defined in the interface file in the upcoming steps:
netstat -nr
We have to perform the following steps to enable the Wi-Fi network connection:
Go to the network interfaces file of the RasPi by entering the
sudo nano /etc/network/interfacescommand in the CLI. Note that you will get acquainted with these commands in the upcoming sections. Once you enter the command, the text you need to change is this:auto lo iface lo inet loopback iface eth0 inet static address 169.254.0.2 netmask 255.255.0.0 broadcast 169.254.0.255 gateway 0.0.0.0 allow-hotplug wlan0 iface default inet dhcp wpa-ssid "ssid_name" wpa-psk "password"After editing the file, press Ctrl + X and press Y to confirm the edit made by you.
Shut down the RasPi by entering the sudo poweroff command. You then need to connect the Wi-Fi dongle and turn it on again. While it is booting up, it finds the Wi-Fi adaptor connected to it. Pretty simple, isn't it!
All of the preceding steps require a dedicated display, mouse, keyboard, and all other cables to get the view of the working RasPi. For regular uses, this is somewhat bulky to carry all of these along with your RasPi. At this stage, I assume that you have already installed Raspbian OS.
Note
For this method, you just need your laptop/desktop (it already has an inbuilt Wi-Fi module, which is why we don't purchase an additional Wi-Fi dongle for RasPi until we have a special requirement), the Windows operating system, and an Internet connection. You do not need any add-on displays, keyboard, mouse, or Wi-Fi dongles connected with the RasPi.
So all we need is an Ethernet cable, a power supply to RasPi, the SD card with Raspbian, a Windows-based PC with an Ethernet port, an SD card reader for the PC (just required for the first time, either inbuilt or as an add-on SD card reader), and the RasPi (obviously!).
Assemble all of these on a neat table and just start your laptop without starting up the RasPi. I will run you through the step-by-step process. If you follow it, you'll have a working Internet connection provided from your PC to your RasPi with no added costs of Wi-Fi dongles.
The first step is to edit the file that RasPi checks when it starts booting. Try inserting the SD card of the RasPi into your PC's SD card reader. Open Explorer (where all the drives are listed); there, you can find the removable media. You will be amazed to see that the partition is about 15 MB to 20 MB, but your card is actually 8 GB or 16 GB! Don't panic; it's just the boot space of RasPi. You will be able to see the multiple files on this media. We are interested in editing the cmdline.txt file. Just double-click on the file (or open it in standard Notepad), and you will be able to see the following startup commands:
dwc_otg.lpm_enable=0 console=ttyAMA0,115200 kgdboc=ttyAMA0,115200 console=tty1 root=/dev/mmcblk0p2 rootfstype=ext4 elevator=deadline rootwait
You can change some settings by adding the static IP address of your RasPi at the end of the line (take a look at the following code). There is no need to understand the meaning of all of these parameters at this stage; I will introduce them when they will be useful.
dwc_otg.lpm_enable=0 console=ttyAMA0,115200 kgdboc=ttyAMA0,115200 console=tty1 root=/dev/mmcblk0p2 rootfstype=ext4 elevator=deadline rootwait ip=169.254.0.2
In bold, you will see the static IP we have provided for the RasPi.
Note
From now onwards, you'll always have to access your Pi using this IP address, when you access it from your PC.
Tip
If you are a Linux or Mac OS X user, insert the SD card into the SD card reader. There will be two partitions visible. Open the boot partition and follow the same process explained to add the IP address to the cmdline.txt file.
Save the file, safely remove the SD card from the PC, and move on to the next step.
Now it's time to start and boot the RasPi by inserting the SD back into the RasPi. Establish an Ethernet connection between the RasPi and your PC before powering up the RasPi. You will see now multiple LEDs blinking on RasPi, stating that the Ethernet connection is being established and there is a transfer of data occurring between the PC and the RasPi. Check the working connection of PC and RasPi by entering ping 169.254.0.2 in Command Prompt (Start Menu | Run | cmd.exe). Note that we are using the same IP address as entered in the cmdline.txt file. It should give a response like this:
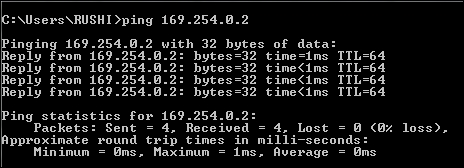
The ping command allows us to send the predefined size of packets to the host systems and expects them to be reflected back. The Lost = 0 section in the response shows that all the packets sent from the PC to the RasPi are reflected back and the connection is working.
For Linux and Mac OS X users, the connection can be verified by entering the ping 169.254.0.2 command in the terminal. Enter the ping command in the same Command Prompt to get the Ethernet port IP address of your PC. Following this, enter ipconfig (ifconfig in the case of Mac OS X and Linux users) and note down the IP address of the LAN connection (Ethernet), which is 169.254.121.232 in the following screenshot:

Shut down the RasPi (sudo poweroff), remove the SD card, insert it back into your PC, and follow the Editing the command-line file of RasPi section. Add the noted IP address (in this case, it's 169.254.121.232) at the end of the cmdline.txt file, as shown in the following code:
dwc_otg.lpm_enable=0 console=ttyAMA0,115200 kgdboc=ttyAMA0,115200 console=tty1 root=/dev/mmcblk0p2 rootfstype=ext4 elevator=deadline rootwait ip=169.254.0.2 ::169.254.121.232
Here, the double colon (::) is the most important part to be put between the RasPi's IP address and your PC's IP address. Then, save the cmdline.txt file.
Turn on the RasPi after safely inserting the SD card back into RasPi and plugging in the micro USB adapter. On a Windows PC, you need to open Network and Sharing Center by navigating to Control Panel | Change adapter settings, right-clicking on the adapter where you are getting Internet connection, and going to its properties.
Click on the Sharing tab. Keep the Allow other network users to connect through this computer's Internet connection option checked and click on OK. This setting changes the IP address of the Ethernet port of the PC; we need to reset it.
In the same window of the adapter settings, go to the properties of the Local Area Network connection (Ethernet), double-click on the IPv4 settings, and click on Obtain an IP Address Automatically as well as Obtain DNS server address automatically.
Tip
The IP address we provide for the RasPi may have a subnet class different from the network in your home. The interesting point is that this subnet class remains between the RasPi and PC. Don't panic if the Wi-Fi adapter of your PC is getting IPs in range of 192.x.x.x. This method still works, as Windows allows the Internet sharing between cross subnets. This is because we have enabled the Internet sharing and Ethernet settings as automatic. Therefore, it is clear that the Wi-Fi-to-PC (192.x.x.x) and PC-to-RasPi (169.254.x.x) scenarios work successfully.
Mac OS X user can follow the same steps by navigating to Preferences | Sharing and it would be very easy to follow the GUI.
Linux users can click on network menu in the top panel and navigate to Edit Connections... and then double click your wired connection and keep the wireless connection untouched. Navigate to the IPv4 Settings tab and select method: Shared to other computers.
Secure Shell (SSH) is a cryptographic network protocol for secure data communication. It means remote command-line login and remote command execution between two networked computers. Here, we use it for the command-line login and remote command execution between the PC and the RasPi. A one-of-a-kind and free SSH client is PuTTY (www.putty.org) for Windows, and since it is an open source, you can download it for free. Run PuTTY on your Windows PC and change the settings as follows:
Tip
For Linux and Mac OS X users, there is no need to install the PuTTY client, as they can directly perform this task from their terminal window by the ssh [email protected] command.
In the Host Name textbox of PuTTY, provide the same IP address that you entered in
cmdline.txt(which is169.254.0.2, as per the example given in the previous section).Following this, navigate to Category | Connection | SSH | X11 and check the Enable X11 forwarding option.
In the left-side Category menu, click on Session, enter the session name in the Saved Sessions field, and save it so that you don't have to save the settings every time you connect the RasPi with the PC.
Double-click on the saved connection and enter the ID and password; you will get the CLI on the screen of your laptop. Now how do we check the working Internet connection on the RasPi?
The answer to the preceding question is simple; enter the following command to check the Internet connection:
ping -c 4 www.google.com
You should get the same response with 0 percent packet loss, and now you have a working Internet connection on your RasPi. All of this is one-time hard work; later on, if you just have to keep your settings unchanged, log in to PuTTY, and enjoy the Internet on the RasPi. For the first time, setting up is somewhat a long process, but you know you've saved almost 10 USD for a Wi-Fi dongle. Isn't that a great thing?
Note
Here is a beautiful tip: you can install Xming from http://www.straightrunning.com/XmingNotes/, which is an X Windows System Server. Once it is installed, run it and you should see that there is no window. Worry not because as soon as you magically input the command lxsession in PuTTY, you will see the entire desktop of the RasPi on your PC's screen. A program similar to Xming is VNC Viewer, which directly opens the desktop of the RasPi by entering the IP address of the RasPi without logging in from PuTTY. Amazing, right?