
In this section, we will look at setting up the Linux host PC so that we can easily develop Qt applications.
Preparing the host machine
Installing Qt
Qt comes in two basic licenses—Commercial and Open Source. We will be using the Open Source version.
Projects developed with the Open Source version of Qt must comply with the applicable GPL and LGPL licenses.
Qt can be download from https://qt.io/dowownload. Make sure to download the Linux version of the online installer for the Open Source version.
You might be wondering why we don't use the version of Qt already installed or installable from your Linux distribution. The answer is quite simple—to avoid confusion caused by different versions of Qt and its tools. Each version of each Linux distributions tends to come with a different Qt version. By downloading Qt for ourselves, we ensure that we are working with the same version and tools.
Once downloaded, make the installer executable (chmod +x <file>) and then launch it.
This book is written for Qt 5.12.0 that's been installed in ~/Qt, along with Qt Creator. You can change the installation directory, but you will have to also adjust some of the steps that are provided.
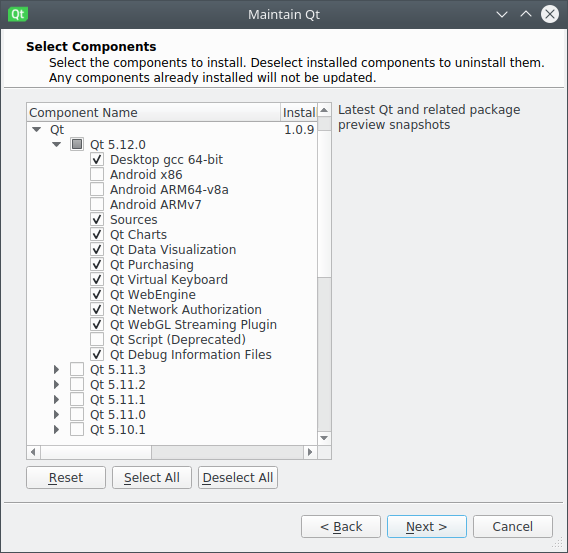
We only need some of the Qt components, but you can install more if you like. From the Qt 5.12.0 section, select at least the following components from the Qt sub-menu:
- Desktop gcc 64-bit
- Sources
- Qt Charts
- Qt Virtual Keyboard
- Qt WebGL Streaming Plugin
- Qt Debug Information Files
Consider the following diagram for the preceding components:
Also, be sure to install the latest version of Qt Creator (4.8.0 at the time of writing).
Just these few items pose a fairly large download. If you have a slow internet connection, you may want to find something else to do while it completes.
Setting up the cross compilation environment
There are several steps to setting up the cross compilation environment. We will put everything into the ~/raspi directory on the host so that you can create it.
Installing the cross compilation tools
Since the Raspberry Pi uses an ARM processor, we will need to install a cross compilation tool chain. A cross compile toolchain allows the host to build code that will run on a Target, even if the processor and possibly the OS do not match. A typical toolchain contains a compiler, linker, debugger, and other tools that run on the host, but generate code for the Target. You could think of it almost like a really cool translator that allows you to write a book in English and have it magically appear in Mandarin when it's done.
While we could build the cross compilation tools from sources, it is a lot easier to download pre-built binaries from https://github.com/raspberrypi/tools. We will want to put the tools in ~/raspi/tools. You can either use Git to pull them down or download the ZIP file.
To use Git, simply clone the directory, as follows:
[On Host] $ cd ~/raspi
[On Host] $ git clone https://github.com/raspberrypi/tools
You can grab the ZIP file from https://codeload.github.com/raspberrypi/tools/zip/master. Once you've download the ZIP file, extract the tools-master directory to ~/raspi/, then rename tools-master to tools:
[On Host] $ cd ~/raspi
[On Host] $ unzip tools-master.zip
[On Host] $ mv tools-master tools
Preparing for debugging
In order to successfully debug applications on the Target, we need to have a multi-architecture version of gdb (the debugger) installed. On Ubuntu, you can install it easily using apt:
[On Host] $ sudo apt install gdb-multiarch
Accessing the Target's root directory on the host
Cross compiling for the Linux target is best done when the host PC has access to parts of the root filesystem of the Target so that the proper includes and libraries can be accessed. There are a couple of different ways of doing this.
The first method is to share the filesystem between the host and target PC by remote mounting it from one system to the other. This is typically done using NFS.
The other method is by cloning the necessary parts of the target filesystem on the host. There are some definite advantages to cloning the filesystem, as follows:
- The Target can be run independently of the host. This is perfect for demos or when the always available network is down.
- The Target doesn't need to be present when compiling code for it. This seems to happen to me quite often when the software team grows and new Target hardware is limited. You will still need a Target at some point to transfer the code to it, just not while building.
For our purposes, we will clone the Target filesystem.
The required pieces of the root filesystem from the Target will be stored in ~/raspi/sysroot. RSync will be used to pull the copy:
[On Host] $ cd ~/raspi
[On Host] $ mkdir sysroot sysroot/usr
[On Host] $ rsync -avz root@raspberrypi:/lib sysroot
[On Host] $ rsync -avz root@raspberrypi:/usr/include sysroot/usr
[On Host] $ rsync -avz root@raspberrypi:/usr/lib sysroot/usr
- The next step is to fix the symbolic links in sysroot. On the Target, they refer to absolute paths, but on the Host, they will need to refer to relative paths within sysroot. Once more, a script has been provided to take care of this for us, which can be found at https://raw.githubusercontent.com/riscv/riscv-poky/priv-1.10/scripts/sysroot-relativelinks.py. You can use wget to fetch it. Next, make it executable.
- Run it by providing the location of the host copy of the Target's root filesystem:
[On Host] $ cd ~/raspi
[On Host] $ wget
https://raw.githubusercontent.com/PacktPublishing/Hands-On-Embedded-Programming-with-Qt/master/Chapter01/sysroot-relativelinks.py
[On Host] $ chmod +x sysroot-relativelinks.py
[On Host] $ ./sysroot-relativelinks.py sysroot