
Coding a rock, paper, scissors wrist game
You are now going to code this wrist game to be able to randomly choose rock, paper, or scissors. You can play it against yourself or use it against another human. If you have a friend that has a kit, then you can both build one and compete this way:
- Using the default yellow when program starts block, add a purple Light block named write Hello. You will need to change the word from Hello to Left:

Figure 2.37 – "Left" being programmed to screen
- Add two yellow Events blocks named when Left Button pressed. Make one that activates when the setting is set for the left button and the second block set for the right button.
- Go to the pink My Block sections of the coding blocks and make two new blocks. Name one
start gameand the otherplayagain. Add these new blocks to the yellow blocks. Add the start game block for the left button and playagain for the right button:
Figure 2.38 – Decision making with MyBlocks
- In the previous step when you created these blocks, you should have seen two new pink blocks show up in your coding canvas named define playagain and define Start Game. Locate define playagain:

Figure 2.39 – playagain My Block
- Under the define playagain block, add a sound effect by adding a purple play sound block named play sound Cat Meow until done. Change the audio file to one of your choice. Under this block, add a Light block named turn on Smiley Face for 2 seconds. Click the face and change the graphic to your choice. In this example, an
Xwas made. Add another light block underneath this one, turning off all the lights. Finally, add a final purple Light block named write Hello and change Hello to Left. - You will follow a similar process for the other define Start Game block. Locate this pink block. Add a purple play sound block named play sound Cat Meow until done. Change the audio file to your choice. Add a purple Light block named turn on Smiley Face for 2 seconds. Change this block to the number
3in the graphical interface and change it from2seconds to1second. Right-click the purple play sound block you just added and choose duplicate. Duplicate these two blocks two times so you don't have to keep dragging blocks. Change the3to a2and the other to a1to create a countdown timer. Last, create another pink My Block and name itRps. Add this block to the end of this code:
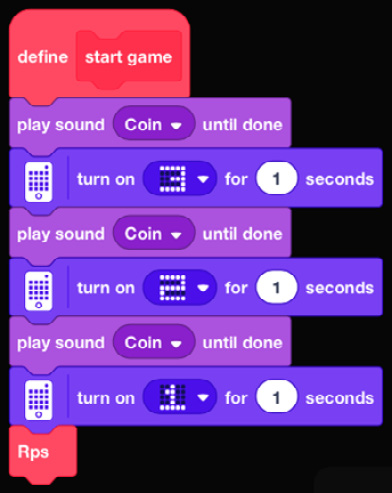
Figure 2.40 – start game My Block
The final step is to program the Rps block:
- Add a purple Light block named turn on and change the smiley face to the four squares in the corners.
- Add an orange Control block named wait until. Add a blue Sensor block of Hub is shaken to the diamond space.
- Go to the orange Variable block and make a variable named
Rps_Random. Add the set Rps_Random block to the code. Use a green Operator block named Pick Random and select numbers 1-3. - Add an orange Control block named If. Drag in a green Operator block that compares with the = sign. On one side of the equals sign, add your Rps_Random block, and on the other side, insert the number
1. - Within that If block, add a purple Light block named turn on and turn on all the lights to symbolize paper.
- Add one more purple Light block named set Center Button light to and choose a color.
- Right-click this If block you just created and duplicate it two more times. For these two copies, change the numbers to
2and1. Change the design from paper (all lights) to a smaller square for rock for one, and for the other, design a pair of scissors. - Add an orange Control block named Wait and choose
5seconds so that you have time to see your game choice. - Add a purple Light block named write Hello and change it to
Right:
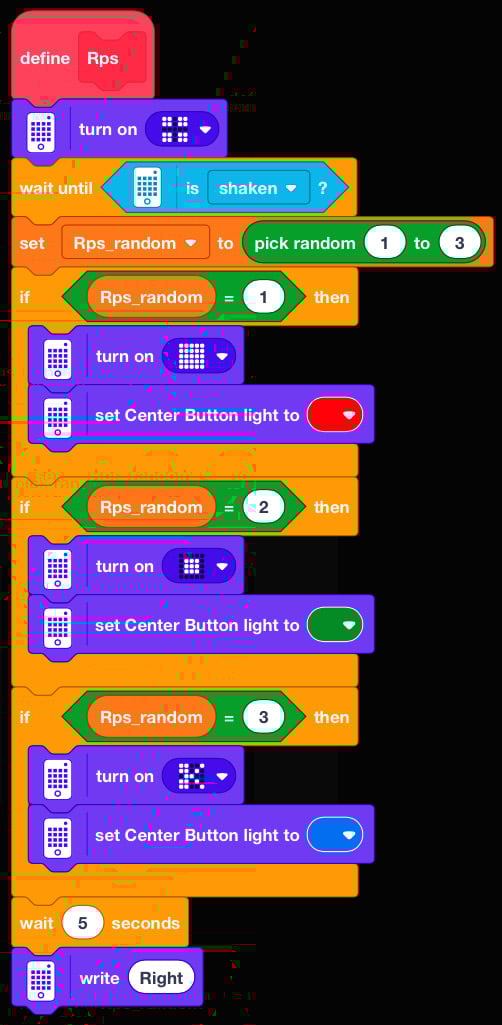
Figure 2.41 – Rps My Block
In the end, your code should look like this:
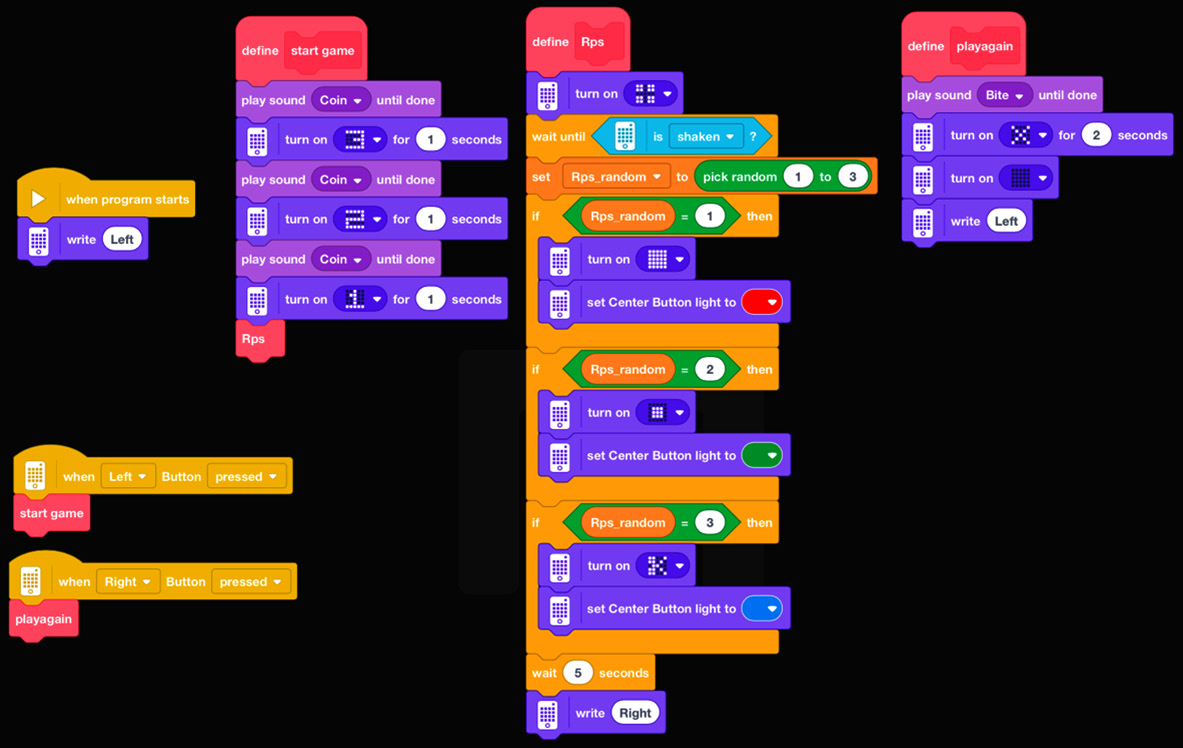
Figure 2.42 – Complete view of the code
How it works is the game will tell you Left on the screen to indicate to press the left button. This will trigger the start game My Block, which will do a countdown timer to show your choice. Once it counts down, it will then move to Rps, where the code will wait for you to shake the Intelligent Hub before displaying a choice of rock, paper, or scissors. After it displays the choice for 5 seconds, it will then tell you Right, so when you press the right button, it will reset the screen and wait for you to press left again to play the game.