

If your network does not include a DHCP server or it is disabled (typically, these are built into most modern ADSL/cable modems or routers), you may need to configure your network settings manually.
Before you start, you will need to determine the network settings for your network.
You will need to find out the following information from your router's settings or another computer connected to the network:
- IPv4 address: This address will need to be selected to be similar to other computers on the network (typically, the first three numbers should match, that is,
192.168.1.Xifnetmaskis255.255.255.0), but it should not already be used by another computer. However, avoidx.x.x.255as the last address, since this is reserved as a broadcast address. - Subnet mask: This number determines the range of addresses the computer will respond to (for a home network, it is typically
255.255.255.0, which allows up to 254 addresses). This is also sometimes referred to as the netmask. - Default gateway address: This address is usually your router's IP address, through which the computers connect to the internet.
- DNS servers: The Domain Name Service (DNS) server converts names into IP addresses by looking them up. Usually, they will already be configured on your router, in which case you can use your router's address. Alternatively, your Internet Service Provider (ISP) may provide some addresses, or you can use Google's public DNS servers at the addresses
8.8.8.8and8.8.4.4. These are also called nameservers in some systems.
For Windows, you can obtain this information by connecting to the internet and running the following command:
ipconfig /allLocate the active connection (usually called Local Area Connection 1 or similar if you are using a wired connection, or if you are using Wi-Fi, it is called a wireless network connection) and find the information required, as follows:
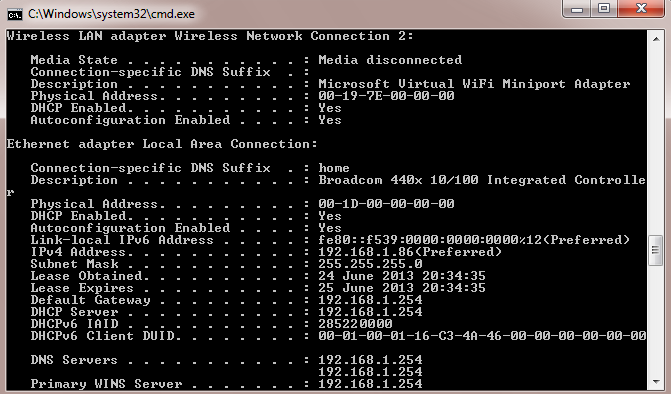
The ipconfig/all command shows useful information about your network settings
For Linux and macOS X, you can obtain the required information with the following command (note that it is ifconfig rather than ipconfig):
ifconfigThe DNS servers are called nameservers and are usually listed in the resolv.conf file. You can use the less command as follows to view its contents (press Q to quit when you have finished viewing it):
less /etc/resolv.confTo set the network interface settings, edit /etc/network/interfaces using the
following code:
sudo nano /etc/network/interfacesNow perform the following steps:
iface eth0 inet static address 192.168.1.10 netmask 255.255.255.0 gateway 192.168.1.254
- Save and exit by pressing Ctrl + X, Y, and Enter.
- To set the name servers for DNS, edit
/etc/resolv.confusing the following code:
sudo nano /etc/resolv.conf- Add the addresses for your DNS servers as follows:
nameserver 8.8.8.8nameserver 8.8.4.4
- Save and exit by pressing Ctrl + X, Y, and Enter.
You can configure the network settings by editing cmdline.txt in the BOOT partition and adding settings to the startup command line with ip.
The ip option takes the following form:
ip=client-ip:nfsserver-ip:gw-ip:netmask:hostname:device:autoconf- The
client-ipoption is the IP address you want to allocate to Raspberry Pi - The
gw-ipoption will set the gateway server address if you need to set it manually - The
netmaskoption will directly set thenetmaskof the network - The
hostnameoption will allow you to change the defaultraspberrypihostname - The
deviceoption allows you to specify a default network device if more than one network device is present - The
autoconfoption allows the automatic configuration to be switched on or off