
Introduction to ESP32 platform and modules
The first ESP32 chip was launched in 2016 when I was working for a smart home company as a technical product manager. The wireless communication technology that we had chosen for our product line was Z-wave on account of its technical features (sub-gigahertz wireless communication, mesh networking, interoperability, and suchlike) and market status (many vendors, thousands of certified products, and so on).
The vision was not to be yet another device vendor, but to be a platform where every other vendor meets with end users. The most crucial step was to develop the most affordable Z-wave gateway on the market such that any smart home enthusiast would prefer our gateway as the access point of other Z-wave devices in their home. Our first prototype was a high-performance, embedded Linux board with an ARM-CortexA SoC; however, in terms of pricing, it was certainly not the most affordable one in our segment. Then we discovered ESP32 from Espressif. This was a game-changer.
ESP32 allowed us to slash the price of the gateway to a quarter of what it was originally. Having an ESP32 as the main computing unit, we attached a Z-wave module to it as the network co-processor. The other end was Wi-Fi, a built-in feature of ESP32, to connect the backend system. We didn't worry about security requirements because there was a cryptographic hardware accelerator in the ESP32 chip for encryption/decryption purposes. That was all that we needed. However, as always, life is not that easy. The Z-wave library that we procured from the market had targeted Linux-based boards, not a resource-constrained SoC like ESP32. So we started to port the whole Z-wave library for ESP32 and succeeded. Finally, we had the most compact and most affordable Z-wave gateway on the market.
Why ESP32?
IoT technologies have proven their worth over the years and, as developers, we have a great many tools available to us today for developing exceptional IoT products compared to 5 or 10 years ago. ESP32 is definitely one of those tools and there are many reasons as to why this is so:
- Its price tag and availability
- Wi-Fi and Bluetooth in a single SoC
- Great hardware features with many peripheral interfaces, different power modes, and cryptographic hardware acceleration
- Variants for different requirements, in terms of both chips and modules
- Advanced development platforms and frameworks
- A huge community
- And finally, native integration with top cloud infrastructures
These are the reasons for putting ESP32 at the top of your SoC selection list if you require a Wi-Fi SoC in your project.
ESP32 features
Since the introduction of the first ESP32 on the market, Espressif launched several variants of ESP32 and most recently, in 2020, they introduced ESP32-S2 series chips. The ESP32 family is a general-purpose, feature-rich, and versatile SoC solution that you can use in many different types of IoT projects where you require Wi-Fi connectivity. Let's have a quick look at the main features:
- CPU and memory: 32-bit Xtensa® LX6 microprocessor with a clock frequency/MIPS of up to 240 MHz/600 MIPS. Single- or dual-core variants. 448 KB ROM, 520 KB SRAM, and 16 KB RTC memory. Support for external SPI flash and SPI RAM for module variants. DMA for peripherals.
- Connectivity: Wi-Fi 802.11 n (2.4 GHz) up to 150 Mbps (STA and softAP modes) and Bluetooth-compliant with Bluetooth v4.2 BR/EDR and BLE specifications.
- Peripheral interfaces: GPIOs, ADC, DAC, SPI, I2C, I2S, UART, eMMC/SD (chip variants), CAN, IR, PWM, touch sensor, and hall sensor.
- Security: Cryptographic hardware acceleration (random number, hash, AES, RSA, and ECC), 1024-bit OTP, secure boot, and flash encryption.
- Power modes: Different power modes with the help of an Ultra-Low-Power (ULP) co-processor and a Real-Time Clock (RTC). 100 μA power consumption in deep-sleep mode (ULP active).
The new ESP32-S2 series is a bit different, with some notable differences including the following:
- Single core.
- No Bluetooth.
- No support for SD/eMMC, but USB OTG has been added.
- Enhanced security features.
To make hardware design easier, Espressif provides different ESP32 modules with different configurations. Variable parameters for the modules are the ESP32 chip variant, external flash (4, 8, or 16 MB), external SRAM, and the antenna type. We can select among modules with a PCB antenna, or there is an external antenna option realized with the help of a U.FL/IPEX connector. On the ESP32-S2 side, we have only one module option as of the time of writing this book. Most of the time, it is enough to choose one of those modules in your projects. However, if you require a specific ESP32 chip, for example, one with high-temperature operation, then you need to use a corresponding chip variant such as ESP32-U4WDH and design your PCB accordingly. You can find available modules on the Espressif website here: https://docs.espressif.com/projects/esp-idf/en/latest/esp32/hw-reference/index.html.
The following photo shows an ESP32-WROOM-32D module with an integrated onboard antenna:

Figure 1.2 – ESP32-WROOM-32D module
As a development kit, we can find many boards from different vendors on the market. We can easily start to develop with such a kit without the need for the actual hardware design and prototype of the final product. All models integrate a USB-UART bridge chip and a USB port, so we only need to plug the kit into our development PC to flash and test the firmware:
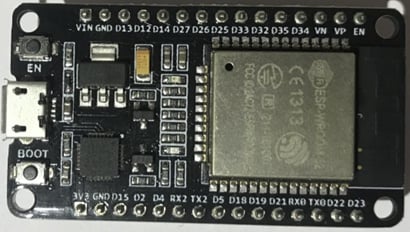
Figure 1.3 – DOIT ESP32 Devkit v1
Following this introduction to the hardware, we can continue with the firmware development platforms and frameworks.