

In this example, we will cover in detail as to how to write code for a slightly more complicated AngularJS app. This app is modified from the official example found at angularjs.org. This example will be used as a base when we convert it from a web application to a PhoneGap application.
For starters, create the index.html and todo.js files. Just for your information, the code found in this section can be found in the todo folder in Chapter 1.
We need to prepare our HTML file so that we can make use of AngularJS. Similar to the previous concepts.html file, you will see that we have included the use of AngularJS via script. Open up your index.html file in your favorite editor and you can start by adding the following code:
<!doctype html>
<html ng-app>
  <head>
    <script src="https://ajax.googleapis.com/ajax/libs/angularjs/1.2.12/angular.min.js"></script>
    <script src="todo.js"></script>
    <link rel="stylesheet" href="http://netdna.bootstrapcdn.com/bootstrap/3.0.3/css/bootstrap.min.css">
    <style>
      body {
        padding:40px;
      }
      #todoDetails {
        visibility: hidden;
      }
    </style>
  </head>
  <body>
    <div class="row"  ng-controller="todoCtrl">
      <div class="col-md-6">
        <h2>Todo</h2>
        <div>
          <span>{{getRemaining()}} of {{todos.length}} remaining</span>
          [ <button ng-click="archive()">archive</button> ]
          <ul class="unstyled">
            <li ng-repeat="todo in todos">
              <input type="checkbox" ng-model="todo.done">
              <span class="done-{{todo.done}}">{{todo.text}}</span>
              <button ng-click="showDetail(todo.text)">Detail</button>
            </li>
          </ul>
          <form ng-submit="addTodo()">
            <input type="text" ng-model="todoText"  size="30"
                   placeholder="add new todo here">
            <input class="btn-primary" type="submit" value="add">
          </form>
        </div>
      </div>
      <div id="todoDetails" class="col-md-6" >
        <h2>Details</h2>
        Title: <span id="title">{{currentText}}</span>
        <br>
        Add Details:
        <form ng-submit="addDetails()">
          <textarea id="details" ng-model="currentDetails">{{currentDetails}}</textarea>
          <p>
          <input class="btn-primary" type="submit" value="Add Details">
          <input class="btn-primary" type="submit" value="Cancel" ng-click="closeThis()">
        </p>
        </form>
      </div>
    </div>
  </body>
</html>
Now, to make sure that you are on the same page as I am, I want you to open this file in your favorite browser. You should see something like the following screenshot:

Our HTML template
Got the previous code? It looks weird now due to the fact that we have not added the main JavaScript functionalities. We will be working on it in the next section.
Now, let me explain the code; notice that I have highlighted a few lines of it. These are the most important lines of the code that you should take note of in this example. The remaining lines are just the usual HTML code.
The first two lines of the highlighted code simply install AngularJS and include BootStrap 3's CSS for styling purposes. Without both, the project will not work and may not look good.
The
ng-controllerdirective is what we covered briefly earlier on in this chapter. We are applyingtodoCtrlto this block of HTML.The
ng-clickdirective is another directive that we did not touch on in the previous section. Whatng-clickdoes is that it executes whatever function is defined for this directive. In our example,ng-click="archive()"means that on clicking it,archive()will be executed. The JavaScript functionarchive()is written in ourtodo.jsfile, which we will cover later.The
ng-repeatdirective is a directive that loops through a collection. Notice how we implementedng-repeatin our HTML code:<li ng-repeat="todo in todos"> <input type="checkbox" ng-model="todo.done"> <span class="done-{{todo.done}}">{{todo.text}}</span> <button ng-click="showDetail(todo.text)">Detail</button> </li>Anything that is within
<li>is dependent on thetodoobject, which is part of thetodoscollection.The
ng-submitdirective is generally used in forms. This is a directive which controls what is being done on the submit form. In this case, on the submit form, we will execute the JavaScript functionaddToDo().The
[]option encapsulates<button ng-click="archive()">archive</button>, which simply adds a square bracket around the button.
Now we will open our todo.js file, which we created in the previous section. Open todo.js in your favorite text editor. Let us begin by coding the following:
function todoCtrl($scope) {

}
We are first going to define a controller, which we will be using for our app. Notice that we have named it todoCtrl, which is mapped onto ng-controller in the HTML file (index.html), where ng-controller="todoCtrl" means that todoCtrl will be controlling this portion of the web page.
Also, notice the use of $scope, which is an object that refers to the application model; it is the execution context for related expressions, such as ng-click, ng-model, and so on. Any such expressions of a predefined directive outside this scope will not be executed.
Let's start by initializing our to-do list. Within todoCtrl, add the following code:
  $scope.todos = [
    {text:'here is my first to do', done:true, details:''},
    {text:'continue writing chapter 1 for this book', done:false, details:''},
    {text:'work on chapter 2 examples', done:false, details:''}
  ];

  $scope.currentText = ''; // make the text empty
  $scope.currentDetails = ''; // make the text empty
What $scope.todos does is that it simply creates a list of objects, which contains the text, details, and whether this to-do is executed or not (true or false). Notice that todos here is mapped to the collection todos as seen in index.html, where ng-repeat is being used.
Let's move on by adding more functionalities. After $scope.currentDetails, add the following three JavaScript functions:
  $scope.addTodo = function() {
    $scope.todos.push({text:$scope.todoText, done:false, details:''});
    $scope.todoText = '';
  };

  $scope.remaining = function() {
    var count = 0;
    angular.forEach($scope.todos, function(todo) {
      count += todo.done ? 0 : 1;
    });
    return count;
  };

  $scope.archive = function() {
    var oldTodos = $scope.todos;
    $scope.todos = [];
    angular.forEach(oldTodos, function(todo) {
      if (!todo.done) $scope.todos.push(todo);
    });
  };
The $scope.todoText function resets todoText after it has been pushed into the array. The $scope.addTodo function does what it is suppose to do, simply adding a new to-do to the list of todos as defined earlier. The beauty of AngularJS is that it uses standard JavaScript data structures that make manipulation so much easier.
The $scope.getRemaining function simply calculates the number of items that are not done yet. Here, we can see two-way data-binding in action as this function executes whenever there is a change in the length of todos.
The $scope.archive function marks a to-do as done:true in standard JavaScript manner.
By now, you should have noticed that all the JavaScript functions defined here are being used in index.html under ng-controller="todoCtrl".
Let's now add three more JavaScript functions to complete the finishing touch for this sample application.
After the $scope.archive function, add the following functions:
  $scope.showDetail = function(text) {
    var result = $scope.todos.filter(function (obj) {
      return obj.text == text;
    })
    $scope.currentText = result[0].text;
    $scope.currentDetails = result[0].details;
    document.getElementById('todoDetails').style.visibility = 'visible';
  }

  $scope.closeThis = function() {
    $scope.currentText = '';
    $scope.currentDetails = '';
    document.getElementById('todoDetails').style.visibility = 'hidden';
  }

  $scope.addDetails = function(text) {
    var result = $scope.todos.filter(function (obj) {
      return obj.text == text;
    })
angular.forEach($scope.todos, function(todo) {
      if(todo.text == text) {
        todo.details = $scope.currentDetails;
      }
    });
    document.getElementById('todoDetails').style.visibility = 'hidden';

  }
The $scope.showDetail function simply retrieves the current to-do being clicked on and shows it on the div with ID #todoDetails. The visibility of the #todoDetails function is then set to visible.
The $scope.close function simply changes the visibility of #todoDetails to hidden.
Finally, $scope.addDetails adds the details of the todo item, and changes the visibility of #todoDetails to hidden once done.
Okay, so to see if we are on the same page, we now need to check our code. Save this file as todo.js. Refresh your browser and you should still see the same user interface as per the previous screenshot.
Now, try clicking on the Detail button in front of work on chapter 2 examples, and you should see the following screenshot:
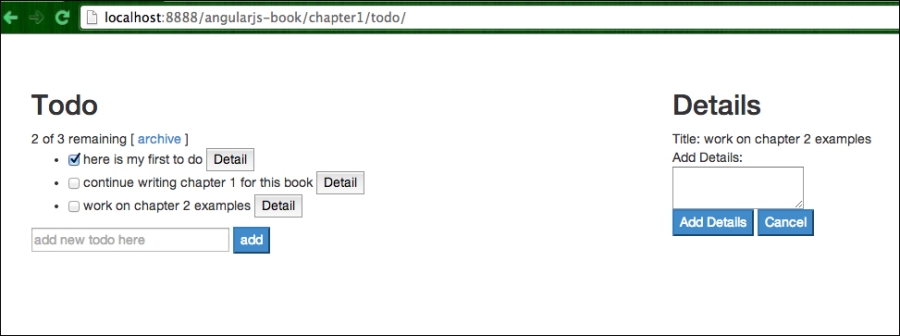
Details of the ToDo item shows on clicking on the corresponding detail button
You will see the details of a particular to-do item. You can try to add some details for this item and click on Add Details. You can then click on other items and come back to this item later (without refreshing the browser), and you should still see the details in the text area.
You can also check off any of the items and you will see that the number of remaining to-do item decreases:

Number of items changes dynamically as you check off items
And of course, you can add new items by simply typing in the input box and clicking on the add button. You should notice that the number of items now increases:

Adding new to-dos changes the number of items dynamically and also shows on the screen immediately