
The most obvious way to describe Swift is to compare it with Objective-C, which was the reference programming language for building Cocoa apps. Objective-C is an object-oriented programming language with similarities to dynamic languages, such as Ruby or Python. It is built on top of C, to which Apple has added features to make it modern, such as blocks, properties, and an Automatic Reference Counter (ARC) to manage the memory.
Swift is an object-oriented programming language with some functional programming characteristics. It aims to flatten the learning curve for the beginner, and to also provide more advanced features for the expert, adding more checks at runtime that could help make apps safer.
Objective-C is a loosely static-typed language; every variable must have a type, but it's possible to define a variable using the id type, reaching a sort of dynamic typing, where the type is evaluated at runtime. Thanks to its powerful runtime environment, it's possible to change the structure of a class; for example, adding a method or variable at runtime. This makes Objective-C a really flexible language, but it is also difficult to manage and prone to creating subtle bugs that are difficult to catch at runtime.
Swift is a strong static-typed language. This means that the type of a variable must be set and is evaluated at compile time. It also lacks any kind of metaprogramming at runtime, but this sternness, added to the functional patterns it supports, should help programmers eliminate an entire class of bugs, allowing apps to be more robust in a faster way.
However, the best way to learn a language is to play with it, and Xcode 7 has brought forth a really nice way to do it.
Usually, the only way to experiment and learn a language until Xcode 5 was by creating a new app and writing code inside any method of that app. Then, you would compile and run it, reading the log or stopping using the debugger.
Xcode introduced the concept of a playground, which isn't an app or a program to be built, but a source file that is constantly compiled and evaluated every time it changes.
Xcode 7 can be downloaded for free from the Mac App Store at http://www.apple.com/osx/apps/app-store/. Once it is installed, go to File | New | Playground, as shown in the following screenshot:

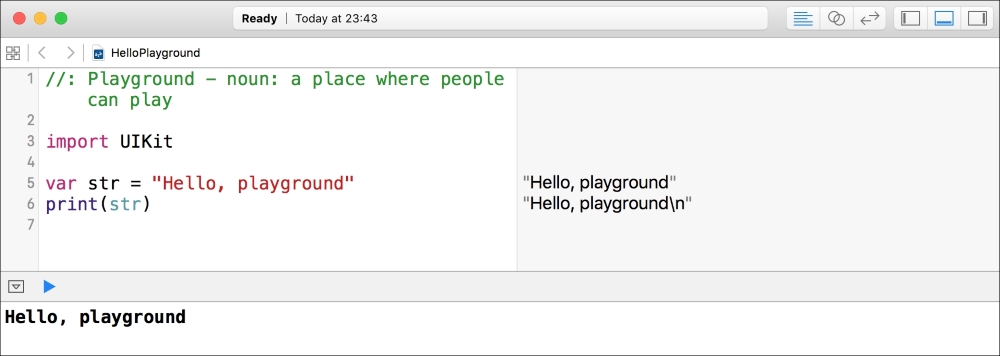
Without changing anything, you have created your first Swift program! The following screenshot shows our first program:

The playground is split into two windows: to the left is our code, and to the right is the evaluation of the code on the left-hand side.
If we change the string from "Hello, playground" to "Hello, world", as you can see in the following screenshot, the code is compiled and run without the need to select anything from the menu. This is because the compilation is triggered by the saving operation:

If we make an error, for example, by removing the closing quote from the string, the left part presents a red dot. This dot shows the error type when we click on it. Notice that the right part still presents the result of the previous run. This screenshot displays how the playground shows an error:

With the print() function, it is possible to print messages on a debug console, which can be opened by clicking on the triangle on the bottom left, as shown in the following screenshot:

The console is basically another view just below the playground view, as you can see in this screenshot:
There is much more to learn about playground, but even with this much knowledge, we can dive into Swift without further ado.
As already said, Swift is a strongly typed language, which means that every variable must be declared with the type it holds:
let name: String = "Paul"
let age: Int = 27
Tip
Downloading the example code
You can download the example code files for this book from your account at http://www.packtpub.com. If you purchased this book elsewhere, you can visit http://www.packtpub.com/support and register to have the files e-mailed directly to you.
Using the let keyword, we define a constant variable that cannot change its value and, as in math, the constant becomes the identity of the value itself. The following screenshot shows what the console looks like when we try to change the constant after we have defined it:

To define a variable, we can use the var keyword:
var name: String = "Paul"
var age: Int = 27
name = "John"
age = 29
We can change the value of a variable, paying attention to set a new value of the same kind. Otherwise, an error will be raised, as shown in this screenshot:

Speaking of type declaration, Swift is smarter than just requiring the type of a variable. If the value of the variable is set during its declaration, Swift can understand the type without the need for an explicit type. This feature is called type inference, and it allows us to create more concise code. For example, we can write code like the following:
let bassPlayer = "Paul"
let bassPlayerAge = 27
let guitarPlayer = "John"
let guitarPlayerAge = 29
Obviously, the type is mandatory if a variable is declared without being initialized:
var bassPlayer: String
var bassPlayerAge: Int
var guitarPlayer: String
var guitarPlayerAge: Int
Because it's really difficult to track all the changes made to a mutable variable, it is good practice to use constants as much as we can and use variables only to contain the status in a small and well-defined scope in which it's easy to understand whether the code is correct or not.
A variable is the minimum information that we can handle, but, sometimes, it is useful to group variables together. Swift provides three types of containers for this purpose: tuple, array, and dictionary.
A tuple is a limited set of heterogeneous values, like this, for example:
let bassPlayer = (name: "Paul", surname: "McCartney", age: 27)
In the declaration of a tuple, each piece of information is separated by a comma (,), each variable is a name-value pair separated by a colon (:), and all the elements are surrounded by a pair of parentheses.
To access the elements of a tuple, it is possible to use a dot notation, specifying the name of a variable:
bassPlayer.name    // Paul
bassPlayer.surname // McCartney
bassPlayer.age     // 27
A tuple can also be defined as an unnamed collection, that is, without specifying the names of the elements:
let bassPlayer = ("Paul", "McCartney", 27)In this case, to access the elements, we must use their positions inside the tuple:
bassPlayer.0 // Paul
bassPlayer.1 // McCartney
bassPlayer.2 // 27
It is also possible to unwrap the values of a tuple and use them in simple external values, assigning each value inside the tuple to specific variables:
let bassPlayer = ("Paul", "McCartney", 27)
let (name, surname, age) = bassPlayer
print(name)
print(surname)
print(age)
An array is an unnamed list of homogeneous values:
var band = ["Paul", "John"]
An array has a number of elements. These elements can be asked for using the count property:
band.count // 2
Each element can be accessed using square brackets ([]) around the index of the value:
band[0] // Paul
band[1] // John
Just as in a tuple, the first index starts from 0.
Unlike Objective-C, where containers have mutable and immutable implementation, in Swift, it depends on the way in which the variable is declared with let or with var.
If an array is mutable, we can change the value at a particular index, but we can also add elements using the append method:
band.append("George")
band.append("Ringo")
Moreover, using the sum operator (+), it is possible to create a new array that contains all the elements of the two previous arrays:
let theBeatles = band + ["George", "Ringo"]
The third container Swift provides is a dictionary, which is a sort of named-index array. Its syntax is similar to that of a tuple using a name-value list separated by commas and surrounded by square brackets:
var band = ["bass": "Paul", "guitar": "John"]
Each value can be reached using the key inside the square brackets:
band["bass"]   // Optional("Paul")
band["guitar"] // Optional("John")
The value retrieved is not exactly the same value we inserted during the initialization, but it is wrapped by an optional value, which means that the result can be either a real value or nil. For example, if we use a key that is not present, the value returned is nil:
band["keyboard"] // nil
We'll see optional values later in this chapter. For the moment, it's enough to know that to extract the value from an optional, we must use the exclamation mark (!). Pay attention: you must do this only if you are sure that a value is inside an optional value. Otherwise, a runtime error will occur, as shown in this screenshot:

The most basic construct used to control the flow is the conditional check, which executes a piece of code if the condition provided is true:
var name = "Jim"
if name == "Paul" {
    print("Let's play the bass")
} else if name == "John" {
    print("Let's play the guitar")
} else if name == "George" {
    print("Let's play the sitar")
} else if name == "Ringo" {
    print("Let's play the drums")
} else {
    print("What do you want to play?")
}
The parentheses around the condition are optional but the curly braces are required, even in the case of a single statement.
The switch block in Swift is more powerful than in other languages. It is a nicer way of writing a chain of if statements:
var name = "Jim"
switch name {
case "Paul":
    print("Let's play the bass")
case "John":
    print("Let's play the guitar")
case "George":
    print("Let's play the sitar")
case "Ringo":
    print("Let's play the drums")
default:
    print("What do you want to play?")
}
Whereas other languages' switch constructs handle-only integers, in Swift, we can have different types of conditional variables.
The list of possible values must be exhaustive, and, in this case, a default case must be provided.
A case block is executed until the entered variable's value matches the case. Swift is smart enough to break a case block on completion, so you don't have to explicitly break out of the switch at the end of a case's code.
If you want the same behavior of case in Objective-C, which means continuing if there is no break command before the next case statement, you must add the fallthrough keyword, as shown here:

As said earlier, switches are more than this, but we'll see better when we implement the apps.
Swift 2 brought another keyword to manage the flow: guard.
A guard keyword is a sort of check that ensures that a certain condition is met, otherwise the function exits.
For example:
    guard let data = db.getData() where data.count > 0 else {
        return
}
print("Data read from DB [\(data)")
As you can see, the role of the guard is to allow the flow only if the condition is valid; to note that the variable scoping works differently than the usual: the data variable is valid even after guard, and you can consider the variable created before the guard in the same scope as the guard itself.
Until now, we have created only linear code without jumping around or going back. It's now time to introduce the loop constructs provided by Swift. A loop is a statement that allows a block of code to be executed repeatedly, controlled by an exit condition.
The most basic kind is the while loop, where the loop is executed if a condition is true, as depicted in this screenshot:

To illustrate the while loop, we introduce the string format, which is a handy way to insert a part of code to evaluate inside a string using a backslash (\) followed by parenthesis (()). The contained element is evaluated and the result replaces the expression. In other programming languages, this is called interpolation.
Another kind of loop is fast enumeration, which permits to iterate through an array without using an index, but by accessing the values straightaway, as shown in the following screenshot:

If we want to fast-enumerate through an array, and have also provided the index of the item, we can use the enumerate function. The following screenshot shows the use of enumerate function, which basically returns an array of tuples containing the index and the value:

Swift is a multi-paradigm language that mixes object-oriented programming with functional patterns.
The former organizes the code around objects, which are constructs with variables and functions in imperative way. This means telling the software how to execute the instructions one after the other. The latter defines the structures and elements of code as an evaluation of functions in a declarative way, which means defining what the elements are instead of how the elements behave.
These two paradigms apparently opposite give more flexibility to the developer, who can leverage one or the other depending on the context.
In Swift, functions are first-class citizens, which means that they can be assigned to variables, or they can be passed as either parameters or return values of other functions.
A function in Swift is a named block of instructions that can be initialized, executed, passed as a parameter, or returned as a return value.
A function is declared using the func keyword and by enclosing the code to be executed around curly braces ({}):
func greet() {
    print("Hello, world!")
}
greet() // Hello, world!
In Swift, a function can be declared in an anonymous way; in this case, it is called a closure:
let greet = {
    print("Hello, world!")
}
greet() // Hello, world!
A function can have a parameter, which is defined inside parentheses:
func greet(name: String) {
    print("Hello, \(name)!")
}
greet("Jim") // Hello, Jim!
When a function is defined as a closure, the parameters are inside the open curly brace and the in keyword separates them from the block of instructions:
let greet = { (name: String) in
    print("Hello, \(name)!")
}
greet("Jim") // Hello, Jim!
A function can return a value, which is defined using the arrow (->) in the declaration:
func greet(name: String) -> String {
    return "Hello, \(name)!"
}
print(greet("Jim")) // Hello, Jim!
In a consistent manner, the closure defines the return value after the parameters:
let greet = { (name: String) -> String in
    return "Hello, \(name)!"
}
print(greet("Jim")) // Hello, Jim!
A function can have more than one parameter:
func greet(name: String, greeting: String) -> String {
    return "\(greeting), \(name)!"
}
print(greet("Jim", greeting: "Hi")) // Hi, Jim!
As we can see from this example, the parameters during the call are passed in a positional way: for the first, the label is omitted, but for the other, it is mandatory:
func greeting(firstname: String, surname: String) -> String {
    return "My name is \(surname), \(firstname) \(surname)"
}

greeting("James", surname:"Bond") //My name is Bond, James Bond
In this case, duplicating the name of the parameter in the declaration of the function and labels during calls becomes mandatory:
func greeting(firstname firstname: String, surname: String) -> String {
    return "My name is \(surname), \(firstname) \(surname)"
}

greeting(surname: "Bond", firstname: "James") //My name is James, Bond JamesEarlier in this chapter, we saw how to group variables using tuples; starting from this concept, Swift offers a way to create complex custom types through structs.
A struct is a container of different elements with the possibility to add functions to manipulate them.
Starting from the example we used for the tuple, we can define a struct in this way:
struct Player{
    let name: String
    let surname: String
    let age: Int
    let instrument: String
}

let bassPlayer = Player(name: "Paul", surname: "McCartney",age: 27, instrument: "bass")
let guitarPlayer = Player(name: "John", surname: "Lennon", age: 29, instrument: "guitar")
We can access the elements of a struct using the dot notation that we used for the named tuple:
guitarPlayer.name       // John
guitarPlayer.instrument // guitar
This form doesn't seem much different from a tuple, but the structs are more powerful than this.
For example, we can add a function inside the struct:
struct Player{
    let name: String
    let surname: String
    let age: Int
    let instrument: String
    func fullname() -> String{
        return "\(name) \(surname)"
    }
}
bassPlayer.fullname()  // Paul McCartney
One of the basic principles of functional programming is to have functions that deal only with immutable elements: they receive immutable objects and return immutable objects.
In this way, the mutable state is not shared in different places of the program, adding complexity to the code because a variable can be mutated in different places.
The struct construct was created with this principle in mind: to enforce immutability. When a struct variable is assigned to another variable, it is assigned by copy. This means that a new struct is created with the same values as the previous struct. The same happens when a struct is passed as a function argument. The nature of the struct is also known as the Value Type.
On the contrary, classes (which we'll see in the next section) are passed by reference. This means that only the address of the object is copied and the variable points to the same object.
As just mentioned, although it is better to have immutable structs, it's possible to define variables inside a struct, making it possible to change their values:
struct Player{
    var name: String
    var surname: String
    var age: Int
    var instrument: String
    func fullname() -> String{
        return "\(name) \(surname)"
    }
}

var guitarPlayer = Player(name: "John", surname: "Lennon",
    age: 29,
    instrument: "guitar")
guitarPlayer.fullname()             // John Lennon
guitarPlayer.name  = "Joe"
guitarPlayer.surname  = "Satriani"
guitarPlayer.fullname()            // Joe Satriani
As already said, a struct is a container of elements; these elements are called properties. Other related properties can be created starting from already defined properties.
A struct in Swift offers the mechanism of computed properties to create related properties. These are basically functions disguised as properties:
struct Player{
    var name: String
    var surname: String
    var age: Int
    var instrument: String
    var fullname: String {
        return "\(name) \(surname)"
    }
}

var guitarPlayer = Player(name: "John", surname: "Lennon",
    age: 29,
    instrument: "guitar")

print(guitarPlayer.fullname) //John Lennon
Note that from a caller point of view, a computed property is indistinguishable from a defined property, so it's also possible to define a way to change it:
import Foundation

struct Player{
    var name: String
    var surname: String
    var age: Int
    var instrument: String
    var fullname: String {
        get { return "\(name) \(surname)" }
        set(newFullname) {
          let names = newFullname.componentsSeparatedByString(" ")
          name = names[0]
          surname = names[1]
        }
    }
}
var guitarPlayer = Player(name: "John", surname: "Lennon",
    age: 29,
    instrument: "guitar")

guitarPlayer.fullname = "Joe Satriani"
print(guitarPlayer.name)    //Joe
print(guitarPlayer.surname) //Satriani
There are a few things to talk about in this snippet.
First of all, we needed to use import Foundation to use the componentsSeparatedByString method, which creates an array of elements, splitting the string using the parameter string as a separator.
Inside the definition of the computed property, we defined two functions: a getter (get), which is the same code that we used in the previous example, and a setter (set), which accepts a string as a parameter. In the function body, split the parameter in tokens, separated by an empty space, and assign the first value to name and the second to surname.
As already mentioned, a struct is a value type in Swift, such as an integer, a string, an array, and so on. This means that an instance of a struct is copied when assigned to a new variable or passed as a parameter:
struct Player{
    var name: String
    var surname: String
    var age: Int
    var instrument: String
}

var originalPlayer = Player(name: "John", surname: "Lennon",
    age: 29,
    instrument: "guitar")

var newPlayer = originalPlayer
newPlayer.name = "Joe"
newPlayer.surname = "Satriani"

originalPlayer.surname // Lennon
newPlayer.surname      // Satriani
A struct is also copied when it is passed a parameter in a function:
var originalPlayer = Player(name: "John", surname: "Lennon",
    age: 29,
    instrument: "guitar")

func transformPlayer(var player: Player) -> Player {
    player.name = "Joe"
    player.surname = "Satriani"
    return player
}

var newPlayer = transformPlayer(originalPlayer)

originalPlayer.surname // Lennon
newPlayer.surname      // Satriani
This knowledge of structs is enough to start using them efficiently.
If you already know another object-oriented programming language, you might be wondering whether there are classes in Swift, and, if so, why we haven't introduced them earlier.
Of course there are! In the end, the main purpose of Swift is to create iOS or OS X apps using Cocoa, which is an object-oriented framework.
Nevertheless, with Swift being a multi-paradigm programming language, classes are no longer the central concepts around which everything is built, as in object-oriented languages. However, they are a way to encapsulate the business logic.
Let's explore classes by altering the previous example to use classes instead of structs:
class Player{
    var name: String
    var surname: String
    var age: Int
    var instrument: String
    init(name: String, surname: String, age: Int, instrument: String){
        self.name = name
        self.surname = surname
        self.age = age
        self.instrument = instrument
    }
}

var originalPlayer = Player(name: "John", surname: "Lennon", age: 29, instrument: "guitar")
Basically, instead of the struct keyword, we used class, and we also needed to provide an initializer with all the parameters to initialize the instance (a constructor is a method called when the object is instantiated and initialized).
At first sight, it seems that class and struct are the same construct, but, in reality, the difference is substantial and relative to the nature of the two constructs.
The main difference is that an instance of a class is copied by reference. This means that the object isn't copied, but the reference of the object is copied, so when we change the new object, we are changing the original object as well.
Let's convert the example of the structs using a class:
var originalPlayer = Player(name: "John", surname: "Lennon", age: 29, instrument: "guitar")
func transformPlayer(var player: Player) -> Player {
    player.name = "Joe"
    player.surname = "Satriani"
    return player
}

var newPlayer = transformPlayer(originalPlayer)

originalPlayer.surname // Satriani
newPlayer.surname      // Satriani
We can see in the log of the playground that the function changed originalPlayer as well.
The other main difference is that a class supports inheritance. This means that we can create a specialized version of a class, which is still of the same category as the original class but has more characteristics:
class Guitarist: Player{
    var guitarBrand: String
    init(name: String, surname: String, age: Int, guitarBrand: String){
        self.guitarBrand = guitarBrand
        super.init(name: name, surname: name, age: age, instrument: "guitar")
    }
}

var alienGuitarist = Guitarist(name: "Joe", surname: "Satriani", age: 31, guitarBrand: "guitar")
So, a guitarist is basically a player with a guitar.
Note that in the constructor, we need to initialize all the variables of our level (in our case, just one), and then call the parent initializer using the super keyword to continue the chain of initialization.
To help understand when to use a struct or a class, it is often stated to favor the use of structs over classes. When an object represents something concrete (for example, a view or a button), we must use a class. When we need to represent properties or values that don't exist as concrete real things, such as Coordinates or Rect, we must use structs.
A good way to tame the complexity of code is to separate what an object does from how it does it.
This is accomplished by defining the interface of an object, namely the properties and the methods of a class or a struct.
If the class or struct adheres to a protocol, it must implement all the methods defined in the protocol:
protocol Playable {
    func play()
}

class Player: Playable{

    //...

    func play() {
        // use instrument to play
    }
}
This allows us to call the defined methods without knowing the actual value of an instance:
func concert(band: [Playable]){
    for player in band {
        player.play()
    }
}
The concept of protocols is widely used in Cocoa for loose coupling and permitting an object to interact without knowing which kind of implementation it has.
In Swift 1.x, protocols just defined the interface that must be implemented, but from Swift 2.0, protocols can also have code than can be used in the implemented class or struct.
Let's see a simple example, implementing three different instrument players as a protocol:
protocol Guitarist {}
extension Guitarist {
    func playGuitar() {
        print("I'm playing a guitar")
    }
}

protocol BassPlayer {}
extension BassPlayer {
    func playBass() {
        print("I'm playing a bass guitar")
    }
}

protocol KeyboardPlayer {}
extension KeyboardPlayer {
    func playKeyboard() {
        print("I'm playing a keyboard")
    }
}
Given these, we can create a class that conforms to all of them:
class MultiInstrumentalist: Guitarist, BassPlayer, KeyboardPlayer{}Finally, let's instantiate an object and call the play function:
let trent = MultiInstrumentalist()
trent.playBass()     // I'm playing a bass guitar
trent.playGuitar()   // I'm playing a guitar
trent.playKeyboard() // I'm playing a keyboard
As you can see, although the class doesn't have any defined functions, it exposes the functions implemented in the protocols.
What if we redefine one of the protocol functions inside the implemented class? As you can imagine, the class functions take the precedence:
class MultiInstrumentalist: Guitarist, BassPlayer, KeyboardPlayer{
    func playGuitar() {
        print("I'm playing an amazing guitar")
    }
}

let trent = MultiInstrumentalist()
trent.playBass()     // I'm playing a bass guitar
trent.playGuitar()   // I'm playing an amazing guitar
trent.playKeyboard() // I'm playing a keyboard
Probably this is one of the most important new features in Swift 2.0, which allows you to compound complex behavior without creating unnecessary complex object hierarchy.
Note
The protocol extensions were introduced during the WWDC 2015 in a presentation called Protocol Oriented Programming in Swift. I strongly recommend you to watch it at https://developer.apple.com/videos/play/wwdc2015-408/.
We have already seen optional values when we discussed the dictionary.
The introduction of optional values is a radical, phenomenal change from Objective-C, where it is allowed to call a method on a nil object without crashing the app and the method call is silently discarded.
It might be handy in several occasions, but it can often create really subtle, difficult-to-track, bugs. For example, if some objects of the UI are not connected to the controller and we try to change their values, we send messages to nil and nothing happens, leaving us without a clue as to what happened.
On the other hand, when we try to insert a nil object into a collection such as array or dictionary, the app crashes at runtime.
Swift forces the developer to think of the nature of an element, whether it's always present or whether it could be nil.
An optional is declared using a question mark (?), and to make the code compile, the developer must check whether an optional value is nil before using it.
Also, an optional integer or optional string is not an ordinary integer or string; it's an integer or string wrapped in a container. To extract and evaluate the value inside the container, we must use the exclamation mark (!):
var optionalInt: Int?

if optionalInt != nil {
    let realInt = optionalInt!
    print("The value is [\(realInt)]")
} else {
    print("The value is nil!")
}
This pattern is so common that Swift allows us to create the unwrapped variable during the nil check:
var optionalInt: Int? = 3

if let realInt = optionalInt {
    print("The value is [\(realInt)]")
} else {
    print("The value is nil!")
}
As a good rule, it's recommended to use an optional as little as you can in your code, and to always check whether a variable is nil before using it.
Exploiting the fact that in Swift it is possible to define a non-optional variable from an option variable, with Swift 2.0 and the guard keyword, this is a very common patter to unwrap the optional:
var usefulValue: Int?
//….
guard let usefulValue = usefulValue else {
return
}
// Code that uses usefulValue
In this way the code is readable and safe.
Enumerations are common constructs in several programming languages, but in Swift they are really powerful.
They are used when we have a limited and well-defined set of possible values, for example, the code responses for HTTP or the suits of a card game.
While you can have only numeric-based enumerations in Objective-C, in Swift, enumerations can also be implemented with string:
enum Instrument: String {
    case Guitar = "guitar"
    case Bass = "bass"
    case Drums = "drums"
    case Sitar = "sitar"
    case Keyboard = "keyboard"
}
Using this enumeration, we can define a variable:
let instrument = Instrument.Drums
In this case, the constant infers the type from the initialization, but it is also possible to declare the type and use an abbreviated version of the value:
let instrument: Instrument = .Drums
Because the constant is an instrument, the compiler is expecting a value of the enumeration to assign to it, and it becomes superfluous when declaring the kind of enumerations on the right side.
We have already seen the switch construct, and it's really useful with enumeration, and in such a case, a statement contains a value of the enumeration:
let instrument: Instrument = .Drums

switch instrument {
case .Guitar:
    print("Let's play guitar")
case .Bass:
    print("Let's play bass")
case .Drums:
    print("Let's play drums")
case .Sitar:
    print("Let's play sitar")
case .Keyboard:
    print("Let's play keyboard")
}
// Let's play drums
As previously mentioned, the cases of a switch must be exhaustive and all possible values must have a case; this enforces Swift to eliminate, as much as it can, the chances of introducing bugs because of distraction or superficiality. For every case, as in optional values, the developer is forced to pay attention and make a decision, which can be wrong, of course, but at least it's not because he forgets to test a condition.
A really advanced feature of enumerations in Swift is the possibility to associate values with members. For example, we can add the number of strings for Guitar and the brand for Keyboard:
let keithEmersonInstrument: Instrument = .Keyboard("Hammond")
let steveVaiInstrument: Instrument = .Guitar(7)
let instrument = steveVaiInstrument

switch instrument {
case .Guitar(let numStrings):
    print("Let's play a \(numStrings) strings guitar")
case .Bass:
    print("Let's play bass")
case .Drums:
    print("Let's play drums")
case .Sitar:
    print("Let's play sitar")
case .Keyboard(let brand):
    print("Let's play a \(brand) keyboard")
}

// Let's play 7 strings guitar
Here, you can see that to extract the value from members, we need to use the binding inside the case.
Enumerations are more powerful than what we have seen in this section, but this is enough to understand their power, which, when linked with the features of switch statements, make them one of the most important additions to Swift.
As seen in the previous paragraph, the switch statement is really useful to decide the logic given an input.
For example, a check can be added to a case statement having defined an enum with associated values:
enum Instrument{
    case Guitar(numStrings: Int)
    case Keyboard(brand: String)
}

let instrument = Instrument.Guitar(numStrings: 7)
We can extract the logic using these statements:
switch instrument {
case .Guitar(numStrings: let numStrings)
    where numStrings == 7:
    print("Let's play 'For the Love of God'")
case .Guitar(numStrings: let numStrings)
    where numStrings == 12:
    print("Let's play 'Stairway to Heaven'")
case .Keyboard(brand: let brand)
    where brand == "Hammond":
    print("Let's play 'Tarkus'")
case .Keyboard(brand: let brand)
    where brand == "Korg":
    print("Let's play 'The Show Must Go On'")
default:
    print("Sorry, I can't suggest any song")
}
Sometimes the logic resides in the composition of the input; for example, if we have two instruments and we want the first one to decide the kind of the songs, we can exploit the switch with a tuple to decide it:
let firstInstrument = Instrument.Keyboard(brand: "Hammond")
let secondInstrument = Instrument.Guitar(numStrings: 7)

switch (firstInstrument, secondInstrument) {
case (.Guitar, _):
    print("Let's play a guitar song")
case (.Keyboard, _):
    print("Let's play a keyboard song")
}
Because we don't care of the second instrument, which can be the same as the first, we use the wildcard character ( _ ) that matches any value.
The final example I want to show is using the switch for a type casting pattern.
To define any possible type, class, struct, protocol, and so on, Swift provides the keyword Any.
import UIKit

var anUnknownObjct: Any?

anUnknownObjct = "Hello, World"

switch anUnknownObjct {
case nil:
    print("I cannot handle nil element")
case is UIView:
    print("I cannot handle graphic element")
case let value as String:
    print(value)
case let value as Int:
    print("The successor is \(value + 1)")
default:
    print("Unmatched object \(anUnknownObjct)")
}
Because we are not really interested in the value of the variable when the variable is a UIView, we just check is it is a UIView, whereas for the String and Int, we want to use that value so that we can bind it to a constant using let. If nothing matches, we just log the value.
To build the safest code possible, we must handle and manage errors in the most robust way possible.
Usually, each language has a particular way to handle the error, and Swift, as a successor of Objective-C, supports, and enhances, the Objective-C ways.
Historically, Objective-C did not have exception handling, which was added later through a class, NSException, and the MACROs NS_DURING, NS_HANDLER, and NS_ENDHANDLER.
This was the way to use them:
NS_DURING
{
    [obj riskyOperation];
    [safeObj safeOperation];
}
NS_HANDLER
    NSLog("Severe error happened!");
NS_ENDHANDLER
The code around the NS_DURING and NS_HANDLER ensures that if a exception is raised in the riskyOperation method, the execution is interrupted and the control is passed to the code inside NS_HANDLER and NS_ENDHANDLER.
This construct was very limited, for example it is impossible to define different exceptions to describe different error scenarios.
In OS X 10.3, native exception handling was added, basically importing the C++ mechanism.
It was then possible to write code like this:
@try {
    [obj riskyOperation];
    [safeObj safeOperation];
}
@catch (BadError *exception) {
    // Handle the exception…
}
@catch (TerribleError *exception) {
    // Handle the exception…
}
@catch (AwfulError *exception) {
    // Handle the exception…
}
@finally {
    // Clean up…
}
The pattern is similar to the implementation in other languages, like Java; the code in the @try block is guarded against any possible exception and if an exception is raised, the block related to that type of exception is executed.
The @finally block is executed regardless if an exception is raised or not.
Despite the fact that the implementation was seamlessly integrated with the rest of SDK, the Objective-C developers rarely used the exceptions as an error mechanism, and Apple itself suggested to use exceptions only for non recoverable errors.
The usual way to handle errors in Objective-C and Swift 1.x is through the use of a NSError variable passed as a parameter:
NSError *error;
BOOL success = [db saveData:data error:&error];
if (!success) {
    NSLog("Unexpected error [%@]", error);
} else {
    NSLog("Success");
}
This code is translated literally in Swift 1.x:
Var error: NSError?
let success = db.saveData(data, error:&error)
if!success {
    print("Unexpected error [\(error)]")
} else {
    print("Success")
}
Although the previous code is still valid in Swift 2.0, one of the biggest improvements in the new version of the language is the introduction of the exception handling mechanism.
The previous code could be rewritten as:
do {
try db.saveData(data)
}
catch ErrorType {
print("Unexpected error happened")
}
Although the syntax is similar to Objective-C, the exceptions in Swift are more lightweight: for example the stack is not unwind like in Objctive-C, which can lead to a memory leak, but it just exists from the scope.
Also, in Objective-C, all the exceptions are resolved at runtime, leading to some performance issues, but in Swift, part of those, mainly when there are concatenations of functions that can throw exceptions, can be optimized at compile time.
The exceptions must be defined as an enum implementing ErrorType.
Let's see a simple example where we implement a class, called Vault, and where we encrypt a string passing a password; the Vault uses exceptions to notify an invaded password.
First of all, it defines the possible exceptions:
enum VaultError: ErrorType {
    case Empty
    case Short
    case Invalid(String)
    case AlreadyEncrypted
}
These cases describe the scenario when a password is either too short, empty, or invalid, and also the case when we try to encrypt an already encrypted Vault class.
Then, we implement a simple Vault class:
class Vault {
    private let unencryptedData: String
    private var encryptedData: String?
    init(data: String){
        unencryptedData = data
    }

    func encryptWithPassword(password: String) throws {
        guard password.characters.count > 0 else {
            throw VaultError.Empty
        }
        guard password.characters.count >= 5 else {
            throw VaultError.Short
        }

        guard isValid(password) else {
            throw VaultError.Invalid("The password must contains numbers and letters, lowercase and uppercase.")
        }

        guard encryptedData == nil else {
            throw VaultError.AlreadyEncrypted
        }

        encryptedData = encryptData(unencryptedData,
                          password: password)
    }
}
As you can see, the signature of encryptWithPassword() is decorated with the throws instruction so that the compile knows that the function can throw exceptions and force the use of the keyword try; a big difference with the Objective-C exceptions is that in Swift 2.0, the developer is forced to handle the exceptions, even with an empty implementation, but at least the compiler gives you an option to try to manage a possible error.
Going back to our example:
let dataToEncrypt = "Some super important stuff!"
let password = "23Hello_42"

let vault = Vault(data: dataToEncrypt)

do {
    try vault.encryptWithPassword(password)
}
catch VaultError.Empty {
    print("You should provide a password")
}
catch VaultError.Short {
    print("The password should be at least 5 characters")
}
catch VaultError.Invalid(let message) {
    print(message)
}
catch VaultError.AlreadyEncrypted {
    print("It's not possible to encrypt twice")
}
As you can see, all the case must be handled.
Sometime we are really sure that a function doesn't throw an exception and we have already checked the validity of the password before passing it to the Vault; for example, in this case we can use try!, whose behavior is similar to an implicitly unwrapped optional value with the risk of a crash if the function raises an exception:
try! vault.encryptWithPassword(password)
What if we need to clean up resources regardless if the encryption succeeds? Swift 2.0 implemented, and improved, the @finally{} pattern, calling it defer:
let vault = Vault(data: dataToEncrypt)
defer {
    vault.destroy()
}
Besides the fact that the defer block should be the last block of the exception handling, another interesting characteristic is that it is possible to define multiple defers for the same scope and Swift will call all of them in the same order it found was declared in the scope.
One of the more exciting peculiarities of Swift is the introduction of functional programming patterns in the language.
As already mentioned, we can define functional programming as a paradigm where the focus, instead of steps of instructions to be executed, is on declaring the program as an evaluation of pure functions avoiding mutable state.
Although Swift cannot be considered a functional language, http://robnapier.net/swift-is-not-functional, it allows you to mix imperative and Object-Oriented Programming (OOP) concepts with functional patterns.
One important concept to include in Swift is that its functions are High Order Functions that means that they can accept functions as parameters and that can return functions as a return value.
Let's show the subject with an example.
Having defined two functions:
import Foundation

func square(value: Int) -> Int {
    return value * value
}

func cube(value: Int) -> Int {
    return value * value * value
}
Let's define a function that randomly returns one of those:
func randFunc() -> (Int) -> Int {
    if Int(arc4random_uniform(UInt32(100))) > 50 {
        return square
    } else {
        return cube
    }
}
Then, define a function that accepts another function as a parameter:
func average(v1: Int, v2: Int, f: (Int)->Int) -> Int {
    return (f(v1) + f(v2))/2
}
Finally, we can use them like this:
average(3, v2: 5, f: randFunc()) // 17 or 76
The collection category in Swift implements some High Order Functions that can be used to concatenate transformation.
Let's see the first one: map().
This function is used when we want to transform an array of A elements to an array of B elements using a function that transforms A to B.
Giving, for example, an array of double, we want to map it to an array of string, prepending it the dollar symbol:
let notes = [5, 10, 20, 50, 20, 10]
notes.map { note in
    return "$\(note)"
}
// ["$5", "$10", "$20", "$50", "$20", "$10"]
Because the transform function is really simple, we can use the succinct form allowed by Swift, removing the input variable declaration and using the positional value ($) as the first parameter, $0 the third, and so on) and suppressing the return.
let notes = [5, 10, 20, 50, 20, 10]
notes.map { "$\($0)" }
// ["$5", "$10", "$20", "$50", "$20", "$10"]
The result is the same as the more conventional fast enumeration:
let notes = [5, 10, 20, 50, 20, 10]
var dollars = [String]()
for note in notes {
    dollars.append("$\(note)")
}
// ["$5", "$10", "$20", "$50", "$20", "$10"]
This way, though, avoids the creation of a temporary mutable structure and can be used to concatenate transformation. Moreover, the emphasis is on what to do instead of how to do it.
Another important function is the filter() function, which iterates on the array and checks if every element satisfies a closure passed as a parameter. Let's imagine wanting to filter out all the notes greater or equal to 50:
let notes = [5, 10, 20, 50, 20, 10]
notes.filter { note in
    return note < 50
}
// [5, 10, 20, 20, 10]
Again, we can use the succinct form:
let notes = [5, 10, 20, 50, 20, 10]
notes.filter { $0 < 50 }
// [5, 10, 20, 20, 10]
The third important High Order Function is reduce(), which accumulates the values in a variable, applying the passed closure to each element.
Let's assume we want to sum the notes:
let notes = [5, 10, 20, 50, 20, 10]
notes.reduce(0) { accumulator, element in
    return accumulator + element
}
// 115
We pass the first value and a function to apply to each value.
The closure can also be written like this:
let notes = [5, 10, 20, 50, 20, 10]
notes.reduce(0) { $0 + $1}
// 115
Because the operator + is a function that accepts two Int as parameters and returns the sum, the reduce() function can be even reduced like:
let notes = [5, 10, 20, 50, 20, 10]
notes.reduce(0, combine: +)
// 115
The power of these functions lies in the fact that we can concatenate them, and to sum the notes less than 50 we can write:
let notes = [5, 10, 20, 50, 20, 10]
notes.filter { $0 < 50 }.reduce(0, combine: +)
// 65
Swift 2.0 brought an alternative to fast enumeration to iterate on elements: forEach().
The syntax is similar to map(), but the difference is that forEach() doesn't return any values but operates on the element.
For example, to print the dollar value of each note, we could write:
let notes = [5, 10, 20, 50, 20, 10]
notes.forEach { note in
    print("$\(note)")
}
// $5
// $10
// $20
// $50
// $20
// $10
Finally, the last High Order Function I want to present is the flatMap(), which flattens every contained element in the array:
let notes = [[5, 10, 20], [50, 20, 10]]
notes.flatMap { $0 }
// [5, 10, 20, 50, 20, 10]
Another valuable use of the flatMap() is to filter out the nil values:
func filterGreaterThan50(value: Int?) -> Int? {
    guard let value = value else {
        return nil
    }
    if value < 50 {
        return value
    }
    return nil
}
let notes: [Int?] = [5, nil, 10, 20, nil, 50, 20, 10]
let a = notes
        .map{filterGreaterThan50($0)}
        .flatMap { $0 }
// [5, 10, 20, 20, 10]