To start off the new TripLog mobile app project, we need to create the initial solution architecture. We can also create the core shell of our app's user interface by creating the initial screens based on the basic features we just defined.
We will start things off by creating a brand new, blank Xamarin.Forms solution within Xamarin Studio, using the following steps:
- In Xamarin Studio, click File | New | Solution. This will bring up a series of dialog screens that will walk you through creating a new Xamarin.Forms solution. On the first dialog, select App on the left, under the Cross-platform section, and then select Xamarin.Forms App in the middle and click Next, as shown in the following screenshot:
- On the next dialog screen, enter the name of the app, TripLog, and make sure Use Portable Class Library is selected for the Shared Code option, as shown in the following screenshot:
- On the final dialog screen, simply click the Create button, as shown in the following screenshot:
After creating the new Xamarin.Forms solution, you will have several projects created within it, as shown in the following screenshot:
There will be a single portable class library project and two platform-specific projects:
- TripLog: This is a portable class library project that will serve as the "core" layer of the solution architecture. This is the layer that will include all of our business logic, data objects, Xamarin.Forms pages, and other non-platform-specific code. The code in this project is common and not specific to a particular platform and therefore can be shared across the platform projects.
- TripLog.iOS: This is the iOS platform-specific project containing all of the code and assets required to build and deploy the iOS app from this solution. By default, it will have a reference to the TripLog core project.
- TripLog.Droid: This is the Android platform-specific project containing all of the code and assets required to build and deploy the Android app from this solution. By default, it will have a reference to the TripLog core project.
Note
If you are using Xamarin Studio on a Windows machine, you will only get an Android project when you create a new Xamarin.Forms solution.
In order to include a Windows (WinRT) app in your Xamarin.Forms solution, you will need to use Visual Studio on a Windows machine.
Although the screenshots and samples throughout this book are demonstrated using Xamarin Studio on a Mac, the code and concepts will work in Xamarin Studio and Visual Studio on a Windows machine as well. Refer to the Preface for further details on software and hardware requirements that need to be met in order to follow along with the concepts in this book.
You'll notice a file in the core library named TripLog.cs, which contains a class named App that inherits from Xamarin.Forms.Application. Initially, the App constructor sets the MainPage property to a new instance of ContentPage that simply displays some default text. The first thing we are going to do in our TripLog app is to build the initial views, or screens, required for our UI, and then update that MainPage property of the App class in TripLog.cs.
Updating the Xamarin.Forms packages
If you expand the
Packages folder within each of the projects in the solution, you will see that Xamarin.Forms is actually a NuGet package that is automatically included when we select the Xamarin.Forms project template. It is possible that the included NuGet packages are out of date and need to be updated, so be sure to update them in each of the projects within the solution, so that you are using the latest version of Xamarin.Forms.
The main page of the app will serve as the main entry point into the app and will display a list of existing trip log entries. Our trip log entries will be represented by a data model named TripLogEntry. Models are a key pillar in the MVVM pattern and data-binding, which we will explore more in Chapter 2, MVVM and Data Binding; but in this chapter, we will just create a simple class that will represent the TripLogEntry model. Let us now start creating the main page:
- First, add a new Xamarin.Forms
ContentPage to the project by right-clicking on the TripLog core project, clicking Add, and then clicking New File. This will bring up the New File dialog screen, as shown in the following screenshot: - On the New File dialog screen, select Forms in the left pane and then select Forms ContentPage in the right pane. Name the new file MainPage and click the New button.
- Next, update the
MainPage property of the App class to a new instance of Xamarin.Forms.NavigationPage whose root is a new instance of TripLog.MainPage that we just created: - Create a folder in the TripLog core project named Models, and create a new empty class file in that folder named
TripLogEntry. - Update the
TripLogEntry class with the following auto-implemented properties: - Now that we have a model to represent our trip log entries, we can use it to display some trips on the main page using a
ListView. We will use a DataTemplate to describe how the model data should be displayed in each of the rows in the ListView using the following code:
At this point, we have a single page that is displayed as the app's main page. If we debug the app and run it in a simulator, emulator, or on a physical device, we should see the main page showing the list of the log entries we hard-coded into the view, like in the following screenshot. In Chapter 2, MVVM and Data Binding, we will refactor this quite a bit as we implement MVVM and leverage the benefits of data-binding.
Creating the new entry page
The new entry page of the app will give the user a way to add a new log entry by presenting a series of fields to collect the log entry details. There are several ways to build a form to collect data in Xamarin.Forms. You can simply use a StackLayout and present a stack of Label and Entry controls on the screen. You can also use a TableView with various types of ViewCells. In most cases, a TableView will give you a very nice default, platform-specific look-and-feel; however, if your design calls for a more custom look-and-feel, you might be better off leveraging the other layout options available in Xamarin.Forms. For the purposes of this app, we're going to use a TableView.
There are some key data points we need to collect when our users log new entries with the app, such as Title, Location, Date, Rating, and Notes. For now, we're going to use a regular EntryCell for each of these fields. We will update, customize, and add to these fields later in this book. For example, we will wire the location fields up to a geo-location service that will automatically determine the location, and we will make the date field use an actual platform-specific date picker control; but for now, we're just focused on building the basic app shell.
In order to create the new entry page that contains a TableView, perform the following steps:
- First, add a new Xamarin.Forms
ContentPage to the project and name it NewEntryPage. - Update the constructor of the
NewEntryPage class using the following code to build the TableView that will represent the data entry form on the page:
Now that we have created the new entry page, we need to add a way for users to get to this new screen from the main page. We will do this by adding a "New" button to the main page toolbar. In Xamarin.Forms, this is accomplished by adding a ToolbarItem to the base ContentPage ToolbarItems collection and wiring up the ToolbarItem Clicked event to navigate to the new entry page, as shown in the following code:
In Chapter 3, Navigation Service, we will build a custom service to handle navigation between pages, and we will replace the Clicked event with a data-bound ICommand ViewModel property, but for now, we will use the default Xamarin.Forms navigation mechanism.
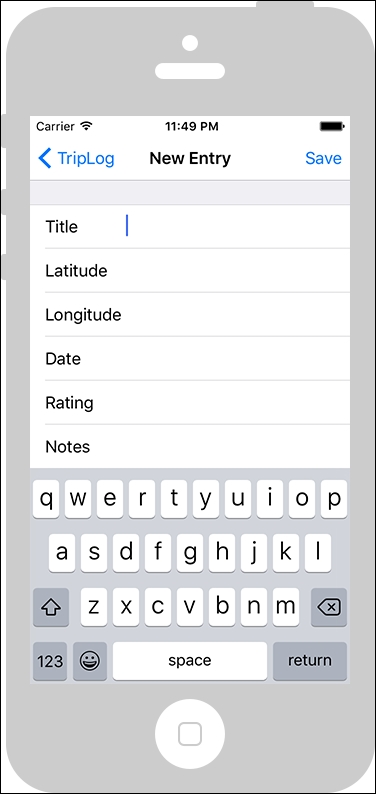
Now, when we run the app we will see a New button on the toolbar of the main page. Clicking the New button should bring us to the New Entry page, as shown in the following screenshot:
We will need to add a "Save" button to the New Entry page toolbar, so that we can have a way of saving new items. For now, this button will just be a placeholder in the UI that we will bind an ICommand to in Chapter 2, MVVM and Data Binding, when we dive into MVVM and data-binding.
The Save button will be added to the new entry page toolbar the same way the New button was added to the main page toolbar.
In the NewEntryPage constructor, simply create a new ToolbarItem and add it to the base ContentPage ToolbarItems property, as shown in the following code:
When we run the app again and navigate to the New Entry page, we should now see the Save button on the toolbar, as shown in the following screenshot:
Creating the entry detail page
When a user taps on one of the log entry items on the main page, we want to take them to a page that displays more details about that particular item, including a map that plots the item's location. Along with additional details and a more in-depth view of the item, a detail page is also a common area where actions on that item might take place, for example, editing the item or sharing the item on social media.
The detail page will take an instance of a TripLogEntry model as a constructor parameter, which we will use in the rest of the page to display the entry details to the user.
In order to create the entry detail page, perform the following steps:
- First, add a new Xamarin.Forms
ContentPage to the project and name it DetailPage. - Update the constructor of the
DetailPage class to take a TripLogEntry parameter named entry, as shown in the following code: - Add the
Xamarin.Forms.Maps NuGet package to the core project as well as each of the platform-specific projects. This separate NuGet package is required in order to use the Xamarin.Forms Map control in the next step. - Update the body of the constructor using a
Grid layout to display the details of the entry constructor parameter, as shown in the following code: - Next, we need to wire up the tapped event on the list of items on the
MainPage to pass the tapped item over to the DetailPage that we just created, as shown in the following code: - Finally, we need to initialize the
Xamarin.Forms.Maps library in each platform-specific startup class (for example, AppDelegate for iOS and MainActivity for Android) using the following code:
Now when we run the app and tap on one of the log entries on the main page, we will be navigated to the details page to see more detail about that particular log entry, as shown in the following screenshot:


 Free Chapter