

As mobile hardware continues to improve, so too does the demand placed on that hardware. With increasingly more powerful applications and user multi-tasking, the already limited resources can be quite challenging. The Android OS has many features built in to help the user get the best performance from their device, such as limiting background processes, disabling application notifications, and allowing data limits. The OS will also manage application lifetime based on foreground tasks. If your application is in the foreground, the life cycle is straightforward. But as soon as your user switches tasks and your application is moved to the background, understanding the Android application life cycle becomes very important.
The following diagram shows the stages through which an activity passes during its lifetime:
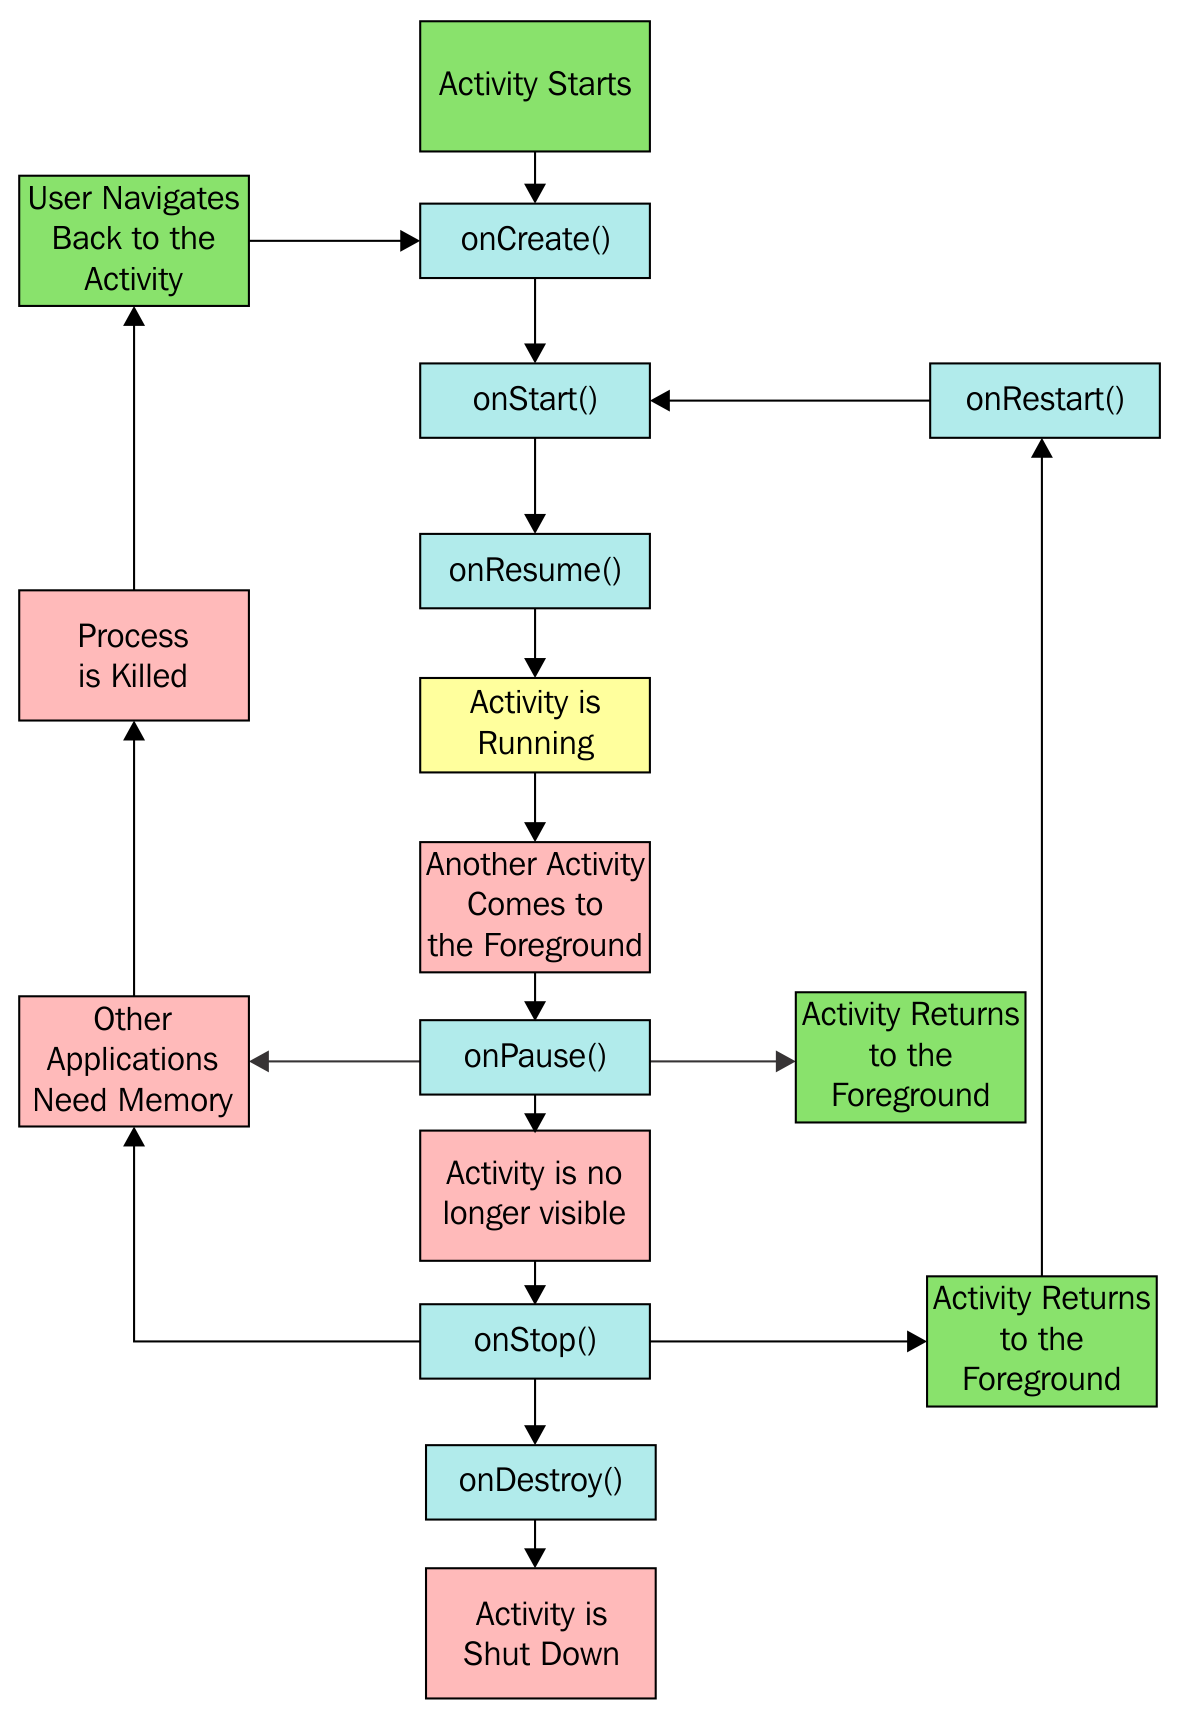
Along with the stages, the diagram also shows the methods that can be overridden. As you can see, we've already utilized most of these methods in the preceding recipes. Hopefully, getting the big picture will help your understanding.
Create a new project in Android Studio with a Blank Activity, and call it ActivityLifecycle. We will use the (auto-generated) TextView method to display the state information.
To see the application move through the various stages, we will create methods for all the stages:
- Open
activity_main.xmland add an ID to the auto-generatedTextView:
android:id="@+id/textViewState"
- The remaining steps will be in
MainActivity.java. Modify theonCreate()method to set the initial text:
((TextView)findViewById(R.id.textViewState)).setText("onCreate()n");
- Add the following methods to handle the remaining events:
@Override
protected void onStart() {
super.onStart();
((TextView)findViewById(R.id.textViewState)).append("onStart()\n");
}

@Override
protected void onResume() {
super.onResume();
((TextView)findViewById(R.id.textViewState)).append("onResume()\n");
}

@Override
protected void onPause() {
super.onPause();
((TextView)findViewById(R.id.textViewState)).append("onPause()\n");
}

@Override
protected void onStop() {
super.onStop();
((TextView)findViewById(R.id.textViewState)).append("onStop()\n");
}

@Override
protected void onRestart() {
super.onRestart();
((TextView)findViewById(R.id.textViewState)).append("onRestart()\n");
}

@Override
protected void onDestroy() {
super.onDestroy();
((TextView)findViewById(R.id.textViewState)).append("onDestroy()\n");
}- Run the application and observe what happens when the activity is interrupted by pressing the Back and Home keys. Try other actions, such as task switching, to see how they impact your application.
Our activity can exist in one of these three states: active, paused, or stopped. There is also a fourth state, destroyed (but there's no guarantee the OS will ever call it):
- An activity is in the
activestate when its interface is available for the user. It persists fromonResume()untilonPause(), which is brought about when another activity comes to the foreground. If this new activity does not entirely obscure our activity, then ours will remain in thepausedstate until the new activity is finished or dismissed. It will then immediately callonResume()and continue. - When a newly started activity fills the screen or makes our activity invisible, then our activity will enter the
stoppedstate, and resumption will always invoke a call toonRestart(). - When an activity is in either the
pausedorstoppedstate, the operating system can (and will) remove it from the memory when the memory is low or when other applications demand it. - It is worth noting that we never actually see the results of the
onDestroy()method, as the activity is removed by this point. If you want to explore these methods further, then it is well worth employingActivity.isFinishing()to see whether the activity is really finishing beforeonDestroy()is executed, as seen in the following snippet:
@Override
public void onPause() {
super.onPause();
((TextView)findViewById(R.id.textViewState)).append("onPause()\n");
    if (isFinishing()){
        ((TextView)findViewById(R.id.textViewState)).append(" ... finishing");
}
}To shut down an activity, directly call its finish() method, which in turn calls onDestroy(). To perform the same action from a child activity, use finishFromChild(Activity child), where child is the calling subactivity.
It is often useful to know whether an activity is being shut down or merely paused, and the isFinishing(boolean) method returns a value that indicates which of these two states the activity is in.