
Hello Flutter – a first glimpse of Flutter
OK, let's start getting our hands dirty with some code. Flutter comes with a simple Hello World app that we will get running and then look at in some detail. First of all though, we need to get your system ready for some Flutter action!
Installing Flutter
Flutter is very easy to install. Head over to the Flutter docs web pages to install Flutter and Dart for your operating system: https://flutter.dev/docs/get-started/install.
The installation documentation for Flutter is comprehensive, with explanations and potential issues all described there. Ensure that you read the installation documentation fully and complete all the steps so that your system is correctly prepared for our journey into Flutter.
You will download the SDK and place it somewhere on your filesystem. Note that downloading Flutter will also download a compatible version of Dart and the relevant dart command-line tool. You should not need to download Dart separately.
Updating your PATH
The installation documentation also explains how to update your PATH so that you can run Flutter commands from your command line. Please do follow these instructions because you will be using the command line regularly to interact with Flutter and Dart.
After installation and PATH setup, you should run the Flutter doctor command to see how ready your system is for Flutter. You will do this from your command line / terminal:
C:\src\flutter>flutter doctor
Here is an example of the output:
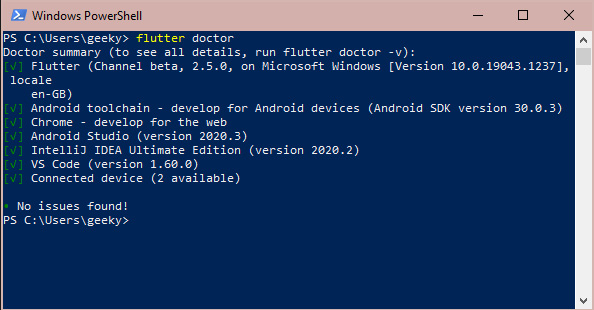
Figure 1.2 – Flutter doctor command-line output
You are likely to see errors in the flutter doctor report at this point because we haven't set up your development environment yet.
If you are unable to run the Flutter doctor command, then it is likely an issue with your PATH, as mentioned previously. Double-check that the path to your Flutter folder is correct and points to the flutter/bin subfolder. Also try closing your command line / terminal and opening it again because the PATH, in some situations, is only updated when the command line / terminal is opened.
Development environment
As mentioned previously, Flutter has excellent support in Android Studio, IntelliJ, and Visual Studio Code. This book will generally be agnostic of IDE, but, where required, will show examples from Visual Studio Code.
All three IDEs can be downloaded from the internet. Android Studio and Visual Studio Code are free, and IntelliJ has both a free Community edition and a paid-for Ultimate edition.
If you are planning to work with Android devices (and because Flutter is cross-platform I would expect you will), then you will need to download and install Android Studio regardless of the IDE you decide to develop code with. This is because installing Android Studio also installs the Android SDK, Android SDK command-line tools, and Android SDK build tools. These are required by Flutter when interacting with Android devices, running Android emulators, and building the app ready for use on the Android Play Store.
On macOS devices, you will also need to install and configure Xcode to allow you to build your app for iOS. Follow the instructions in the Flutter getting started documentation to ensure Xcode is configured correctly.
Important note
You can only build iOS apps on Macs. This is a restriction imposed by Apple and is imposed on all app development, not just Flutter. If this is an issue, then there are options such as cloud-based Mac instances you can use, or virtualization software to allow you to run a Mac virtual machine. An exploration of this is beyond the scope of this book. However, when developing Flutter apps, you can build and test quite happily on Android for the vast majority of the time, only switching to iOS for late-stage testing.
Once you have both your IDE installed and Android Studio (or just Android Studio if that is your IDE of choice), and Xcode installed and configured (if you are on a Mac), then rerun flutter doctor to check everything is ready to go.
Hello world!
With the Flutter development environment configured, we can start using Flutter commands. The typical way to start a Flutter project is to run the following command:
flutter create <output_directory>
Here, output_directory will also be the Flutter project name if you do not specify it as an argument. By running the preceding command, the folder with the provided name will be generated with a sample Flutter project in it. We will analyze the project in a few moments. First, it is good to know that there are some useful options to manipulate the resulting project from the flutter create command. The main ones are as follows:
--org: This can be used to change the owner organization of the project. If you already know Android or iOS development, this is a reverse domain name, and is used to identify package names on Android and as a prefix in the iOS bundle identifier. The default value iscom.example.-s,--sample=<id>: Most of the official examples for widget usage have a unique ID that you can use to quickly clone the example to your machine. Whenever you are exploring the Flutter docs website (https://docs.flutter.dev), you can take a sample ID from it and use it with this argument.-i,--ios-language, and-a,--android-language: These are used to specify the language for the native part code of the project, and are only used if you plan to write native platform code.--project-name: Use this to change the project's name. It must be a valid Dart package identifier. If you do not specify this parameter, it tries to use the same name as the output directory. Note that this argument must be the last in the list of arguments provided.Valid Dart package identifiers
As specified in the Dart documentation: "Package names should be all lowercase, with underscores to separate words, 'just_like_this'. Use only basic Latin letters and Arabic digits: [a- z0-9_]. Also, make sure the name is a valid Dart identifier – that it doesn't start with digits and isn't a reserved word."
Let's see a typical Flutter project structure created with the flutter create hello_world command:
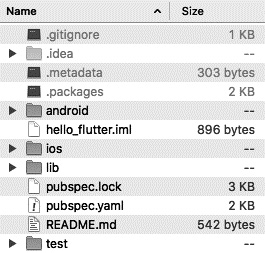
Figure 1.3 – Typical Flutter project structure
Listing the basic structure elements, we get the following:
android/ios: This contains the platform-specific codes. If you already know the Android project structure from Android Studio, there is no surprise here. The same goes for Xcode iOS projects.hello_flutter.iml: This is a typical IntelliJ project file, which contains theJAVA_MODULEinformation used by the IDE.libdirectory: This is the main folder of a Flutter application; the generated project will contain at least amain.dartfile to start work on. We will be checking this file in detail soon.pubspec.yamlandpubspec.lock: Thispubspec.yamlfile is what defines a Dart package. This is one of the main files of the project and defines the app build number, lists dependencies on external plugins, images, and fonts and more. We will be looking at this in more detail in Chapter 5, Widgets – Building Layouts in Flutter.README.md: This is a standard README document that is very common in open source projects. It allows you to document how to set up and use your code so that other developers can easily get your code running.testdirectory: This contains all the test-related files of the project. Here, we can add unit tests and also widget tests to ensure we do not introduce bugs into our code as we develop it.
Most of the commands that we explore can be replicated in the IDE. It is worth noting that the IDEs use these command-line tools behind the scenes to interact with the project.
Now that you have created your first Flutter project (congratulations by the way!), you should open it up in your IDE so that you can start to explore it a lot more.