

Exploring console applications further
We have already created and used basic console applications, but we're now at a stage where we should delve into them more deeply.
Console applications are text-based and are run at the command line. They typically perform simple tasks that need to be scripted, such as compiling a file or encrypting a section of a configuration file.
Equally, they can also have arguments passed to them to control their behavior. An example of this would be to create a new console app using the F# language with a specified name instead of using the name of the current folder, as shown in the following command line:
dotnet new console -lang "F#" --name "ExploringConsole"
Displaying output to the user
The two most common tasks that a console application performs are writing and reading data. We have already been using the WriteLine method to output, but if we didn't want a carriage return at the end of the lines, we could have used the Write method.
Formatting using numbered positional arguments
One way of generating formatted strings is to use numbered positional arguments.
This feature is supported by methods like Write and WriteLine, and for methods that do not support the feature, the string parameter can be formatted using the Format method of string.
Let's begin formatting:
- Add a new console application project named
Formattingto theChapter02folder and workspace. - In the
Mainmethod, add statements to declare some number variables and write them to the console, as shown in the following code:int numberOfApples = 12; decimal pricePerApple = 0.35M; Console.WriteLine( format: "{0} apples costs {1:C}", arg0: numberOfApples, arg1: pricePerApple * numberOfApples); string formatted = string.Format( format: "{0} apples costs {1:C}", arg0: numberOfApples, arg1: pricePerApple * numberOfApples); //WriteToFile(formatted); // writes the string into a file
The WriteToFile method is a nonexistent method used to illustrate the idea.
Formatting using interpolated strings
C# 6.0 and later has a handy feature named interpolated strings. A string prefixed with $ can use curly braces around the name of a variable or expression to output the current value of that variable or expression at that position in the string as the following shows:
- In the
Mainmethod, enter a statement at the bottom of theMainmethod, as shown in the following code:Console.WriteLine($"{numberOfApples} apples costs {pricePerApple * numberOfApples:C}"); - Run the console app, and view the result, as shown in the following partial output:
12 apples costs £4.20
For short formatted strings, an interpolated string can be easier for people to read. But for code examples in a book, where lines need to wrap over multiple lines, this can be tricky. For many of the code examples in this book, I will use numbered positional arguments.
Understanding format strings
A variable or expression can be formatted using a format string after a comma or colon.
An N0 format string means a number with thousand separators and no decimal places, while a C format string means currency. The currency format will be determined by the current thread. For instance, if you run this code on a PC in the UK, you'll get pounds sterling with commas as the thousand separators, but if you run this code on a PC in Germany, you will get Euros with dots as the thousand separators.
The full syntax of a format item is:
{ index [, alignment ] [ : formatString ] }
Each format item can have an alignment, which is useful when outputting tables of values, some of which might need to be left- or right-aligned within a width of characters. Alignment values are integers. Positive integers are right-aligned and negative integers are left-aligned.
For example, to output a table of fruit and how many of each there are, we might want to left-align the names within a column of 8 characters and right-align the counts formatted as numbers with zero decimal places within a column of six characters:
- In the
Mainmethod, enter the following statements at the bottom:string applesText = "Apples"; int applesCount = 1234; string bananasText = "Bananas"; int bananasCount = 56789; Console.WriteLine( format: "{0,-8} {1,6:N0}", arg0: "Name", arg1: "Count"); Console.WriteLine( format: "{0,-8} {1,6:N0}", arg0: applesText, arg1: applesCount); Console.WriteLine( format: "{0,-8} {1,6:N0}", arg0: bananasText, arg1: bananasCount); - Run the console app and note the effect of the alignment and number format, as shown in the following output:
Name     Count
Apples   1,234
Bananas 56,789
More Information: You can read more details about formatting types in .NET at the following link: https://docs.microsoft.com/en-us/dotnet/standard/base-types/formatting-types
Getting text input from the user
We can get text input from the user using the ReadLine method. This method waits for the user to type some text, then as soon as the user presses Enter, whatever the user has typed is returned as a string value:
- In the
Mainmethod, type statements to ask the user for their name and age and then output what they entered, as shown in the following code:Console.Write("Type your first name and press ENTER: "); string firstName = Console.ReadLine(); Console.Write("Type your age and press ENTER: "); string age = Console.ReadLine(); Console.WriteLine( $"Hello {firstName}, you look good for {age}."); - Run the console application.
- Enter a name and age, as shown in the following output:
Type your name and press ENTER: Gary
Type your age and press ENTER: 34
Hello Gary, you look good for 34.
Importing a namespace
You might have noticed that unlike our very first application in Chapter 1, Hello, C#! Welcome, .NET!, we have not been typing System before Console. This is because System is a namespace, which is like an address for a type. To refer to someone exactly, you might use Oxford.HighStreet.BobSmith, which tells us to look for a person named Bob Smith on the High Street in the city of Oxford.
The System.Console.WriteLine line tells the compiler to look for a method named WriteLine in a type named Console in a namespace named System. To simplify our code, the dotnet new console command added a statement at the top of the code file to tell the compiler to always look in the System namespace for types that haven't been prefixed with their namespace, as shown in the following code:
using System;
We call this importing the namespace. The effect of importing a namespace is that all available types in that namespace will be available to your program without needing to enter the namespace prefix and will be seen in IntelliSense while you write code.
Simplifying the usage of the console
In C# 6.0 and later, the using statement can be used to further simplify our code. Then, we won't need to enter the Console type throughout our code. We can use Visual Studio Code's Replace feature to remove the times we have previously written Console.:
- Add a statement to statically import the
System.Consoleclass to the top of theProgram.csfile, as shown in the following code:using static System.Console; - Select the first
Console.in your code, ensuring that you select the dot after the wordConsoletoo. - Navigate to Edit | Replace and note that an overlay dialog appears ready for you to enter what you would like to replace
Console.with, as shown in the following screenshot:
Figure 2.8: Using the Replace dialog box to simplify code
- Click on the Replace All button (the second of the two buttons to the right of the
replacebox) or press Alt + A or Alt + Cmd + Enter to replace all, and then close thereplacebox by clicking on the cross in its top-right corner.
Getting key input from the user
We can get key input from the user using the ReadKey method. This method waits for the user to press a key or key combination that is then returned as a ConsoleKeyInfo value:
- In the
Mainmethod, type statements to ask the user to press any key combination and then output information about it, as shown in the following code:Write("Press any key combination: "); ConsoleKeyInfo key = ReadKey(); WriteLine(); WriteLine("Key: {0}, Char: {1}, Modifiers: {2}", arg0: key.Key, arg1: key.KeyChar, arg2: key.Modifiers); - Run the console application, press the
Kkey, and note the result, as shown in the following output:Press any key combination: k Key: K, Char: k, Modifiers: 0 - Run the console application, hold down
Shiftand press theKkey, and note the result, as shown in the following output:Press any key combination: K Key: K, Char: K, Modifiers: Shift - Run the console application, press the
F12key, and note the result, as shown in the following output:Press any key combination: Key: F12, Char: , Modifiers: 0
When running a console application in Terminal within Visual Studio Code, some keyboard combinations will be captured by the code editor or operating system before they can be processed by your app.
Getting arguments
You might have been wondering what the string[] args arguments are in the Main method. They're an array used to pass arguments into a console application; let's take a look to see how it works.
Command-line arguments are separated by spaces. Other characters like hyphens and colons are treated as part of an argument value. To include spaces in an argument value, enclose the argument value in single or double quotes.
Imagine that we want to be able to enter the names of some colors for the foreground and background, and the dimensions of the Terminal window at the command line. We would be able to read the colors and numbers by reading them from the args array, which is always passed into the Main method of a console application.
- Create a new folder for a console application project named
Argumentsand add it to theChapter02workspace. - Add a statement to statically import the
System.Consoletype and a statement to output the number of arguments passed to the application, as shown highlighted in the following code:using System; using static System.Console; namespace Arguments { class Program { static void Main(string[] args) { WriteLine($"There are {args.Length} arguments."); } } }Good Practice: Remember to statically import the
System.Consoletype in all future projects to simplify your code, as these instructions will not be repeated every time. - Run the console application and view the result, as shown in the following output:
There are 0 arguments. - In TERMINAL, enter some arguments after the
dotnet runcommand, as shown in the following command line:dotnet run firstarg second-arg third:arg "fourth arg" - Note the result indicates four arguments, as shown in the following output:
There are 4 arguments. - To enumerate or iterate (that is, loop through) the values of those four arguments, add the following statements after outputting the length of the array:
foreach (string arg in args) { WriteLine(arg); } - In TERMINAL, repeat the same arguments after the
dotnet runcommand, as shown in the following command line:dotnet run firstarg second-arg third:arg "fourth arg" - Note the result shows the details of the four arguments, as shown in the following output:
There are 4 arguments.
firstarg
second-arg
third:arg
fourth arg
Setting options with arguments
We will now use these arguments to allow the user to pick a color for the background, foreground, and cursor size of the output window. The cursor size can be an integer value from 1, meaning a line at the bottom of the cursor cell, up to 100, meaning a percentage of the height of the cursor cell.
The System namespace is already imported so that the compiler knows about the ConsoleColor and Enum types. If you cannot see either of these types in the IntelliSense list, it is because you are missing the using System; statement at the top of the file.
- Add statements to warn the user if they do not enter three arguments and then parse those arguments and use them to set the color and dimensions of the console window, as shown in the following code:
if (args.Length < 3) { WriteLine("You must specify two colors and cursor size, e.g."); WriteLine("dotnet run red yellow 50"); return; // stop running } ForegroundColor = (ConsoleColor)Enum.Parse( enumType: typeof(ConsoleColor), value: args[0], ignoreCase: true); BackgroundColor = (ConsoleColor)Enum.Parse( enumType: typeof(ConsoleColor), value: args[1], ignoreCase: true); CursorSize = int.Parse(args[2]); - Enter the following command in TERMINAL:
dotnet run red yellow 50
On Linux, this will work correctly. On Windows, this will run, but the cursor will not change size. On macOS, you'll see an unhandled exception, as shown in the following screenshot:
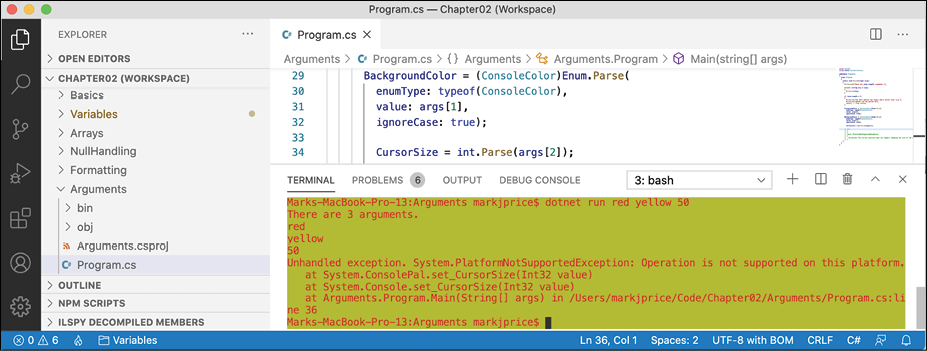
Figure 2.9: An unhandled exception on unsupported macOS
Although the compiler did not give an error or warning, at runtime some API calls may fail on some platforms. Although a console application running on Linux can change its cursor size, on macOS, it cannot, and complains if you try.
Handling platforms that do not support an API
So how do we solve this problem? We can solve this by using an exception handler. You will learn more details about the try-catch statement in Chapter 3, Controlling Flow and Converting Types, so for now, just enter the code.
- Modify the code to wrap the lines that change the cursor size in a
trystatement, as shown in the following code:try { CursorSize = int.Parse(args[2]); } catch (PlatformNotSupportedException) { WriteLine("The current platform does not support changing the size of the cursor."); } - Rerun the console application; note the exception is caught, and a friendlier message is shown to the user.
Another way to handle differences in operating systems is to use the OperatingSystem class, as shown in the following code:
if (OperatingSystem.IsWindows())
{
  // execute code that only works on Windows
}
The OperatingSystem class has equivalent methods for other common OSes like Android, iOS, Linux, macOS, and even the browser, which is useful for Blazor web components.