

2.6 Making the Android SDK Tools Command-line Accessible
Most of the time, the underlying tools of the Android SDK will be accessed from within the Android Studio environment. That being said, however, there will also be instances where it will be useful to be able to invoke those tools from a command prompt or terminal window. In order for the operating system on which you are developing to be able to find these tools, it will be necessary to add them to the system’s PATH environment variable.
Regardless of operating system, the PATH variable needs to be configured to include the following paths (where <path_to_android_sdk_installation> represents the file system location into which the Android SDK was installed):
<path_to_android_sdk_installation>/sdk/tools
<path_to_android_sdk_installation>/sdk/tools/bin
<path_to_android_sdk_installation>/sdk/platform-tools
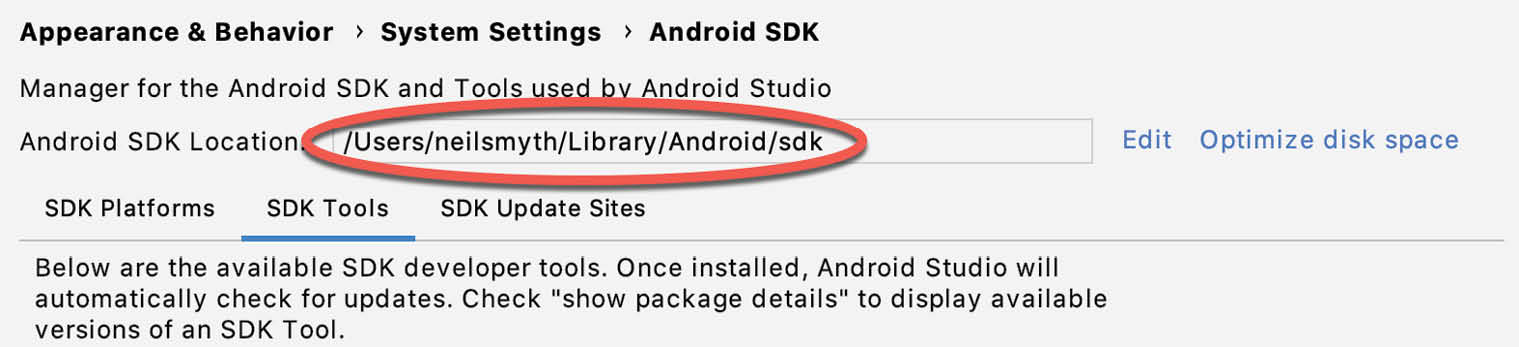
The location of the SDK on your system can be identified by launching the SDK Manager and referring to the Android SDK Location: field located at the top of the settings panel as highlighted in Figure 2-7:
Once the location of the SDK has been identified, the steps to add this to the PATH variable are operating system dependent:
1. Right-click on Computer in the desktop start menu and select Properties from the resulting menu.
2. In the properties panel, select the Advanced System Settings link and, in the resulting dialog, click on the Environment Variables… button.
3. In the Environment Variables dialog, locate the Path variable in the System variables list, select it and click on the Edit… button. Using the New button in the edit dialog, add three new entries to the path. For example, assuming the Android SDK was installed into C:\Users\demo\AppData\Local\Android\Sdk, the following entries would need to be added:
C:\Users\demo\AppData\Local\Android\Sdk\platform-tools
C:\Users\demo\AppData\Local\Android\Sdk\tools
C:\Users\demo\AppData\Local\Android\Sdk\tools\bin
4. Click on OK in each dialog box and close the system properties control panel.
Once the above steps are complete, verify that the path is correctly set by opening a Command Prompt window (Start -> All Programs -> Accessories -> Command Prompt) and at the prompt enter:
echo %Path%
The returned path variable value should include the paths to the Android SDK platform tools folders. Verify that the platform-tools value is correct by attempting to run the adb tool as follows:
adb
The tool should output a list of command line options when executed.
Similarly, check the tools path setting by attempting to launch the AVD Manager command line tool (don’t worry if the avdmanager tool reports a problem with Java - this will be addressed later):
avdmanager
In the event that a message similar to the following message appears for one or both of the commands, it is most likely that an incorrect path was appended to the Path environment variable:
'adb' is not recognized as an internal or external command,
operable program or batch file.
1. On the start screen, move the mouse to the bottom right-hand corner of the screen and select Search from the resulting menu. In the search box, enter Control Panel. When the Control Panel icon appears in the results area, click on it to launch the tool on the desktop.
2. Within the Control Panel, use the Category menu to change the display to Large Icons. From the list of icons select the one labeled System.
3. Follow the steps outlined for Windows 7 starting from step 2 through to step 4.
Open the command prompt window (move the mouse to the bottom right-hand corner of the screen, select the Search option and enter cmd into the search box). Select Command Prompt from the search results.
Within the Command Prompt window, enter:
echo %Path%
The returned path variable value should include the paths to the Android SDK platform tools folders. Verify that the platform-tools value is correct by attempting to run the adb tool as follows:
adb
The tool should output a list of command line options when executed.
Similarly, check the tools path setting by attempting to run the AVD Manager command line tool (don’t worry if the avdmanager tool reports a problem with Java - this will be addressed later):
avdmanager
In the event that a message similar to the following message appears for one or both of the commands, it is most likely that an incorrect path was appended to the Path environment variable:
'adb' is not recognized as an internal or external command,
operable program or batch file.
Right-click on the Start menu, select Settings from the resulting menu and enter “Edit the system environment variables” into the Find a setting text field. In the System Properties dialog, click the Environment Variables... button. Follow the steps outlined for Windows 7 starting from step 3.
On Linux, this configuration can typically be achieved by adding a command to the .bashrc file in your home directory (specifics may differ depending on the particular Linux distribution in use). Assuming that the Android SDK bundle package was installed into /home/demo/Android/sdk, the export line in the .bashrc file would read as follows:
export PATH=/home/demo/Android/sdk/platform-tools:/home/demo/Android/sdk/tools:/home/demo/Android/sdk/tools/bin:/home/demo/android-studio/bin:$PATH
Note also that the above command adds the android-studio/bin directory to the PATH variable. This will enable the studio.sh script to be executed regardless of the current directory within a terminal window.
A number of techniques may be employed to modify the $PATH environment variable on macOS. Arguably the cleanest method is to add a new file in the /etc/paths.d directory containing the paths to be added to $PATH. Assuming an Android SDK installation location of /Users/demo/Library/Android/sdk, the path may be configured by creating a new file named android-sdk in the /etc/paths.d directory containing the following lines:
/Users/demo/Library/Android/sdk/tools
/Users/demo/Library/Android/sdk/tools/bin
/Users/demo/Library/Android/sdk/platform-tools
Note that since this is a system directory it will be necessary to use the sudo command when creating the file. For example:
sudo vi /etc/paths.d/android-sdk