

Creating a list of static items
List views are like scroll views in that they are used to display a collection of items. However, List views are better for dealing with larger datasets because they do not load the entirety of the datasets in memory.
In this recipe, we will create an app the uses static lists to display sample weather data for various cities.
Getting ready
Let's start by creating a new SwiftUI app called StaticList.
How to do it…
We'll create a struct to hold weather information and an array of several cities' weather data. We'll then use a List view to display all the content. The steps are as follows:
- Open the
ContentView.swiftfile and add theWeatherInfostruct right above theContentViewstruct:struct WeatherInfo: Identifiable { var id = UUID() var image: String var temp: Int var city: String } - Add the
weatherDataproperty to theContentViewstruct.weatherDatacontains an array ofWeatherInfoitems:let weatherData: [WeatherInfo] = [ WeatherInfo(image: "snow", temp: 5, city:"New York"), WeatherInfo(image: "cloud", temp:5, city:"Kansas City"), WeatherInfo(image: "sun.max", temp: 80, city:"San Francisco"), WeatherInfo(image: "snow", temp: 5, city:"Chicago"), WeatherInfo(image: "cloud.rain", temp: 49, city:"Washington DC"), WeatherInfo(image: "cloud.heavyrain", temp: 60, city:"Seattle"), WeatherInfo(image: "sun.min", temp: 75, city:"Baltimore"), WeatherInfo(image: "sun.dust", temp: 65, city:"Austin"), WeatherInfo(image: "sunset", temp: 78, city:"Houston"), WeatherInfo(image: "moon", temp: 80, city:"Boston"), WeatherInfo(image: "moon.circle", temp: 45, city:"denver"), WeatherInfo(image: "cloud.snow", temp: 8, city:"Philadelphia"), WeatherInfo(image: "cloud.hail", temp: 5, city:"Memphis"), WeatherInfo(image: "cloud.sleet", temp:5, city:"Nashville"), WeatherInfo(image: "sun.max", temp: 80, city:"San Francisco"), WeatherInfo(image: "cloud.sun", temp: 5, city:"Atlanta"), WeatherInfo(image: "wind", temp: 88, city:"Las Vegas"), WeatherInfo(image: "cloud.rain", temp: 60, city:"Phoenix"), ]
- Add the
Listview to theContentViewbody and use theForEachstructure to iterate over ourweatherDatacollection. Add some font and padding modifiers to improve the styling too:List { ForEach(self.weatherData){ weather in HStack { Image(systemName: weather.image) .frame(width: 50, alignment: .leading) Text("\(weather.temp)°F") .frame(width: 80, alignment: .leading) Text(weather.city) } .font(.system(size: 25)) .padding() } }The resulting preview should look as follows:
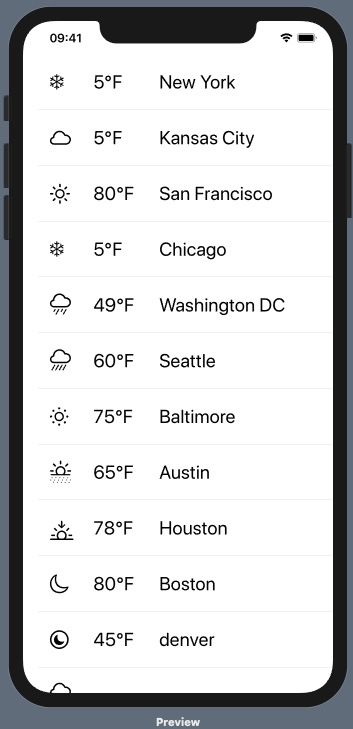
Figure 2.2 – Implementing static lists
How it works…
First, we created the WeatherInfo struct, which contains properties we'd like to use, such as images, temperature (temperate), and city. Notice that the WeatherInfo struct implements the Identifiable protocol. Making the struct conform to the Identifiable protocol allows us to use the data in a ForEach structure without specifying an id parameter. To conform to the Identifiable protocol, we added a unique property to our struct called id, a property whose value is generated by the UUID() function.
The basic form of a static list is composed of a List view and some other views, as shown here:
List {
 Text("Element one")
 Text("Element two")
}
In this recipe, we went a step further and used the ForEach struct to iterate through an array of identifiable elements stored in the weatherData variable. We wanted to display the data in each list item horizontally, so we displayed the contents in an HStack. Our image, temperature, and city are displayed using image and text views.
The weather image names are SF Symbol variants, so using them with an Image view systemName parameter displays the corresponding SF Symbol. You can read more about SF Symbols in Chapter 1, Using the Basic SwiftUI Views and Controls.