

Preparing your project for AR development
When you develop and build a project for augmented reality, Unity needs to know the device and platform you are targeting. This is a multi-step process that includes adding the device plugin to your project and setting the target platform in Build Settings. We'll address the device plugins now and Build Settings later in this chapter.
The following diagram shows the Unity XR technology architecture. As you can see, at the bottom of the stack are the various AR (and VR) provider plugins:
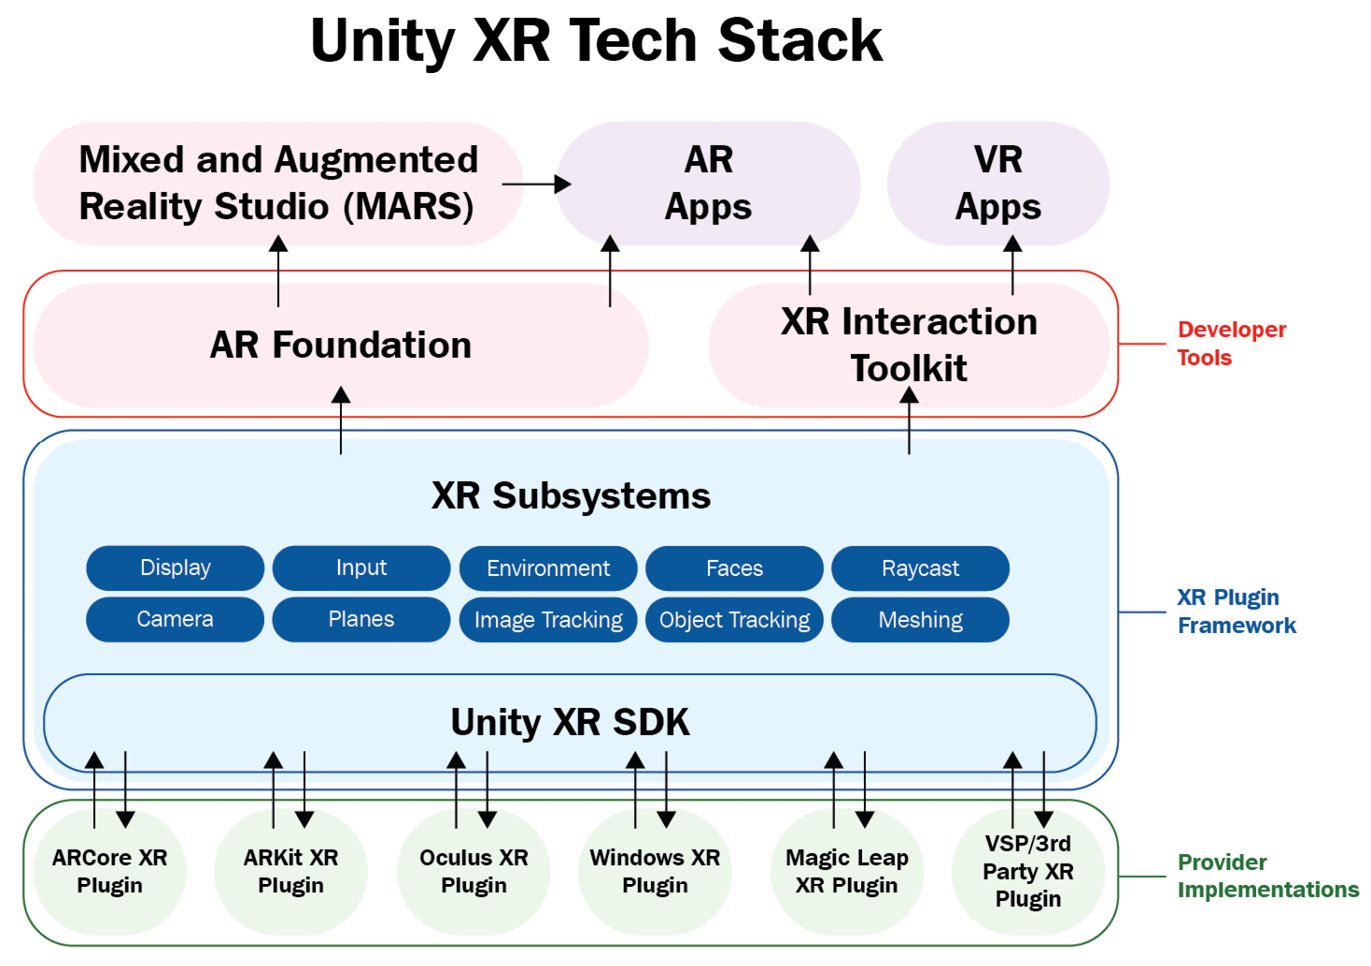
Figure 1.8 – The Unity XR tech stack
At the bottom of the stack is XR Plugins, separate provider packages that implement a software interface to a specific device. Plugins allow Unity to talk with a device by connecting the Unity XR subsystems with an operating system and runtime API. Ordinarily, you will not be using a plugin directly but a higher-level toolkit instead, such as AR Foundation (which we will install in the next section). Some plugins are provided and maintained by Unity Technologies; others are vendor-supported third-party plugins.
In the preceding diagram, at the top of the plugins are XR Subsystems, which form XR Plugin Framework. This abstracts sets of features into separate APIs. When an application is running, it can query the capabilities of the current runtime device and enable or disable sets of features in the app accordingly. Atop XR Subsystems is the AR Foundation toolkit (and XR Interaction Toolkit), which provides the main AR API for your Unity applications. We will be using AR Foundation extensively for the projects in this book.
Now, let's install the XR plugin(s) you need for this project.
Installing XR plugins for AR devices
To prepare our project for AR development, we'll install the AR device plugin for your target device via the XR Plug-in Management window. With your project open in Unity, follow these steps:
- Open the Project Settings window by selecting Edit | Project Settings from the main menu.
- In the Settings menu on the left, select XR Plugin Management.
- Click the Install XR Plugin Management button. It may take a moment for Unity to import and compile the package scripts.
- If necessary, click the XR Plug-in Management item again to show Plug-in Providers and other options. Notice that there are tabs for each of the target platforms. Select the one you will be targeting first.
For example, in the XR Plug-in Management window, the Android tab will be only available if you installed the Android Build Support module when you installed Unity via Unity Hub.
- Check the checkbox for the AR plugin you want to use. For example, for Android, select ARCore, while for iOS, select ARKit.
Tip – Don't Mix VR and AR Plugins in the Same Project
You'll see that the XR Plug-in Management window lets you choose any combination of AR and VR plugins. In our projects, we're only interested in the AR ones. Generally, do not include both AR and VR plugins in the same project as the build settings, player settings, camera rigs, and many other things can differ significantly between AR and VR projects. (Perhaps when you read this, there will be devices that support both modes in a single app, but I am not aware of any at this time.)
In the following screenshot of the Project Settings window, I have selected the XR Plug-in Management Settings menu. In my window, there are three tabs for each of the possible target platforms for this project that I have installed: Desktop, iOS, and Android (yours may be different). With the Android tab selected, you can see that I have checked the ARCore plugin. You'll also notice that, on the left-hand side, there's an additional ARCore menu item that you can click to see options that are specific to that plugin:
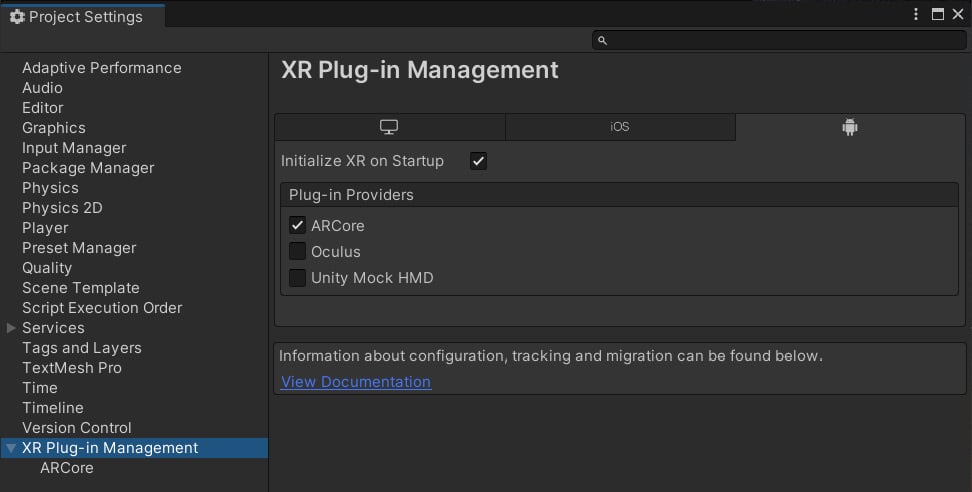
Figure 1.9 – XR Plug-in Management window with the ARCore plugin selected
Interestingly, XR Plug-in Manager is a shortcut to installing the corresponding packages in Package Manager. You can verify this by opening Package Manager and reviewing the installed packages by performing the following steps:
- Open Package Manager from the main menu and choose Window | Package Manager.
- Ensure the filter selection at the top left of the Package Manager window says Packages In Project.
- You should see your plugin in the list; for example, ARCore XR Plugin.
For example, in the following screenshot of Package Manager, which shows Packages In Project (top left of the window), ARCore XR Plugin has been installed and selected. You can see that this specific version of the plugin has been Verified for the Unity version being used by this project. It also shows a description of the plugin's features, links to its documentation, and other details. Also, I have unfolded the plugin's Other Versions list to show you how to review each of the plugin's versions; this is where you might upgrade (or downgrade) a plugin to a different version:
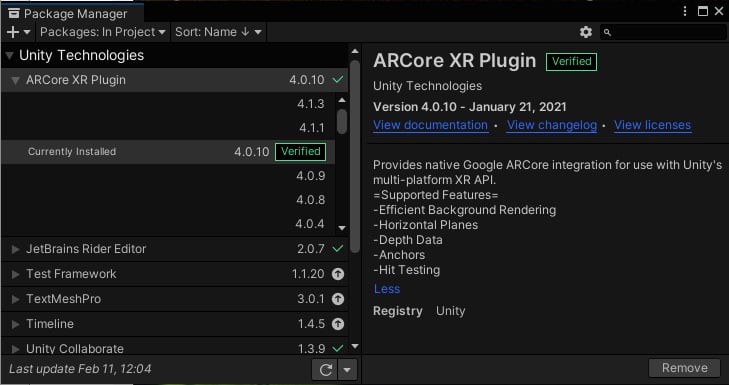
Figure 1.10 – Package Manager with the ARCore XR plugin installed in this project
At this point, you could begin developing an augmented reality project, if you wanted to write code directly using the XR subsystem's developer-facing C# interface. However, it's more likely that you will install a higher-level toolkit that is more Unity developer-friendly. Still, you may need to drop down into the plugin framework to access the XR subsystems directly. For example, you may wish to scan and start a particular subsystem, as shown in the example at https://docs.unity3d.com/Manual/xrsdk-runtime-discovery.html. Later in this book, we may need to access the plugin framework's SDK. For the most part, we will be using the higher-level AR Foundation toolkit.
Installing the AR Foundation package
AR Foundation is a package that provides a development layer between your application and the underlying device features and plugins. AR Foundation provides components and other assets that help you build AR projects once, then deploy for multiple mobile and wearable AR devices. Using a "unified workflow," as Unity says, your app can support current and future features that may or may not be currently available on your end user's specific device at runtime. This helps "future-proof" your AR apps. In this section, we'll install and explore AR Foundation.
The features that are supported by AR Foundation will depend on the current capabilities of the target devices and varies between versions of AR Foundation. The following chart shows the feature support per platform that AR Foundation offers:
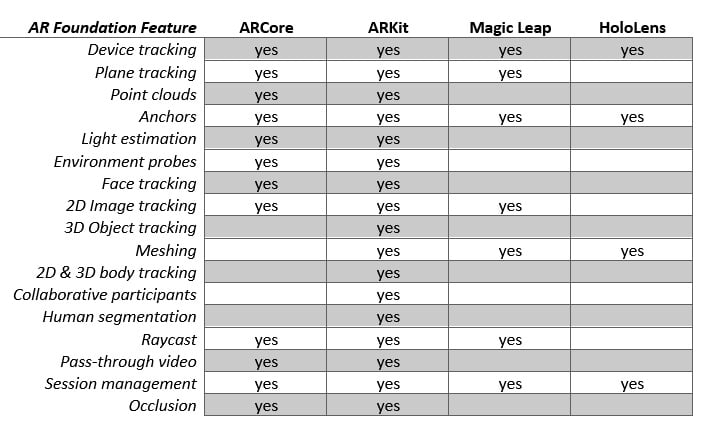
Figure 1.11 – AR Foundation 4.1.5 features per platform
See the Platform Support section of the AR Foundation documentation page (https://docs.unity3d.com/Packages/com.unity.xr.arfoundation@latest/index.html) for the most up to date details for the version you are using.
Unity provides a Package Manager, which enables you to expand Unity's core functionality by installing additional packages in your project. This way, you can choose just the features you need for a particular project. The XR plugins we installed in the previous section are packages. Now, we'll use the Package Manager to install the AR Foundation package.
Information – Advantages of Unity Packages
With Unity packages come many advantages. Unity can update the core Editor independently of other features. Likewise, packages can be updated outside of Unity's core release cycle. Decoupling their dependencies reduces the risk of schedule delays and technical problems, allowing for more agile development cycles and support for technology advances inside and outside the Unity offices. For example, if Apple releases an update to ARKit, then Unity can release an update to its ARKit plugin without having to wait for the next release of the Unity Editor, nor depending on the Unity core development team. If you've ever worked on a large project with multiple teams, you can appreciate the benefits of this architecture. Teams can be organized so that they focus on the details that their package provides, and then test for successful integration with the Unity core product.
You can install AR Foundation using Package Manager by following these steps:
- Open the Package Manager from the main menu by going to Window | Package Manager.
- Set the package filter in the top left to Unity Registry to see a list of all the official packages.
- In the search box, type
ar. You should now see all the AR-related packages in the list. - It is important to pay attention to the version numbers of the package, and whether that particular version has been verified with the Unity version you're using in your project.
- Select AR Foundation, and then press Install. It may take a moment to install.
Once installed, you may discover that new items have been added to the main menu bar, including options under GameObject | XR. Don't select any just yet – we'll get to that in the next chapter, Chapter 2, Your First AR Scene, where we will use the toolkit to create our first AR scene with AR Foundation.
You also need to choose an input handler for your project. We'll look at this in the next section.
Choosing an input handler
The Unity product is continually improving. One relatively recent advancement is the introduction of the new Input System, which is replacing the classic Input Manager. At the time of writing, Unity projects can be configured to use either one, or both in the same project. The input handler you choose can have a significant impact on your development because their usages are quite different. The classic Input Manager mostly uses polling, while the new Input System uses events (see https://blog.unity.com/technology/introducing-the-new-input-system). This is a generalization as both software patterns can be implemented using either handler, but the new Input System is better designed and more flexible. In the interest of advancing the state of the art, the projects in this book will use the new Input System.
However, some example scenes that you will be importing into your project, including the AR Foundation Samples in Chapter 2, Your First AR Scene, will use the classic Input Manager, so it's prudent to allow your project to support both.
To configure your project to use the new Input System, perform the following steps:
- To import the Input System package, open the Packager Manager by going to Window | Package Manager.
- Select Unity Registry from the filter selection in the top left of the window.
- Find Input System (use the search field and type in
input), and click Install. - You may be prompted to let Unity automatically change your Player Settings to use the new Input System. You can say "no" to this. We'll do this manually.
- Open the Player Settings window by going to Edit | Project Settings | Player.
- Locate Configuration | Active Input Handling and select Both (or if you prefer, select Input System Package (New)).
We will begin working with input in Chapter 2, Your First AR Scene, as well as the subsequent chapters.
You also need to set up the project's render pipeline for AR support. Let's learn how to do this.
Adding support for the Universal Render Pipeline
Because we created this project using the Universal Render Pipeline (URP), there's one additional thing you need to do – add AR video background support to the graphics forward renderer (see https://docs.unity3d.com/Packages/[email protected]/manual/ar-camera-background-with-scriptable-render-pipeline.html). This feature renders the device's video feed immediately on the screen before the virtual graphics are rendered on top of those pixels. Perform the following steps:
- In the Project window, locate the folder that contains the Scriptable Render Pipeline settings assets. This is usually the
Assets/Settings/folder. - Select the asset named ForwardRenderer.
- In the Inspector window, click the Add Renderer Feature button and select AR Background Renderer Feature. The resulting Forward Renderer settings are shown in the following screenshot:
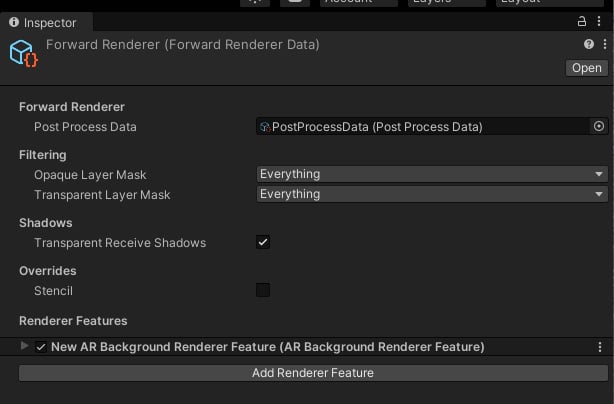
Figure 1.12 – ForwardRenderer data asset with the AR Background Renderer Feature added
Furthermore, as a reminder, if you import any assets into your project, you may need to convert their materials for the render pipeline. We will do this for the sample assets at the end of this chapter.
You have now installed Unity using Unity Hub, created and opened a new Unity project, installed XR plugins for your AR device, installed the AR Foundation package, selected an input handler for your project, and configured the render pipeline for AR. The next step is to continue setting up your project for the target platform.