

We've discussed the different types of textures AndEngine provides; now let's go over the options we can supply our textures with. The contents in this topic tend to have noticeable effects on the quality and performance of our games.
Perform the Working with different types of textures recipe given in this chapter, so that we've got a basic AndEngine project set up with BitmapTextureAtlas or BuildableBitmapTextureAtlas loading in place.
In order to modify a texture atlas' option and/or format, we need to add a parameter or two to the BitmapTextureAtlas constructor depending on whether we'd like to define either the options, format, or both. See the following code for modifying both, texture format and texture options:
BitmapTextureAtlas mBitmapTextureAtlas = new BitmapTextureAtlas(mEngine.getTextureManager(), 1024, 1024, BitmapTextureFormat.RGB_565, TextureOptions.BILINEAR);
From here on, all texture regions placed on this specific texture atlas will have the defined texture format and option applied to it.
AndEngine allows us to apply texture options and formats to our texture atlases. The various combination of options and formats applied to a texture atlas will affect the overall quality and performance impact that sprites have on our game. Of course, that is if the mentioned sprites are using ITextureRegion objects, which are related to the modified BitmapTextureAtlas atlas.
The base texture options available in AndEngine are as follows:
Nearest: This texture option is applied to texture atlases by default. This is the fastest-performing texture option we can apply to a texture atlas, but also the poorest in quality. This option means that the texture will apply blending of pixels that make up the display by obtaining the nearest texel color to a pixel. Similar to how a pixel represents the smallest element of a digital image, a texel represents the smallest element of a texture.
Bilinear: The second main texture filtering option in AndEngine is called bilinear texture filtering. This approach takes a hit performance-wise, but the quality of scaled sprites will increase. Bilinear filtering obtains the four nearest texels per pixel in order to provide smoother blending to an onscreen image.
Take a look at the following figure to see a comparison between bilinear filtering and nearest filtering:
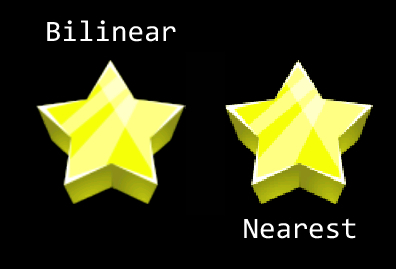
These two images are rendered in the highest bitmap format. The difference between nearest and bilinear filtering is very clear in this case. In the left-hand side of the image, the bilinear star has almost no jagged edges and the colors are very smooth. On the right-hand side, we've got a star rendered with the nearest filtering. The quality level suffers as jagged edges are more apparent and if observed closely, the colors aren't as smooth.
The following are a few additional texture options:
Repeating: The repeating texture option allows the sprite to "repeat" the texture assuming that the ITextureRegion object's width and height has been exceeded by the size of the sprite. In most games, the terrain is usually generated by creating a repeating texture and stretching the size of the sprite, rather than creating many separate sprites to cover the ground.
Let's take a look at how to create a repeating texture:
    /* Create our repeating texture. Repeating textures require width/height which are a power of two */
    BuildableBitmapTextureAtlas texture = new BuildableBitmapTextureAtlas(engine.getTextureManager(), 32, 32, TextureOptions.REPEATING_BILINEAR);

    // Create our texture region - nothing new here
    mSquareTextureRegion = BitmapTextureAtlasTextureRegionFactory.createFromAsset(texture, context, "square.png");

    try {
      // Repeating textures should not have padding
      texture.build(new BlackPawnTextureAtlasBuilder<IBitmapTextureAtlasSource, BitmapTextureAtlas>(0, 0, 0));
      texture.load();

    } catch (TextureAtlasBuilderException e) {
      Debug.e(e);
    }
The previous code is based on a square image which is 32 x 32 pixels in dimension. Two things to keep in mind when creating repeating textures are as follows:
Texture atlases using the repeating texture option format require the power of two dimensions (2, 4, 8, 16, and so on)
If you are using a buildable texture atlas, do not apply padding or spacing during the
build()method, as it will be taken into account in the repeating of the texture, breaking the first rule of repeating textures
Next, we have to create a sprite which uses this repeated texture:
/* Increase the texture region's size, allowing repeating textures to stretch up to 800x480 */
ResourceManager.getInstance().mSquareTextureRegion.setTextureSize(800, 480);
// Create a sprite which stretches across the full screen
Sprite sprite = new Sprite(0, 0, 800, 480, ResourceManager.getInstance().mSquareTextureRegion, mEngine.getVertexBufferObjectManager());
What we're doing here is increasing the texture region's size to 800 x 480 pixels in dimension. This doesn't alter the size of the image while the repeating option is applied to a texture, rather it allows the image to be repeated up to 800 x 480 pixels. This means that if we create a sprite and supply the repeating texture, we can scale the sprite up to 800 x 480 pixels in dimension, while still displaying a repeat effect. However, if the sprite exceeds the width or height dimensions of the texture region, no texture will be applied to the exceeding area.
Here's the outcome taken from a device screenshot:
Pre-multiply alpha: Lastly, we have the option to add the pre-multiply alpha texture option to our textures. What this option does is multiply each of the RGB values by the specified alpha channel and then apply the alpha channel in the end. The main purpose of this option is to allow us to modify the opacity of the colors without loss of color. Keep in mind, modifying the alpha value of a sprite directly may introduce unwanted effects when using pre-multiplied alpha values. Sprites will likely not appear fully transparent when this option is applied to sprites with an alpha value of 0.
When applying texture options to our texture atlases, we can choose either nearest or bilinear texture filtering options. On top of these texture filtering options, we can include either the repeating option, the pre-multiply alpha option, or even both.
Aside from texture options, AndEngine also allows us to set the texture format of each of our texture atlases. Texture formats, similar to texture options, are often decided upon depending on its purpose. The format of a texture can greatly affect both the performance and quality of an image even more noticeably than the texture options. Texture formats allow us to choose the available color ranges of the RGB values in a texture atlas. Depending on the texture format being used, we may also allow or disallow a sprite from having any alpha value which affects the transparency of the textures.
The texture format naming conventions are not very complicated. All formats have a name similar to RGBA_8888, where the left-hand side of the underscore refers to the color or alpha channels available to the texture. The right-hand side of the underscore refers to the bits available to each of the color channels.
The following texture formats are available:
RGBA_8888: Allows the texture to use red, green, blue, and alpha channels, assigned 8 bits each. Since we have 4 channels each assigned 8 bits (4 x 8), we're left with a 32-bit texture format. This is the slowest texture format of the four.RGBA_4444: Allows the texture to use red, green, blue, and alpha channels, assigned 4 bits each. Following the same rule as the previous format, we're left with a 16-bit texture format. You will notice an improvement with this format overRGBA_8888as we're only saving half as much information as the 32-bit format. The quality will suffer noticeably; see the following image:
In this image, we compare the difference between two texture formats. The stars are both rendered with the default texture option (nearest), which has nothing to do with the RGBA format of the image. What we're more interested here is the color quality of the two stars. The left-hand side star is rendered with full 32-bit color capabilities, the right with 16-bit. The difference between the two stars is rather apparent.
RGB_565: Another 16-bit texture format, though this one does not include an alpha channel; textures using this texture format will not allow for transparency. Due to the lack of transparency, the need for this format is limited, but it is still valuable. One example of this texture format being used would be to display a fullscreen image such as a background. Backgrounds don't require transparency, so it is wise to keep this format in mind when introducing a background. The performance saved is fairly noticeable.A_8: Finally, we have the last texture format, which is an 8-bit alpha channel (does not support colors). Another limited-use format; the A_8 format is generally used as an alpha mask (overlay) for sprites which have colors. One example of a use for this format is a screen fading in or out by simply overlaying a sprite with this texture, then altering the transparency as time passes.
When creating your texture atlases, it is a good idea to think about which types of sprites will use which type of texture regions and pack them into texture atlases accordingly. For more important sprites, we'll most likely want to use the RGBA_8888 texture format, since these sprites will be the main focus of our games. These objects might include the foreground sprites, main character sprites, or anything on the screen that would be more visually prominent. Backgrounds underlay the entire surface area of the device, so we most likely have no use for transparency. We will use RGB_565 for these sprites in order to remove the alpha channel, which will help improve performance. Finally, we have objects which might not be very colorful, might be small, or simply may not need as much visual appeal. We can use the texture format RGBA_4444 for these types of sprites in order to cut the memory needed for these textures in half.
Know the life cycle in this chapter.
Working with different types of textures in this chapter.
Bringing a scene to life with sprites in Chapter 2, Working with Entities.