

Tabbed navigation could also be implemented with the TabWidget class. However, the action bar has some advantages. The action bar automatically adjusts itself according to the device screen size. For instance, if there is not enough space for tabs, it will display tabs in a stacked bar manner. Thus, it's better to use the action bar for tabbed navigation implementation.
Now, we are going to see how to use the action bar for tabbed navigation. Firstly, create an Android project and add two fragments: one that displays Fragment A and an other that displays Fragment B. The layout XML for fragments should look like the following code block:
<?xml version="1.0" encoding="utf-8"?>
<LinearLayout xmlns:android="http://schemas.android.com/apk/res/android"
    android:layout_width="match_parent"
    android:layout_height="match_parent"
    android:orientation="vertical" >

    <TextView
        android:id="@+id/textView1"
        android:layout_width="wrap_content"
        android:layout_height="wrap_content"
        android:text="Fragment A"
        android:textAppearance="?android:attr/textAppearanceLarge" android:layout_gravity="center_horizontal"/>

</LinearLayout>
<?xml version="1.0" encoding="utf-8"?>
<LinearLayout xmlns:android="http://schemas.android.com/apk/res/android"
    android:layout_width="match_parent"
    android:layout_height="match_parent"
    android:orientation="vertical" >

    <TextView
        android:id="@+id/textView1"
        android:layout_width="wrap_content"
        android:layout_height="wrap_content"
        android:text="Fragment B"
        android:textAppearance="?android:attr/textAppearanceLarge"
        android:layout_gravity="center_horizontal"/>

</LinearLayout>
The classes that extend the Fragment class for the two fragments should look like the following code block:
package com.chapter1;

import android.app.Fragment;
import android.os.Bundle;
import android.view.LayoutInflater;
import android.view.View;
import android.view.ViewGroup;

public class FragmentA extends Fragment {

  @Override
  public View onCreateView(LayoutInflater inflater, ViewGroup container,
      Bundle savedInstanceState) {
      View view = inflater.inflate(R.layout.fragment_a, container,false);
    return view;
  }
}
package com.chapter1;

import android.app.Fragment;
import android.os.Bundle;
import android.view.LayoutInflater;
import android.view.View;
import android.view.ViewGroup;

public class FragmentB extends Fragment {


  @Override
  public View onCreateView(LayoutInflater inflater, ViewGroup container,
      Bundle savedInstanceState) {
    View view = inflater.inflate(R.layout.fragment_b, container, false);
    return view;
  }
}
In order to use action bar for tabbed navigation, we should firstly implement the ActionBar.TabListener class. The class that implements TabListener is going to be used in the Activity class in adding tabs. The Activity class with the TabListener implementation should look like the following code block:
package com.chapter1;

import android.app.ActionBar;
import android.app.ActionBar.Tab;
import android.app.ActionBar.TabListener;
import android.app.Activity;
import android.app.Fragment;
import android.app.FragmentTransaction;
import android.os.Bundle;

public class Chapter1ActionBarTabActivity extends Activity {

  @Override
  public void onCreate(Bundle savedInstanceState) {
    super.onCreate(savedInstanceState);
    setContentView(R.layout.main);

    ActionBar actionBar = getActionBar();
    actionBar.setNavigationMode(ActionBar.NAVIGATION_MODE_TABS);

    Tab tab = actionBar
        .newTab()
        .setText("First tab")
        .setTabListener(
          new Chapter1TabListener<FragmentA>(this, "fragmentA",FragmentA.class));
    actionBar.addTab(tab);

    tab = actionBar
        .newTab()
        .setText("Second Tab")
        .setTabListener(
            new Chapter1TabListener<FragmentB>(this, "fragmentB",FragmentB.class));
    actionBar.addTab(tab);
  }

  public static class Chapter1TabListener<T extends Fragment> implements
      TabListener {
    private Fragment mFragment;
    private final Activity mActivity;
    private final String mTag;
    private final Class<T> mClass;

    public Chapter1TabListener(Activity activity, String tag, Class<T> clz) {
      mActivity = activity;
      mTag = tag;
      mClass = clz;
    }

    @Override
    public void onTabSelected(Tab tab, FragmentTransaction ft) {
                 // we initialize and add the fragment to our Activity if it doesn't exist

      if (mFragment == null) {

        mFragment = Fragment.instantiate(mActivity, mClass.getName());
        ft.add(android.R.id.content, mFragment, mTag);

        } else {
                          // If it exists, we simply attach it
        ft.attach(mFragment);
      }
    }

    @Override
    public void onTabUnselected(Tab tab, FragmentTransaction ft) {
                    // in this method we detach the fragment because // it shouldn't be displayed
    if (mFragment != null) {
        ft.detach(mFragment);
        }
    }
    @Override
    public void onTabReselected(Tab tab, FragmentTransaction ft) {
                 // This method is called when the tab is reselected
    }
  }
}
In the Chapter1TabListener class there are three methods that need to be overridden: onTabReselected(Tab tab, FragmentTransaction ft), onTabUnselected(Tab tab, FragmentTransaction ft), and onTabSelected(Tab tab, FragmentTransaction ft). In the onTabSelected(Tab tab, FragmentTransaction ft) method, we initialize and add the fragment to our activity if it doesn't exist. If it exists, we simply attach to it. When the tab is
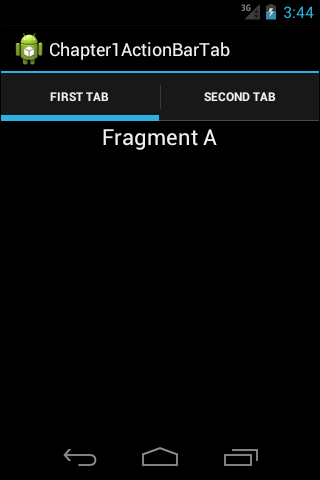
unselected, the onTabUnselected(Tab tab, FragmentTransaction ft) method is called. In this method, we detach the fragment because it shouldn't be displayed. When the tab is reselected, the onTabReselected(Tab tab, FragmentTransaction ft) method is called. We do nothing in this method. In the Chapter1ActionBarTabActivity class, we create and set up the action bar. Layout for our activity has nothing but a LinearLayout layout and we use fragments for the user interface. Firstly, we set the navigation mode of action bar to ActionBar.NAVIGATION_MODE_TABS because we want tabbed navigation. Then we create two tabs, set their TabListener events, and add them to the action bar instance. When you run the application, you will see two tabs named FIRST TAB and SECOND TAB. The first tab will display Fragment A and the second tab will display Fragment B. The screen will look like the following:
It is important not to forget to set the minimum SDK level to API Level 11 or higher, because the action bar was introduced in API Level 11.