

As seen in the earlier recipes, a Kendo Mobile application is initialized using the kendo.mobile.Application object. The Application object can also be used to provide initial configuration details and also in managing application navigation.
While initializing the mobile application, the Application object can be used to provide several configuration details. Perform the following steps:
The function
kendo.mobile.Application()is called to initialize the application.The first parameter to
kendo.mobile.Application()is the target element, which is the container of various widgets withdata-roleattributes. Usually, it is the document's body tag, containing various widgets; hence, the default value for the first parameter is the reference to thedocument.bodyelement.The second parameter is an object that can be used to provide configuration details.
When you set the initial layout in a relatively larger application, you are likely to define multiple layouts and views. One of these layouts can be defined as an initial layout, which would then be rendered when the application loads. This configuration is provided while initializing the application using kendo.mobile.Application().
The following code snippet defines two layouts – defaultLayout and applicationLayout. Also, it defines two views, view1 and view2, as follows:
<div data-role="layout"
  data-id="defaultLayout">

  <header data-role="header">
  <div data-role="navbar">
      Default Layout Title
    </div>
  </header>

</div>

<div data-role="layout"
  data-id="applicationLayout">

  <header data-role="header">
    <div data-role="navbar">
      Application Layout Title
    </div>
  </header>

</div>

<div data-role="view"
  id="view1">
    Hello Kendo!!
</div>

<div data-role="view"
  id="view2">
    Hello Application!!
</div>
In the previous code snippet, the views (view1 and view2) do not specify any references to the layout widget that it likes to be associated with. Now, when you have two layouts in the page, the application would not be able to determine the layout to render when the application loads. This can be specified when the application is initialized using the Application object.
var app = new kendo.mobile.Application(document.body, {
  layout: "applicationLayout"
});
The layout key specifies the layout to be used when the application loads; here, applicationLayout is the value of the data-id attribute of the layout widget(data-role="layout").
Similar to specifying an initial layout, you can also specify the initial view to render when the application loads. The first view in the page would be rendered by default, and if you would like to render any other view, specify the same while initializing the application as follows:
var app = new kendo.mobile.Application(document.body, {
  layout: "applicationLayout",
  initial: "view2"
});
Please note that here view2 is the value of the id attribute that you want to render, while applicationLayout is the value of the data-id attribute.
This screenshot shows how the application works:
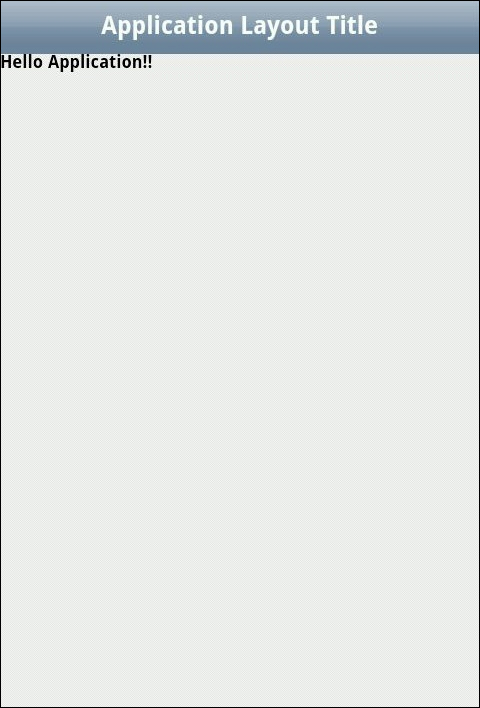
When you execute the previous page, you will see that the view with the id attribute view2 is shown on the layout with the data-id attribute applicationLayout.
The Application object can also be used to provide other configuration details. For example, the Application object can be used to navigate to different views.
Consider an example where you have the following three views:
indexloginviewsignupview
The index view has two buttons for Login and Sign Up as shown in the following code:
<div data-role="view"
  id="loginview">
  Login page
</div>
<div data-role="view"
  id="signupview">
  Sign Up page
</div>

<div data-role="view"
  id="index">

  <span class="button"
    data-role="button"
    id="login">
    In Login view
  </span>

  <span class="button"
    data-role="button"
    id="signup">
    In Sign Up view
  </span>

</div>
As explained earlier, you can set the initial view by specifying the same during application initialization.
var app = new kendo.mobile.Application(document.body, {
  initial: "index"
});
When the application loads, the index view will be shown, which contains two buttons: Login and Sign Up. On clicking on the Login button, you would like the application to navigate to loginview; similarly, on clicking on the Signup button, show signupview. To navigate to a different view, call navigate on the Application object as follows:
$('#login').on('click', function (event) {
  app.navigate('#loginview');
});

$('#signup').on('click', function (event) {
  app.navigate('#signupview');
});
The previous code snippet specifies a mouse-click event listener for all the Login and Sign Up buttons in the index view as shown in the following screenshot:
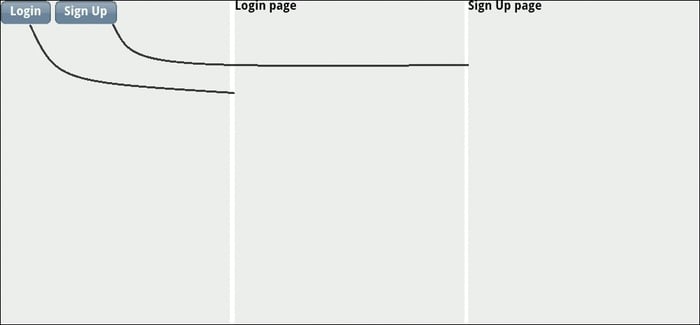
On clicking on the Login button, the navigate method is called on the Application object, specifying the view to navigate (loginview). This will then show the login view. Similarly, the signup view is shown when you click on the Sign Up button.