
Various Steps in NLP
Earlier, we talked about the types of computations that are done on natural language. There are various standard NLP tasks. Apart from these tasks, you have the ability to design your own tasks as per your requirements. In the coming sections, we will be discussing various preprocessing tasks in detail and demonstrating them with an exercise.
Tokenization
Tokenization refers to the procedure of splitting a sentence into its constituent words. For example, consider this sentence: "I am reading a book." Here, our task is to extract words/tokens from this sentence. After passing this sentence to a tokenization program, the extracted words/tokens would be "I", "am", "reading", "a", "book", and ".". This example extracts one token at a time. Such tokens are called unigrams. However, we can also extract two or three tokens at a time. We need to extract tokens because, for the sake of convenience, we tend to analyze natural language word by word. If we extract two tokens at a time, it is called bigrams. If three tokens, it is called trigrams. Based on the requirements, n-grams can be extracted (where "n" is a natural number).
Note
n-gram refers to a sequence of n items from a given text.
Let's now try extracting trigrams from the following sentence: "The sky is blue." Here, the first trigram would be "The sky is". The second would be "sky is blue". This might sound easy. However, tokenization can be difficult at times. For instance, consider this sentence: "I would love to visit the United States". The tokens generated are "I", "would", "love", "to", "visit", "the", and "United States". Here, "United States" has to be treated as a single entity. Individual words such as "United" and "States" do not make any sense here.
To get a better understanding of tokenization, let's solve an exercise based on it in the next section.
Exercise 2: Tokenization of a Simple Sentence
In this exercise, we will tokenize the words in a given sentence with the help of the NLTK library. Follow these steps to implement this exercise:
- Open a Jupyter notebook.
- Insert a new cell and add a following code to import the necessary libraries:
import nltk
from nltk import word_tokenize
- The
word_tokenize()method is used to split the sentence into words/tokens. We need to add a sentence as input to theword_tokenize()method, so that it performs its job. The result obtained would be a list, which we will store in awordvariable. To implement this, insert a new cell and add the following code:words = word_tokenize("I am reading NLP Fundamentals") - In order to view the list of tokens generated, we need to view it using the
print()function. Insert a new cell and add the following code to implement this:print(words)
The code generates the following output:

Figure 1.6: List of tokens
Thus we can see the list of tokens generated with the help of the word_tokenize() method. In the next section, we will see another pre-processing step: Parts-of-Speech (PoS) tagging.
PoS Tagging
PoS refers to parts of speech. PoS tagging refers to the process of tagging words within sentences into their respective parts of speech and then finally labeling them. We extract Part of Speech of tokens constituting a sentence, so that we can filter out the PoS that are of interest and analyze them. For example, if we look at the sentence, "The sky is blue," we get four tokens – "The," "sky," "is," and "blue" – with the help of tokenization. Now, using PoS tagger, we tag parts of speech to each word/token. This will look as follows:
[('The', 'DT'), ('sky', 'NN'), ('is', 'VBZ'), ('blue', 'JJ')]
DT = determiner
NN = noun, common, singular or mass
VBZ = verb, present tense, 3rd person singular
JJ = Adjective
An exercise in the next section will definitely give a better understanding of this concept.
Exercise 3: PoS Tagging
In this exercise, we will find out the PoS for each word in the sentence, "I am reading NLP Fundamentals". We first make use of tokenization in order to get the tokens. Later, we use a PoS tagger, which will help us find PoS for each word/token. Follow these steps to implement this exercise:
- Open a Jupyter notebook.
- Insert a new cell and add the following code to import the necessary libraries:
import nltk
from nltk import word_tokenize
- For finding the tokens in the sentence, we make use of the
word_tokenize()method. Insert a new cell and add the following code to implement this:words = word_tokenize("I am reading NLP Fundamentals") - Print the tokens with the help of the
print()function. To implement this, add a new cell and write the following code:print(words)
The code generates the following output:

Figure 1.7: List of tokens
- In order to find the PoS for each word, we make use of the
pos_tag()method of thenltklibrary. Insert a new cell and add the following code to implement this:nltk.pos_tag(words)
The code generates the following output:

Figure 1.8: PoS tag of words
- In the preceding output, we can see that for each token, a PoS has been allotted. Here, PRP stands for personal pronoun, VBP stands for verb present, VGB stands for verb gerund, NNP stands for proper noun singular, and NNS stands for noun plural.
We have learned about labeling appropriate PoS to tokens in a sentence. In the next section, we will learn about stop words in sentences and ways to deal with them.
Stop Word Removal
Stop words are common words that are just used to support the construction of sentences. We remove stop words from our analysis as they do not impact the meaning of sentences they are present in. Examples of stop words include a, am, and the. Since they occur very frequently and their presence doesn't have much impact on the sense of the sentence, they need to be removed.
In the next section, we will look at the practical implementation of removing stop words from a given sentence.
Exercise 4: Stop Word Removal
In this exercise, we will check the list of stopwords provided by the nltk library. Based on this list, we will filter out the stopwords included in our text. Follow these steps to implement this exercise:
- Open a Jupyter notebook.
- Insert a new cell and add the following code to import the necessary libraries:
import nltk nltk.download('stopwords') from nltk import word_tokenize from nltk.corpus import stopwords - In order to check the list of stopwords provided for the
Englishlanguage, we pass it as a parameter to thewords()function. Insert a new cell and add the following code to implement this:stop_words = stopwords.words('English') - In the code, the list of stopwords provided by the
Englishlanguage is stored in thestop_wordsvariable. In order to view the list, we make use of theprint()function. Insert a new cell and add the following code to view the list:print(stop_words)
The code generates the following output:
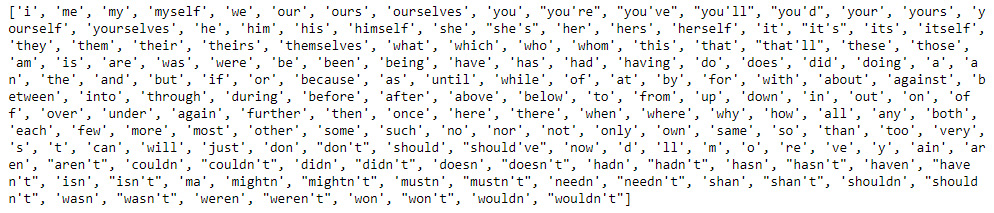
Figure 1.9: List of stopwords provided by the English language
- To remove the stop words from a sentence, we first assign a string to the
sentencevariable and tokenize it into words using theword_tokenize()method. Insert a new cell and add the following code to implement this:sentence = "I am learning Python. It is one of the most popular programming languages" sentence_words = word_tokenize(sentence)
- To print the list of tokens, insert a new cell and add the following code:
print(sentence_words)
The code generates the following output:

Figure 1.10: List of tokens in the sentence_words variable
- To remove the stopwords, first we need to loop through each word in the sentence, check whether there are any stop words, and then finally combine them to form a complete sentence. To implement this, insert a new cell and add the following code:
sentence_no_stops = ' '.join([word for word in sentence_words if word not in stop_words])
- To check whether the stopwords are filtered out from our sentence, we print the
sentence_no_stopsvariable. Insert a new cell and add the following code to print:print(sentence_no_stops)
The code generates the following output:

Figure 1.11: Text without stopwords
As you can see in the preceding figure, stopwords such as "am," "is," "of," "the," and "most" are being filtered out and text without stop words is produced as output.
We have learned how to remove stop words from given text. In the next section, we will focus on normalizing text.
Text Normalization
There are some words that are spelt, pronounced, and represented differently, for example, words such as Mumbai and Bombay, and US and United States. Although they are different, they mean the same thing. There are also different forms words that need to be converted into base forms. For example, words such as "does" and "doing," when converted to their base form, become "do". Along these lines, text normalization is a process wherein different variations of text get converted into a standard form. We need to perform text normalization as there are some words that can mean the same thing as each other. There are various ways of normalizing text, such as spelling correction, stemming, and lemmatization, which will be covered later.
For a better understanding of this topic, we will look into practical implementation in the next section.
Exercise 5: Text Normalization
In this exercise, we will normalize a given text. Basically, we will be trying to replace selected words with new words, using the replace() function, and finally produce the normalized text. Follow these steps to implement this exercise:
- Open a Jupyter notebook.
- Insert a new cell and add the following code to assign a string to the
sentencevariable:sentence = "I visited US from UK on 22-10-18"
- We want to replace "
US" with "United States", "UK" with "United Kingdom", and "18" with "2018". To do so, we make use of thereplace()function and store the updated output in the "normalized_sentence" variable. Insert a new cell and add the following code to implement this:normalized_sentence = sentence.replace("US", "United States").replace("UK", "United Kingdom").replace("-18", "-2018") - Now, in order to check whether the text has been normalized, we insert a new cell and add the following code to print it:
print(normalized_sentence)
The code generates the following output:

Figure 1.12: Normalized text
In the preceding figure, we can see that our text has been normalized.
Now that we have learned the basics of text normalization, in the next section, we explore various other ways that text can be normalized.
Spelling Correction
Spelling correction is one of the most important tasks in any NLP project. It can be time consuming, but without it there are high chances of losing out on required information. We make use of the "autocorrect" Python library to correct spellings. Let's look at the following exercise to get a better understanding of this.
Exercise 6: Spelling Correction of a Word and a Sentence
In this exercise, we will perform spelling correction on a word and a sentence, with the help of the 'autocorrect' library of Python. Follow these steps in order to implement this exercise:
- Open a Jupyter notebook.
- Insert a new cell and add the following code to import the necessary libraries:
import nltk
from nltk import word_tokenize
from autocorrect import spell
- In order to correct the spelling of a word, pass a wrongly spelled word as a parameter to the
spell()function. Insert a new cell and add the following code to implement this:spell('Natureal')The code generates the following output:

Figure 1.13: Corrected word
- In order to correct the spelling of a sentence, we first need to tokenize it into words. After that, we loop through each word in
sentence, autocorrect them, and finally combine them. Insert a new cell and add the following code to implement this:sentence = word_tokenize("Ntural Luanguage Processin deals with the art of extracting insightes from Natural Languaes") - We make use of the
print()function to print all tokens. Insert a new cell and add the following code to print tokens:print(sentence)
The code generates the following output:

Figure 1.14: Tokens in sentences
- Now that we have got the tokens, we loop through each token in
sentence, correct them, and assign them to new variable. Insert a new cell and add the following code to implement this:sentence_corrected = ' '.join([spell(word) for word in sentence])
- To print the correct sentence, we insert a new cell and add the following code:
print(sentence_corrected)
The code generates the following output:

Figure 1.15: Corrected sentence
- In the preceding figure, we can see that most of the wrongly spelled words have been corrected. But the word "Processin" was wrongly converted into "Procession". It should have been "Processing". It happened because to change "Processin" to "Procession" or "Processing," an equal number of edits is required. To rectify this, we need to use other kinds of spelling correctors that are aware of context.
In the next section, we will look at stemming, which is another form of text normalization.
Stemming
In languages such as English, words get transformed into various forms when being used in a sentence. For example, the word "product" might get transformed into "production" when referring to the process of making something or transformed into "products" in plural form. It is necessary to convert these words into their base forms, as they carry the same meaning. Stemming is a process that helps us in doing so. If we look at the following figure, we get a perfect idea about how words get transformed into their base forms:

Figure 1.16: Stemming of the word product
To get a better understanding about stemming, we shall look into an exercise in the next section.
Exercise 7: Stemming
In this exercise, we will pass a few words through the stemming process such that they get converted into their base forms. Follow these steps to implement this exercise:
- Open a Jupyter notebook.
- Insert a new cell and add the following code to import the necessary libraries:
import nltk
stemmer = nltk.stem.PorterStemmer()
- Now pass the following words as parameters to the
stem()method. To implement this, insert a new cell and add the following code:stemmer.stem("production")When the input is "
production", the following output is generated:
Figure 1.17: Stemmed word for production
stemmer.stem("coming")When the input is "
coming", the following output is generated:
Figure 1.18: Stemmed word for coming
stemmer.stem("firing")When the input is "
firing", the following output is generated:
Figure 1.19: Stemmed word for firing
stemmer.stem("battling")When the input is "
battling", the following output is generated:
Figure 1.20: Stemmed word for battling
- From the preceding figures, we can see that the entered words are converted into their base forms.
In the next section, we will focus on lemmatization, which is another form of text normalization.
Lemmatization
Sometimes, the stemming process leads to inappropriate results. For example, in the last exercise, the word "battling" got transformed to "battl," which has no meaning. To overcome these problems with stemming, we make use of lemmatization. In this process, an additional check is being made, by looking through the dictionary to extract the base form of a word. However, this additional check slows down the process. To get a better understanding about lemmatization, we will look at an exercise in the next section.
Exercise 8: Extracting the base word using Lemmatization
In this exercise, we use the lemmatization process to produce the proper form of a given word. Follow these steps to implement this exercise:
- Open a Jupyter notebook.
- Insert a new cell and add the following code to import the necessary libraries:
import nltk nltk.download('wordnet') from nltk.stem.wordnet import WordNetLemmatizer - Create object of the
WordNetLemmatizerclass. Insert a new cell and add the following code to implement this:lemmatizer = WordNetLemmatizer()
- Bring the word to its proper form by using the
lemmatize()method of theWordNetLemmatizerclass. Insert a new cell and add the following code to implement this:lemmatizer.lemmatize('products')With the input "
products", the following output is generated:

Figure 1.21: Lemmatized word
lemmatizer.lemmatize('production')
With the input "production", the following output is generated:

Figure 1.22: Lemmatized word
lemmatizer.lemmatize('coming')
With the input "coming", the following output is generated:

Figure 1.23: Lemmatized word
lemmatizer.lemmatize('battle')
With the input "battle", the following output is generated:

Figure 1.24: Lemmatized word
We have learned how to use the lemmatization process to transform a given word into its base form.
In the next section, we will look at another preprocessing step in NLP: named entity recognition (NER).
NER
Named entities are usually not present in dictionaries. So, we need to treat them separately. The main objective of this process is to identify the named entities (such as proper nouns) and map them to the categories that are already defined. For example, the categories might include names of persons, places, and so on. To get a better understanding of this process, we'll look at an exercise.
Exercise 9: Treating Named Entities
In this exercise, we will find out the named entities in a sentence. Follow these steps to implement this exercise:
- Open a Jupyter notebook.
- Insert a new cell and add the following code to import the necessary libraries:
import nltk from nltk import word_tokenize nltk.download('maxent_ne_chunker') nltk.download('words') - Declare the
sentencevariable and assign it a string. Insert a new cell and add the following code to implement this:sentence = "We are reading a book published by Packt which is based out of Birmingham."
- To find the named entities from the preceding text, insert a new cell and the following code:
i = nltk.ne_chunk(nltk.pos_tag(word_tokenize(sentence)), binary=True)
[a for a in i if len(a)==1]
The code generates the following output:

Figure 1.25: Named entity
In the preceding figure, we can see that the code identifies the named entities "Packt" and "Birmingham" and maps them to an already-defined category such as "NNP".
In the next section, we will focus on word sense disambiguation, which helps us identify the right sense of any word.
Word Sense Disambiguation
There's a popular saying, "A man is known by the company he keeps". Similarly, a word's meaning depends on its association with other words in the sentence. This means two or more words with the same spelling may have different meanings in different contexts. This often leads to ambiguity. Word sense disambiguation is the process of mapping a word to the correct sense it carries. We need to disambiguate words based on the sense they carry so that they can be treated as different entities when being analyzed. The following figure displays a perfect example of how ambiguity is caused due to the usage of the same word in different sentences:

Figure 1.26: Word sense disambiguition
To get a better understanding about this process, let's look at an exercise in the next section.
Exercise 10: Word Sense Disambiguation
In this exercise, we will find the sense of the word "bank" in two different sentences. Follow these steps to implement this exercise:
- Open a Jupyter notebook.
- Insert a new cell and add the following code to import the necessary libraries:
import nltk
from nltk.wsd import lesk
from nltk import word_tokenize
- Declare two variables,
sentence1andsentence2, and assign them with appropriate strings. Insert a new cell and the following code to implement this:sentence1 = "Keep your savings in the bank" sentence2 = "It's so risky to drive over the banks of the road"
- In order to find the sense of the word "bank" in the preceding two sentences, we make use of the
leskalgorithm provided by thenltk.wsdlibrary. Insert a new cell and add the following code to implement this:print(lesk(word_tokenize(sentence1), 'bank'))
The code generates the following output:

Figure 1.27: Sense carried by the word "bank" in sentence1
Here, savings_bank.n.02 refers to a container for keeping money safely at home. To check the other sense of the word bank, write the following code:
print(lesk(word_tokenize(sentence2), 'bank'))
The code generates the following output:

Figure 1.28: Sense carried by the word "bank" in sentence2
Here, bank.v.07 refers to a slope in the turn of a road.
Thus, with the help of the lesk algorithm, we are able to identify the sense of a word in whatever context. In the next section, we will focus on sentence boundary detection, which helps detect the start and end points of sentences.
Sentence Boundary Detection
Sentence boundary detection is the method of detecting where one sentence ends and where another sentence begins. If you are thinking that it is pretty easy, as a full stop (.) denotes the end of any sentence and the beginning of another sentence, then you are wrong. This is because there can be instances wherein abbreviations are separated by full stops. Various analyses need to be performed at a sentence level, so detecting boundaries of sentences is essential. An exercise in the next section will provide a better understanding of this process.
Exercise 11: Sentence Boundary Detection
In this exercise, we will extract sentences from a paragraph. Follow these steps to implement this exercise:
- Open a Jupyter notebook.
- Insert a new cell and add the following code to import the necessary libraries:
import nltk
from nltk.tokenize import sent_tokenize
- We make use of the
sent_tokenize()method to detect sentences in a given text. Insert a new cell and add the following code to implement this:sent_tokenize("We are reading a book. Do you know who is the publisher? It is Packt. Packt is based out of Birmingham.")The code generates the following output:

Figure 1.29: List of sentences
As you can see in the figure, we are able to separate out the sentences from given text.
We have covered all the preprocessing steps that are involved in NLP. Now, based on the knowledge we've gained, we will complete an activity in the next section.
Activity 1: Preprocessing of Raw Text
We have a text corpus that is in an improper format. In this activity, we will perform all the pre-processing steps that were discussed earlier to get some meaning out of the text.
Note
The file.txt file can be found at this location: https://bit.ly/2V3ROAa.
Follow these steps to implement this activity:
- Import the necessary libraries.
- Load the text corpus to a variable.
- Apply the tokenization process to the text corpus and print the first 20 tokens.
- Apply spelling correction on each token and print the initial 20 corrected tokens as well as the corrected text corpus.
- Apply PoS tags to each corrected token and print them.
- Remove stop words from the corrected token list and print the initial 20 tokens.
- Apply stemming and lemmatization to the corrected token list and the print initial 20 tokens.
- Detect the sentence boundaries in the given text corpus and print the total number of sentences.
Note
The solution for this activity can be found on page 254.
By now, you should be familiar with what NLP is and what basic pre-processing steps are needed to carry out any NLP project. In the next section, we will focus on different phases that are included in an NLP project.