
Proper sizing information for Exchange 2013 was released only a few months after the release of the product. The lengthy blog post and many formulae that the guidance incorporates clearly shows that sizing Exchange 2013 isn't something to take lightly.
In order to properly size your Exchange 2013 environment, you'll need to know the key usage statistics described in the previous topic. They will serve as the basis for your sizing exercise.
To us, it's trivial to have the key figures representing the current system's usage. Without these figures, sizing for Exchange 2013 will become very hard. In fact, all that you would be doing is guessing what your future design should look like. The result will be that you will either underestimate the requirements or overshoot them. Maybe if you're lucky, you'll be spot on. But to be honest, we haven't seen that happen very often.
In short, it all starts with determining your Mailbox profiles. A mailbox profile is a logical unit to identify a certain load for a specific mailbox. This load is based on the overall size of the mailbox, the number of messages being sent and received on a daily basis, as well as the average size of the mail item itself.
In the many Exchange design exercises we've done since Exchange 5.5—we like to classify them in different categories, named Bronze, Silver, Gold, and Platinum—the Exchange 2013 Server Role Requirements Calculator talks about different "Tiers".
A great tool to help you identify the different mailbox profiles in your existing Exchange (2003, 2007) environment is the Exchange Profile Analyzer, available for download from the following website:
http://www.microsoft.com/en-us/download/details.aspx?id=10559&
Alternatively, Exchange's message tracking logs could help you out as well. You could work some magic with a little help from PowerShell or have a look at the following article by Exchange MVP Paul Cunningham. In this article, he explains how you can get daily message statistics from the Message Tracking Logs using Logs Parser. The article is available at the following website:
http://exchangeserverpro.com/daily-email-traffic-message-tracking-log-parser/
Generating these statistics from the message tracking logs is fairly easy, however in order to get an accurate number, you need access to historical info as well. The more data you have, the better!
Once you have determined the different mailbox profiles, it is time to start making some calculations. Although Microsoft has done an excellent job in explaining how to size Exchange 2013 through the article in the following website, you would probably want to use the Exchange 2013 Server Role Requirements Calculator tool. This tool is an excel-based spreadsheet that will do the calculations for you using the information you put into it.
Nonetheless, we strongly recommend reading Microsoft's article as it will provide you with a better understanding of where some of the numbers come from. Many will try comparing the results from the tool with Exchange 2010 but, honestly, you shouldn't. The architecture between both versions is so different that comparing them would be like comparing apples and oranges.
You can find Microsoft's article describing the entire process in more detail on the following webpage:
Given the great detail of the information from the article, us explaining how to perform them would be waste of paper. However, we did want to give some basic information to get you going with the calculator.
The first sheet, the Input tab, is where you should enter your requirements for your Exchange server deployment. This is the information the tool will use to calculate the sizing requirements. Amongst others things, this information contains the mailbox profile information and architectural information, such as whether you are deploying Exchange in a virtualized environment and/or you are installing multi-role servers. The following screenshot shows the general information the Role Requirements Calculator will ask you for:
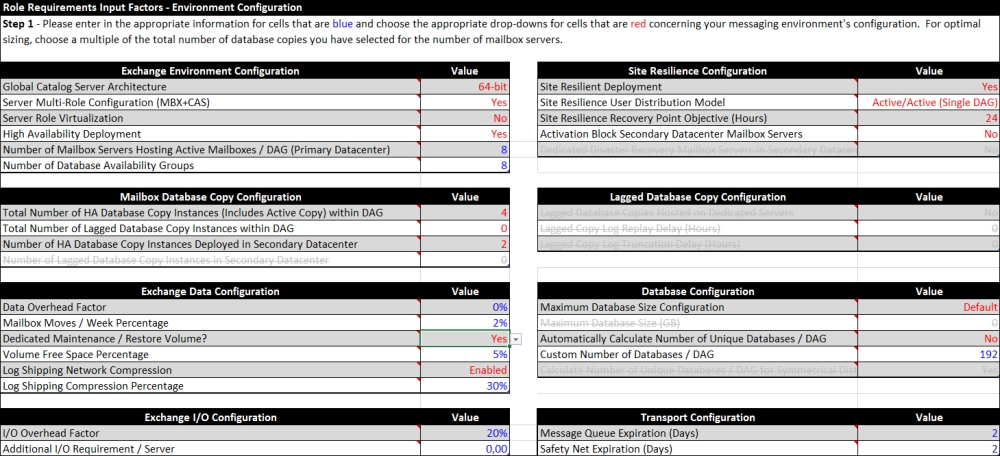
By clicking on the red triangle on each field, you will be given more information about what the tool is expecting or referring to. Usually the field's names are descriptive enough and self-explanatory. However, the part with regards to the high availability requirements can sometimes seem a little confusing.
Consider the following scenario:
A company has a total of 10.000 mailboxes, all located in a single site. After a first (manual) draft of our sizing, we've calculated that we will need at least 4 servers to store mailboxes and have room for high availability. Not only should the environment be able to withstand a single database failure, but also an entire datacenter failure. Also, the database copies in the second datacenter should not be used automatically. However, if the business decided to switch over to the second datacenter, it should also be able to withstand a single database failure.
This information teaches us that each datacenter should have at least two database copies, allowing for a single database failure per datacenter. Because the secondary datacenter should not be activated automatically, the databases in that location should be blocked from activation.
Given that all users are located in a single site, we're actually deploying an Active/Passive scenario. In the real world, this could be the case if you have a primary datacenter and also a secondary one that is solely used for disaster recovery purposes. The latter is sometimes also referred to as a DR-site.
Assuming we would deploy physical multi-role servers, the input for the calculator would look something like this screenshot:

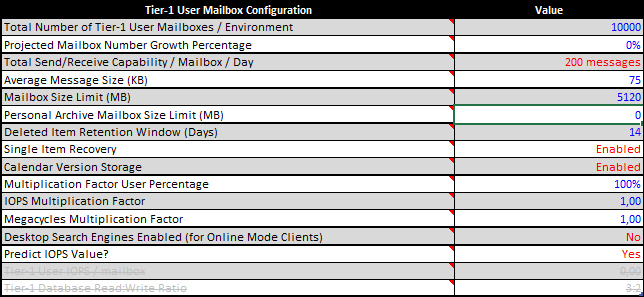
Next, you need to provide the tool with information on mailbox profiles including the maximum required mailbox size, amount of messages received per mailbox per day, and the retention requirements. This is shown in the following screenshot:
Tip
As described earlier, you could define different tiers of users which allow you to define different requirements for different types of users.
The rest of the information on the page is pretty self-descriptive and it shouldn't be too hard to enter or select the correct information except maybe for the part about the Log Replication Configuration. This is shown in the following screenshot:
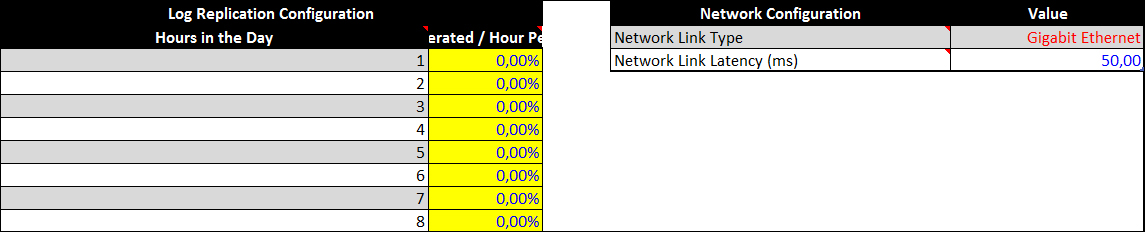
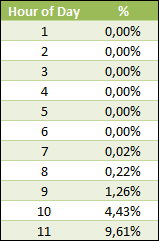
The input from here is used to calculate the bandwidth requirements. In order to do this, the calculator needs to know the amount of logs generated each hour. Without having a live deployment that you could reference to, it's pretty hard to estimate what numbers to enter here.
Luckily, Microsoft has released a tool called the Exchange Client Bandwidth Calculator which operates in a similar way to the Role Requirements Calculator, by entering the details of your clients it will calculate the required bandwidth and predict the usage pattern in 24 hours. To help you with the Role Requirements Calculator, it also contains a table which displays the information you can use to enter in the Log Replication Configuration. This is shown in the following screenshot:
Once you're done entering the information in the Input Sheet, the calculator will automatically generate the results in the other sheets.
The Role Requirements sheet provides you with information on each of the servers, such as the amount of RAM and disk space needed, as well as a calculation of the CPU utilization. If your CPU utilization is too high, you can go back to the Input Sheet and change the CPU information. In such case, you basically have two options, either you buy a CPU that is more powerful or you add more servers to the environment.
This sort of described another widely used approach to sizing Exchange, which is, trial & error. You start by entering information in the Input Sheet, based on what you think the design should look like. Then you go through the other sheets to see if the requirements are feasible. If not, you go back to the input field and change the parameters, such as the amount of servers, disk sizes, or CPU configurations. You keep on doing that until the calculated requirements satisfy your expectations. While this approach might also be effective, we find it to be little efficient. A better approach would be to make the calculations by hand and using the tool to validate and refine them if needed.
The Distribution Sheet contains information on how to layout your database copies throughout your environment. When taking a look at the sheet using the input from earlier, you will see the following screenshot:
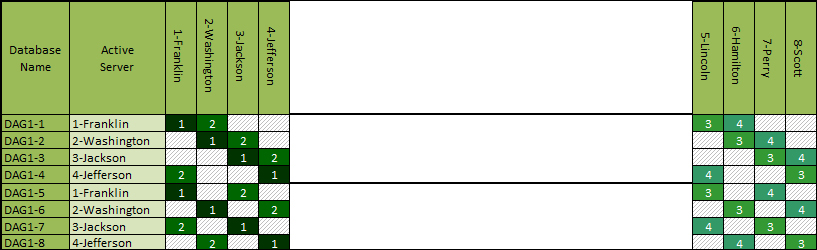
Because of the requirement that the second datacenter needs to be able to take on the entire load of primary datacenter and because it should be able to withstand the failure of a single database copy, we actually need to mirror the architecture from the primary datacenter.
Have a look at Chapter 6, Implementing and Managing High Availability for more information how high availability affects the Exchange 2013 design and ultimately also what you need to input into the Role Requirements Calculator.