

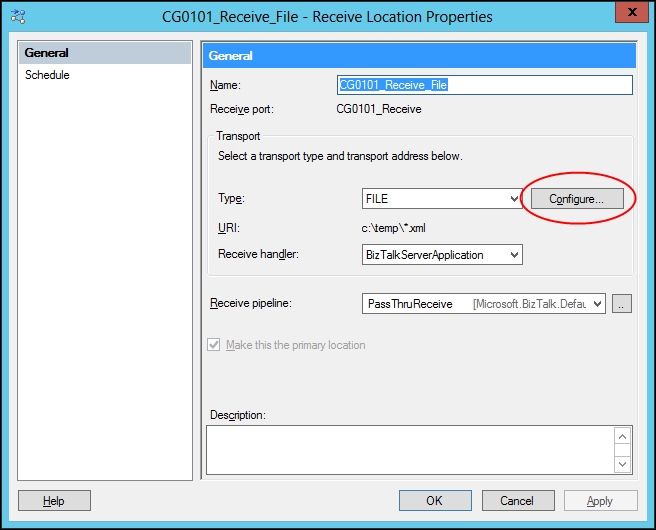
When choosing an Adapter on both Receive Locations and Send Ports, the Adapters need to be configured. To do this, choose the Configure button, as shown in the following screenshot:
What will appear next depends on which type of Adapter was chosen. In this chapter, we will look at some of the core Adapters and how they are configured.
The HTTP section will discuss the use of the HTTP Adapter in both receive and send scenarios.
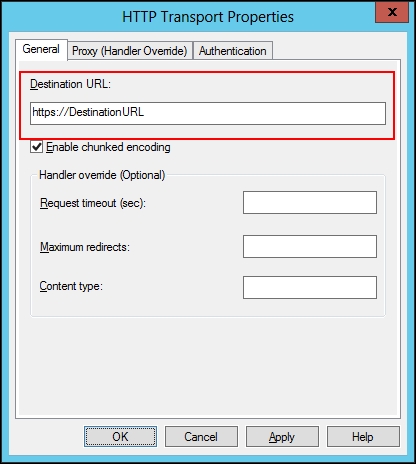
When configuring the HTTP Send Adapter, the URL (Destination URL) of the target HTTP site needs to be configured. The following screenshot shows the basic configuration, and the Destination URL being configured:
Setting up BizTalk to receive HTTP requires more work than sending HTTP. To be able to receive HTTP, we need to use the local Internet information Services (IIS) and have it receive the actual message for us by using an Isolated Host.
First, we need to add BTSHttpReceive.dll. This file is found in the %Program Files%\Microsoft BizTalk Server 2013\HttpReceive64 folder (HttpReceive folder if not using a 64-bit IIS). This DLL needs to be added as an extension inside the IIS. Open the IIS Manager by navigating to Start | Administrative Tools | Internet Information Services(IIS) Manager, click on the computer name and double-click on Handler Mappings. In the action pane on the right-hand side of the window, choose Add Script Map. The following screenshot shows the Add Script Map window:
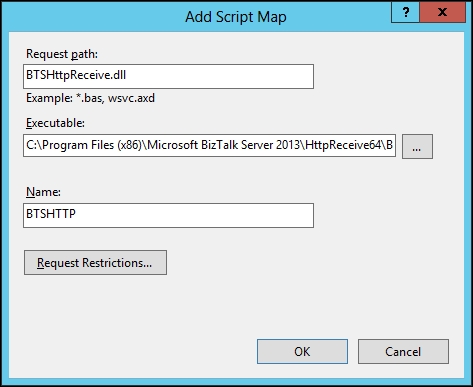
In the Request path field, type BTSHttpReceive.dll. In the Executable field, choose the BTSHttpReceive.dll file from within program files and give the mapping a proper name. Now click on OK.
Click on Yes in the Add Script Map dialog.
Now, we need to perform the following steps for creating a Virtual Directory containing BTSHttpReceive.dll, as mentioned earlier:
Right-click on the Default Web Site folder and select Add Virtual Directory.
Set the Alias property to the name we want the callers of our HTTP service to use in the URL (
http://servername/Alias/BTSHTTPReceive.dll).Under Physical Path, choose the folder where the
BTSHTTPReceive.dllfile is located (underProgram Files) and click on OK.
Next, we need to set up an HTTP Receive Location. The HTTP flow we are receiving in BizTalk can be both One-Way or Request-Response (refer to the Implementing messaging patterns section).
When configuring the HTTP Receive Adapter, we need to specify the Virtual Directory and the DLL extension, as shown in the following screenshot:
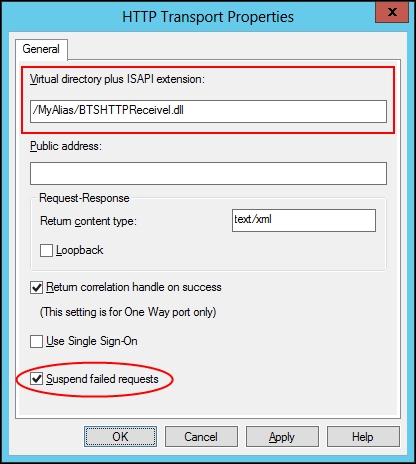
In most cases, the Suspend failed requests option should also be enabled. What this option does is gives BizTalk the responsibility of processing the message as soon as it has been submitted. If this option is not enabled (default), the caller will get an error back if the message could not be processed correctly (the Pipeline fails, no subscribers were found, and so on). This could be a valid setup, but in most situations it would make more sense to have the HTTP Receive Adapter handle errors the same way as a FILE Adapter, by taking responsibility for the message as soon as it is submitted, and not bother the caller with any problems inside BizTalk, but rather suspend the message and deal with the problems internally and let the caller believe that everything processed as expected. This is, of course, only the case of one-way HTTP calls.
The POP3 Adapter is used to receive e-mails. The Adapter is a receive-only Adapter because sending something through POP3 doesn't make any sense. The send equivalent of POP3 is usually SMTP, which we will look at in the next section.
Note
Under certain conditions, the POP3 Adapter will not run under a multiserver setup, and in these cases, the use of clustering Hosts might be needed. Read more about this at http://msdn.microsoft.com/en-us/library/gg634567.aspx.
The following screenshot shows the configuration of the POP3 Receive Adapter:
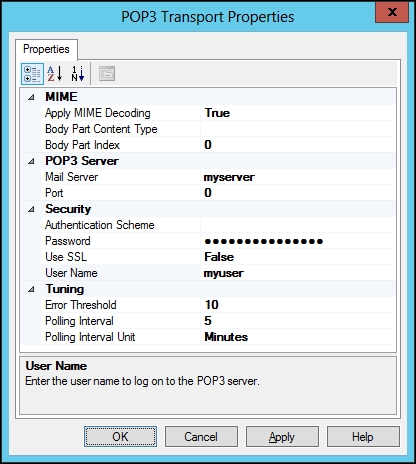
We need to set up Mail Server (from which the messages can be retrieved), User Name, Password, and Body Part Index.
The Body Part Index attribute is used to choose what part of the mail will be considered as the actual message inside BizTalk. 0 is the message body, 1 is the first attachment, 2 is the second attachment, and so on.
Note
Note that if Body Part Content Type is set to a specific content type, the algorithm for choosing which part of the mail to use is a bit more complex. For further information, visit http://msdn.microsoft.com/en-us/library/aa560251(v=bts.80).aspx.
The SMTP Adapter is used for sending e-mails.
To set up the SMTP Adapter, it is often a good idea to configure the general server credentials inside the STMP Send Handler (refer to the Managing Adapter Handlers section).
The following screenshot shows the configuration screen of the SMTP Send Handler Adapter:
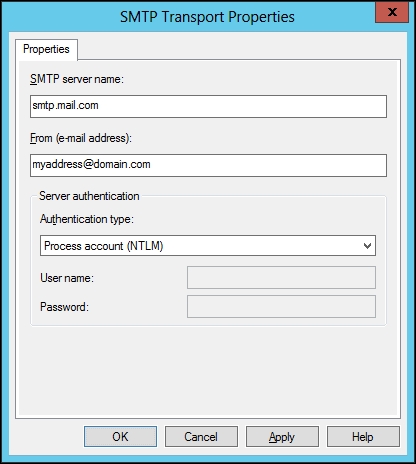
On the Send Handler, the SMTP Server name and From (e-mail address) can be configured since they will likely be the same for all SMTP Send Ports. These parameters can be overwritten on a single Send Port, if required.
When configuring the actual SMTP Adapter on a Send Port, perform the following steps:
In the General tab, type the desired e-mail address in the To: field. Also, give a subject to the e-mail and, if needed, specify a CC address.

In the Compose tab, choose either the BizTalk message body part option as the e-mail body or the Text option for standard text.
Choose Attach only body part to have the actual message as an attachment.
Use the Handler Override options if the SMTP Server setup in the Adapter handler should be overwritten.
The FTP Adapter can be used for both receiving and sending messages in BizTalk. On the receive side, only single Host Instance server set up is allowed.
When configuring the FTP Adapter, there are some basic features that apply to both sending and receiving, as shown in the following screenshot:
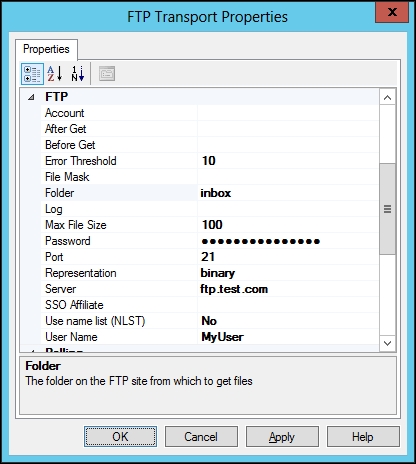
For all FTP configurations, at least the following four parameters should be configured:
When using basic configuration, the FTP Server will delete the files when they are processed so that the same files are not processed more than once.
However, this might not always be the desired functionality since we might not be allowed to delete the files. The server could be holding files that are not just for us, but published for many subscribers.
In order to overcome this issue, new polling features have been introduced in BizTalk Server 2010, and are still available in 2013, which are shown in the following screenshot:
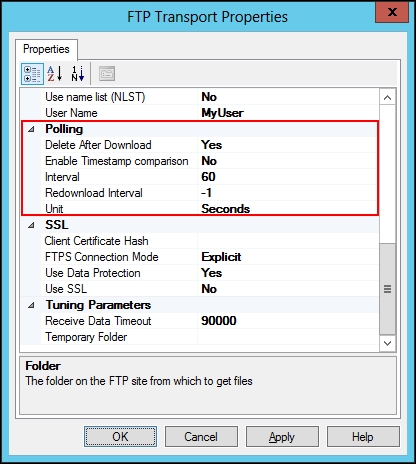
It is now possible to change the Delete After Download attribute on the FTP Receive Adapter from Yes to No. By doing this, BizTalk will keep track of which files have already been downloaded, and the same files will not be downloaded again even though they are still on the FTP Server. If existing files are edited and overwritten on the FTP Server, and we want a new copy when changes happen to the files, we should also set the Enable Timestamp comparison attribute to Yes. By doing this, we will not only get new files once, but also a fresh copy of any file that has been overwritten on the FTP Server.
The interval (60 seconds in the previous example) should also be taken into consideration when setting up the receive FTP. This is an indication of how often BizTalk will look in the FTP folder for new messages. If set too often, we might experience too much network traffic and problems with the FTP Server. On the other hand, if not set often enough, we might experience that messages submitted for BizTalk takes too long to process because they are not polled by BizTalk often enough.
The FTP protocol does not have any proper lock mechanism. So if a large file is being written to the folder where BizTalk is polling from, BizTalk will start downloading the file as soon as the file is visible, and not necessarily when the file is complete. This problem needs to be addressed by the systems uploading the files to BizTalk in the FTP folders by creating the files with a temporarily extension (filename.xml.tmp) and then removing the .tmp after the file is completed. In that case, we also need to set up the File Mask property on the FTP receive to look for files with the xml extension (*.xml).
Another way of dealing with the problem of files being downloaded by BizTalk before the file is fully written, is having the submitter upload the file to a temporary folder, and then moving it to the correct folder where BizTalk is polling from when the file is completed.
When sending FTP, it is basically the core configuration that is needed (server, user name, and so on). However, there are two other properties that are often relevant to take into consideration. These properties are shown in the following screenshot:

First, we will take a look at Target File Name. This is used to specify the name that BizTalk will give to the file written to the FTP Server. The default is %MessageID%.xml, where %MessageID% will be replaced with an internal GUID unique for each message so that no two files uploaded to an FTP Server from BizTalk will ever have the same name. The use of hardcoded name (such as Order.xml) is not recommended, as this will cause a failure on the send side if BizTalk tries to upload File with the same name twice and the first file has not been processed by the destination party yet. Depending on the FTP Server it might also result in the files just being overwritten. However, there is a property called Append if exists that can be set to Yes. This is seldom used and will only work for Flat Files and not for XML, since the latter requires one root element.
It is also possible to use %SourceFileName% as a file mask in Target File Name. This will give the file the same name as it had when submitted to BizTalk by either a file or FTP. Again, we need to take into consideration whether or not two files could end up with the same name, and therefore, cause the FTP Send Adapter to fail. Also, this will only work if all files sent through the FTP Adapter were in fact received into BizTalk by either the FILE or FTP Adapter (refer to the Implementing messaging patterns section).
Another property that might be useful when sending FTP is Temporary Folder. This enables the Adapter to upload the file to another folder, rather than to the one specified in the Folder property, and move the file to the correct folder when upload has completed. As we discussed with the receive FTP Adapter, this might be useful because FTP doesn't have any proper locking mechanism.
The FILE Adapter is one of the most used Adapters, both for testing/demo purposes and for communicating with several legacy systems where the only protocol supported is exporting and importing files.
Configuring the Receive FILE Adapter requires a path to the folder where BizTalk should pick up files (Receive folder) as well as a File mask, specifying which type of files and/or filenames should be received. This folder can either be local or located on a file server somewhere on the network. Using local folders is not recommended when working with multiserver environments since that would cause BizTalk to have more than one file entry-point. How many BizTalk Servers a BizTalk Group contains should be transparent to the surrounding environments.
When using a file server, be aware that using mapped drive letters in Receive folder might not work as intended (Z:\Inbox), since it will use the mapped drives of the user running the Host Instance and not necessarily the mapped drives seen by the user configuring the Port. Therefore, UNC paths are recommended (\\ServerName\Path\Inbox). The following screenshot shows the general configuration properties for a Receive FILE Adapter:
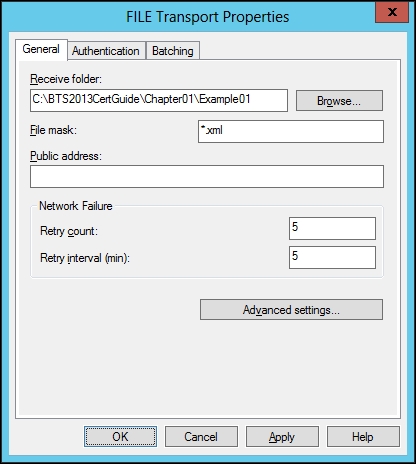
The Receive folder can only point to a single folder. It is not possible to have the same Receive Location probing in more than one folder. This limitation also includes subfolders.
When working on NTFS file systems, the FILE Adapter will work using .NET File System Events, so every time a file is submitted, BizTalk will be notified almost immediately and will start processing the file (except if service windows are implemented on the Receive Location).
When using the FILE Adapter on the send side, the configuration looks similar to the following screenshot:
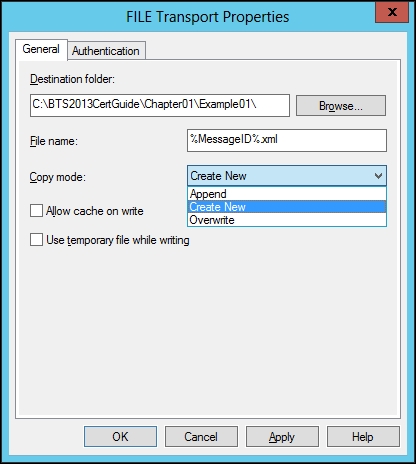
When sending files using the FILE Adapter, we need to specify the Destination folder and the File name. The default filename is %MessageID%.xml, which will give the filename a unique GUID to make sure no two files are given the same name.
Just as the FTP Adapter, %SourceFileName% can also be used on the FILE Adapter, but again we should use it with caution, since it will only work if the original message was received through either an FTP or FILE Adapter.
It is also possible to configure how the FILE Adapter should write the file to folder using the Copy mode option. The following are the three possible modes:
Append: This will append the message into an existing file, if the file is already present. It is usually used for Flat Files (comma delimited, positional text files) and not for XML.
Create New (default): This setting is the most commonly used setting. It will create, or try to create, a new file each time a message is sent to the Port. When using this setting, it is recommended that the filename is unique, which can be done by using the
%MessageID%macro.Overwrite: This will overwrite any existing files that have the same name as the file currently being written to a file folder. This is often used when dealing with daily inventory reports and so on, where the old data is obsolete as soon as new data is present.
If no credentials are specified in the FILE Adapter configuration, it will be the user running the Host Instance, which needs to have the correct amount of rights to the folder it is receiving from or sending to. If the user does not have the sufficient amount of credentials, we can supply another username and password for the FILE Adapter to use, as shown in the following screenshot:
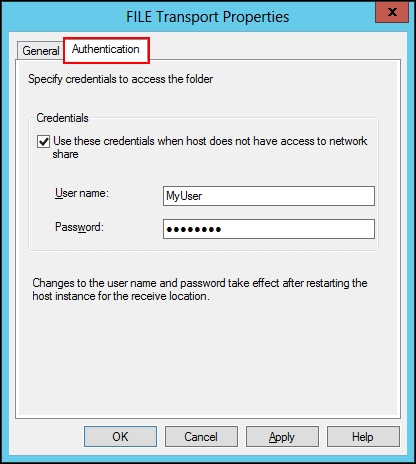
Click on the Authentication tab and specify a username and password. Now, this user will be used instead of the Host Instance User. This can be done for both receiving and sending files.