

A reverse proxy (a service that retrieves information on behalf of a client from servers usually located in a corporate network) is a required part of any Lync Server 2013 deployment that we want to make available to external users (as shown at http://technet.microsoft.com/en-us/library/gg398069.aspx). There are many reverse proxy solutions offered by vendors and a couple of free solutions available as part of the Windows OS. The first one is the Web Application Proxy (WAP) that is part of the Remote Access Server role in Windows Server 2012 R2. However, WAP is a relatively new technology, and there have been some issues related to using it as a reverse proxy solution for Lync Server 2013. The other solution is the IIS Application Request Routing (ARR) that enables a Windows server to act as a reverse proxy. We will talk about the setup required for the latter scenario.
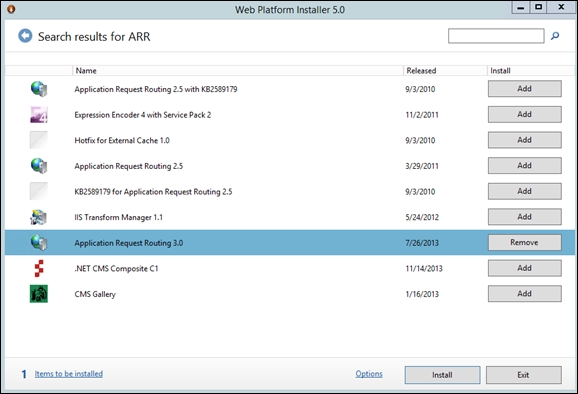
The latest available version of IIS ARR is 3.0. A prerequirement for ARR 3.0 is to have IIS enabled on the server (we can use the default settings). ARR is available using the Microsoft Web Platform Installer (MWPI) at http://www.microsoft.com/web/gallery/install.aspx?appid=ARRv3_0. There is also a standalone version (ARR 3.0 standalone package) at http://www.microsoft.com/en-us/download/details.aspx?id=40813, which does not require the Web Platform Installer and could be a good solution for a server with a high level of segregation. We will use the first option (with MWPI). The FQDN of the server we are going to use is dormouse, the Lync 2013 Standard Edition Front End server is madhatter.absoluteuc.corp, and the AD DS server (that includes a certification authority) is alice.absoluteuc.corp. The frontend has a public name madhatter.absoluteuc.org, as shown in the following screenshot:

The configuration of a reverse proxy for Lync Server 2013 requires a digital certificate (usually issued from a public CA) that must include at least the Lync Pool FQDN and the Lync simple URLs for Lync (meet and dial-in). The admin simple URL is optional, and for internal use only (http://technet.microsoft.com/en-us/library/gg425874.aspx).
Note
The reverse proxy in Lync can also be used as a proxy also the simple URLs for Lync Web External (lyncwebext), Mobility (Lyncdiscover), Office Online external URL (which could be unique or shared with lyncwebext). If we enable it, we will also have the simple URL for webscheduler.
Some reference material on this topic is available in the See also section of this recipe. A reverse proxy is usually deployed in a Demilitarized Zone (DMZ) network and will require two different network interfaces (NICs), one behind the Internet-facing firewall (external NIC) and one behind the backend firewall, used to connect to our internal Lync deployment (internal NIC). The reverse proxy will be reachable from the Internet using a Network Address Translation (NAT), a process performed by the firewall that converts an internal network address into a different address that is public on the Internet.
Our reverse proxy will be located in a DMZ (that is a best practice). Usually, in a similar scenario, we have no access to a DNS server that is able to resolve the FQDNs of the internal domain (in our situation,
wonderland.lab), so we have to populate the localHOSTSfile on our server.Prepare the SSL digital certificate, starting from a CSR generated using IIS (http://technet.microsoft.com/en-us/library/cc732906(v=ws.10).aspx) or a third-party utility like the DigiCert Certificate Utility for Windows (https://www.digicert.com/util/) and follow the steps required by the selected CA.
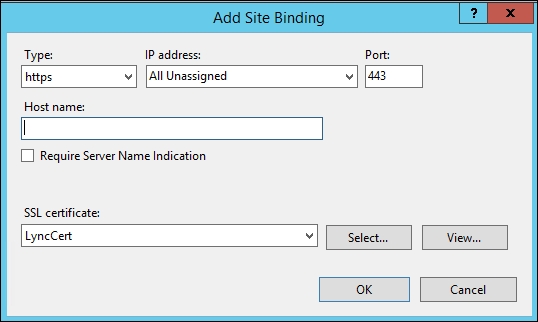
Open the Internet Information Services (IIS) Manager and go to the server home screen. Select Server Certificates and select Import… to import the SSL certificate (in our example, it will be named
LyncCert).Open the Default Web Site page, and select Bindings….
Select Add, set Type HTTPS, and select the SSL certificate as shown in the following screenshot:
Launch the installer and select Application Request Routing 3.0, as shown in the following screenshot. The configuration will go on automatically.
Open the start screen, select Internet Information Server (IIS) Manager, and go to the Server Farms screen. Right-click and select Create Server Farm, as we can see in the following screenshot:

Type the FQDN of the service we are going to publish (for example,
madhatter.absoluteuc.org). Leave the online flag selected. Click on Next.Before we add the server, select the Advanced Settings… tab. On the ApplicationRequestRouting parameters, change the HTTP and HTTPS ports (for Lync Server 2013, they are
8080and4443, if we haven't customized them in the topology design). In the server name field, type the name of our internal server (or load balancer) and click on Add. The configuration is shown in the screen capture. The steps are shown in the following screenshot: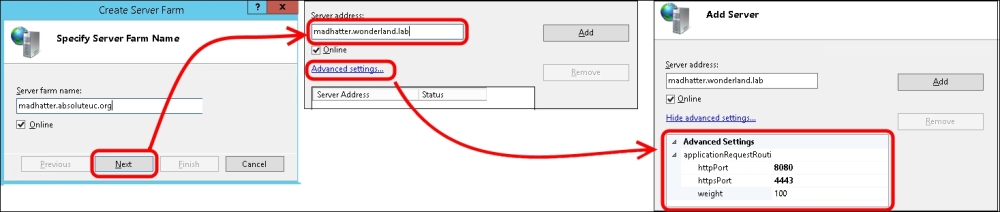
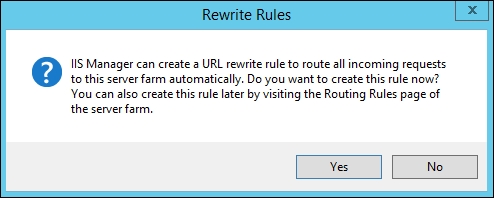
Select Finish. A notification like the one in the following screenshot will be shown. Select Yes.
Now, under the Server Farms menu, we will have lyncdiscover.absoluteuc.org. We have to select it and modify some of the options shown in the following screenshot:
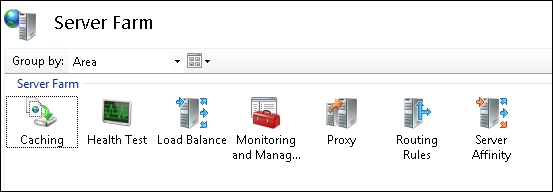
Go to the Caching options. Remove the flag from Enable disk cache. Select Apply.
Go to the Routing Rules options. Remove the flag from Enable SSL Offloading. Select Apply.
Go to the server's home screen and select URL rewrite. The previous wizard created two rewrite rules, one with HTTPS/SSL and one with plain HTTP. Remove the one we are not going to use and edit the other one to match our needs. In our example, we are going to publish madhatter.absoluteuc.org using HTTPS, so we will remove the HTTP rule and edit the SSL rewrite rule, as shown in the following screenshot:

The conditions to use are as follows:
input= {HTTPS}, Type=Matches the Pattern, Pattern=on input={HTTP_HOST}, type=Matches the pattern, Pattern=madhatter.*We also have a Test Pattern option to match the URL we are going to use with the rules. When we have done, we have to select Apply. The screen is shown in the following screenshot:

The previously mentioned steps have to be repeated for every URL we plan to publish.

The reverse proxy will receive requests on standard ports (TCP 80 for HTTP and TCP 443 for HTTPS) and redirect them to ports 8080 and 4443 of our Lync Server deployment. The "public" Lync 2013 site that is listening on these ports has rewrite rules to handle all the SIP domains we have deployed. For more information, see the Lync 2013 Internal and External Web Sites post at http://tsoorad.blogspot.it/2013/04/lync-2013-internal-and-external-web.html by John Weber.
To plan Lync certificates, the following are some useful resources:
TechNet post Request and Configure a Certificate for Your Reverse HTTP Proxy at http://technet.microsoft.com/en-us/library/gg429704.aspx
Lync 2013 Detailed Design Calculator at http://gallery.technet.microsoft.com/lync/Lync-2013-Standard-Edition-324bf0f1
Microsoft Lync Server 2013 Internal Certificate Planning and Deployment at http://lyncuc.blogspot.de/2014/04/internal-certificate-deployment-in-lync.html