First, let's see how to identify a wireless adapter:
- One of the first pieces of information you should have in hand is the name and type of your network connection. This information will prove extremely helpful later on, when you are using the various utilities and scripts as well as ensuring that you have the proper and optimal adapters to get the best results from your test.
- So, let's cover how to locate and identify your current network adapters and which information is going to be useful later on during our penetration testing.
Using ifconfig to identify a network adapter.
Within Linux exists a command that can easily assist us in identifying our wireless connection and its state, this command is ifconfig. This command, accessible via the command line, reveals network connection information about each adapter present on the system and their associated names.
To run the command, simply type in the following at the Kali command line:
Ifconfig
- Press Enter
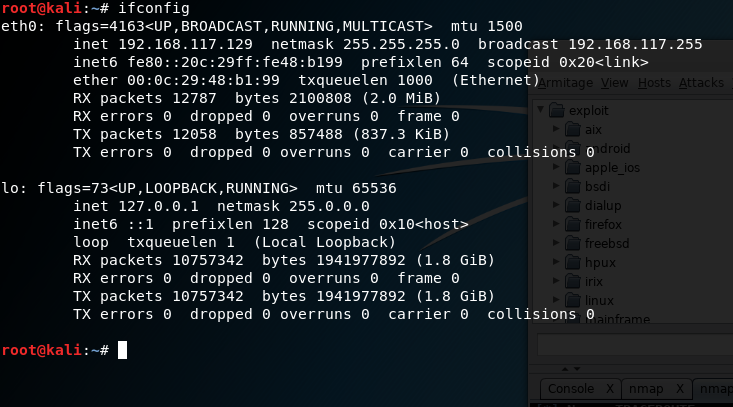
- The results you will retrieve from the command will look somewhat like the following:
As you can see in the preceding screenshot, we have a lot of information. So, let's break it down.
The first piece of information you should note is the name of the network connections which, in this case, are named eth0 and lo. You can have names such as eth1 or other labels in these places based on the network type. For our purposes, we should see an adapter labeled wlan0 or wlan1 or something starting with the wlan prefix indicating wireless. For the purposes of our analysis, we will use the eth0 adapter; the lo adapter is the loopback virtual adapter and is not of use for us here.
You should also notice in this line the word UP or DOWN, which will tell you if the adapter is online or offline.
The second piece of important information is the line starting with the label inet. This line gives us information about the current configured IPv4 address and associated netmask and other details. The line directly under it is giving the same sort of information, but for IPv6.
The next line gives us a piece of information labeled ether, which is the network adapter's Media Access Control (MAC) address, which is also known as the physical address of the adapter.
The balance of the lines gives detailed information about the network configuration and transfer of data. We will ignore these for right now.
You should always familiarize yourself with the contents of at least the first three lines for each adapter (for our purposes, just your wireless adapter will suffice). All of this information will come in handy later on when you are using the various tools and scripts to attack a wireless network:
- Selecting a network adapter.
- One of the next actions you will need to take is to select a wireless network adapter or items you need to perform your test. While you can use the adapters that are built into your notebook or other device, they do lack some capabilities in some cases.
- Some features that may not be present in internal adapters, but may be desirable to have are:
- Ability to support an external antenna
- Ability to perform packet injection (needed for some attacks)
- Incompatible chipsets on some cards may not work with some specific utilities
- Lack of support for new wireless standards
- Lack of support for different frequencies
This is a short list of features which lack of support or capability for can limit your ability to accurately and completely perform your test.
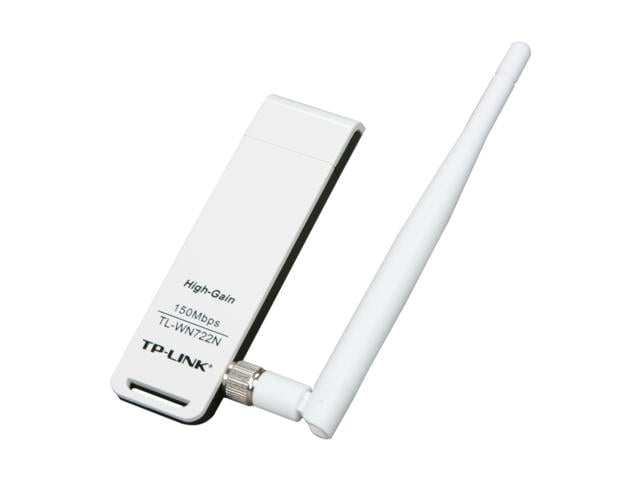
It is with this in mind that I will show an example of an adapter that is fairly common and works quite well. The following image is an example of an adapter by TP-Link that supports many of the capabilities on the list noted here:
An external USB wireless adapter
As you can see from the preceding photograph the most notable feature of this adapter is its use of an external antenna, designed to provide better performance. You can even replace the antenna on this adapter to provide different amounts of coverage and performance.
So, how do you know which is the right adapter for you? In most cases, you can get away with the internal wireless network adapters, but not always. If you intend to perform advanced attacks on wireless networks, increase the range and power of your test.