

If you are not a programmer who is actively involved in the development of web applications, then chances of you knowing the inner workings of the HTTP protocol, the different ways web applications interact with the database, and what exactly happens when a user clicks a links or types in the URL of a website in the web browser are very low.
If you have no prior programming skills and you are not actively involved in the development of web application, you won't be able to effectively perform the penetration test. Some initial knowledge of web applications and HTTP protocol is needed.
As a penetration tester, understanding how the information flows from the client to the server and back to the client is very important. For example, a technician who comes to your house to repair your television needs to have an understanding of the inner working of the television set before touching any part of it. This section will include enough information that would help a penetration tester who has no prior knowledge of web application penetration testing to make use of tools provided in Kali Linux and conduct an end-to-end web penetration test. We will get a broad overview of the following:
HTTP protocol
Headers in HTTP
Session tracking using cookies
HTML
Architecture of web applications
The underlying protocol that carries web application traffic between the web server and the client is known as the hypertext transport protocol. HTTP/1.1 the most common implementation of the protocol is defined in the RFCs 7230-7237, which replaced the older version defined in RFC 2616. The latest version, known as HTTP/2, was published in May 2015 and defined in RFC 7540. The first release, HTTP/1.0, is now considered obsolete and is not recommended. As the Internet evolved, new features were added in the subsequent release of the HTTP protocol. In HTTP/1.1, features such as persistent connections, OPTION method, and several improvements in way HTTP supported caching were added.
HTTP is basically a client-server protocol, wherein the client (web browser) makes a request to the server and in return the server responds to the request. The response by the server is mostly in the form of HTML formatted pages. HTTP protocol by default uses port 80, but the web server and the client can be configured to use a different port.
The HTTP request made by the client and the HTTP response sent by the server have some overhead data that provides administrative information to the client and the server. The header data is followed by the actual data that is shared between the two endpoints. The header contains some critical information which an attacker can use against the web application. There are several different ways to capture the header. A web application proxy is the most common way to capture and analyze the header. A detailed section on configuring the proxy to capture the communication between the server and client is included in Chapter 2, Setting up Your Lab with Kali Linux. In this section, we will discuss the various header fields.
Another way to capture the header is using the Live HTTP Headers add-on in the Chrome browser, which can be downloaded from https://chrome.google.com/webstore/detail/live-http-headers/iaiioopjkcekapmldfgbebdclcnpgnlo?hl=en. The add-on will display all the headers in real time as you surf the website.
The following screenshot is captured using a web application proxy. As shown here, the request is from a client using the GET method to the www.bing.com website. The first line identifies the method used. In this example, we are using the GET method to access the root of the website denoted by "/". The HTTP version used is HTTP/1.1:
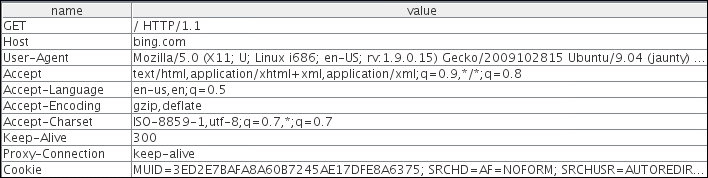
There are several fields in the header, but we will discuss the more important ones:
Host: This field is in the header and it is used to identify individual website by a hostname if they are sharing the same IP address. The client web browser also sets a user-agent string to identify the type and version of the browser.
User-Agent: This field is set correctly to its default values by the web browser, but it can be spoofed by the end user. This is usually done by malicious user to retrieve contents designed for other types of web browsers.
Cookie: This field stores a temporary value shared between the client and server for session management.
Referer: This is another important field that you would often see when you are redirected from one URL to another. This field contains the address of the previous web page from which a link to the current page was followed. Attackers manipulate the Referer field using an XSS attack and redirect the user to a malicious website.
Accept-Encoding: This field defines the compression scheme supported by the client; gzip and Deflate are the most common ones. There are other parameters too, but they are of little use to penetration testers.
The following screenshot displays the response header sent back by the server to the client:

The first field of the response header is the status code, which is a 3-digit code. This helps the browser to understand the status of operation. Following are the details of few important fields:
Status code: There is no field named as status code but the value is passed in the header. The status codes starting with 200 are used to communicate a successful operation back to the web browser. The 3xx series is used to indicate redirection when a server wants the client to connect to another URL when a web page is moved. The 4xx series is used to indicate an error in the client request and the user will have to modify the request before resending. The 5xx series indicate an error on the server side as, the server was unable to complete the operation. In the preceding image the status code is 200 which means the operation was successful. A full list of HTTP status codes can be found at https://developer.mozilla.org/en-US/docs/Web/HTTP/Response_codes.
Set-Cookie: This field, if defined, will contain a random value that can be used by the server to identify the client and store temporary data.
Server: This field is of interest to a penetration tester and will help in the recon phase of a test. It displays useful information about the web server hosting the website. As shown here, www.bing.com is hosted by Microsoft on IIS version 8.5. The content of the web page follows the response header in the body.
Content-Length: This field will contain a value indicating the number of bytes in the body of the response. It is used so that the other party can know when the current request/response has finished.
The exhaustive list of all the header fields and their usage can be found at the following URL:
http://www.w3.org/Protocols/rfc2616/rfc2616-sec14.html
For a hacker, the more data in the header the more interesting is the packet.
When a client sends a request to the server, it should also inform the server what action is to be performed on the desired resource. For example, if a user wants to only view the contents of a web page, it will invoke the GET method that informs the servers to send the contents on the web page to the client web browser.
Several methods are described in this section and they are of interest to a penetration tester as they indicate what type of data exchange is happening between the two end points.
The GET method passes the parameters to the web application via the URL itself. It takes all the input in the form and appends them to the URL. This method has some limitations; you can only pass 255 characters in the URL via GET and if it is exceeding the count, most servers will truncate the character outside the limit without a warning or will return an HTTP 414 error. Another major drawback of using a GET method is that the input becomes a part of the URL and prone to sniffing. If you type in your username and password and these values are passed to the server via the GET method, anybody on the web server can retrieve the username and password from the Apache or IIS log files. If you bookmark the URL, the values passed also get stored along with the URL in clear text. As shown in the following screenshot, when you send a search query for Kali Linux in the Bing search engine, it is sent via the URL. The GET method was initially used only to retrieve data from the server (hence the name GET), but many developers use it send data to the server:

The POST method is similar to the GET method and is used to retrieve data from the server but it passes the content via the body of the request. Since the data is now passed in the body of the request, it becomes more difficult for an attacker to detect and attack the underlying operation. As shown in the following POST request, the username and password is not sent in the URL but in the body, which is separated from the header by a blank line:

The
HEAD method is used by attackers to identify the type of server as the server only responds with the HTTP header without sending any payload. It's a quick way to find out the server version and the date.
When a TRACE method is used, the receiving server bounces back the TRACE response with the original request message in the body of the response. The TRACE method is used to identify any alterations to the request by intermediary devices such as proxy servers and firewalls. Some proxy servers edit the HTTP header when the packets pass though it and this can be identified using the TRACE method. It is used for testing purposes, as you can now track what has been received by the other side. Microsoft IIS server has a TRACK method which is same as the TRACE method. A more advance attack known as
cross-site tracing (XST) attack makes use of
cross-site scripting (XSS) and the TRACE method to steal user's cookies.
The
PUT and DELETE methods are part of WebDAV, which is an extension to HTTP protocol and allows management of documents and files on the web server. It is used by developers to upload production-ready web pages on to the web server. PUT is used to upload data to the server whereas DELETE is used to remove it.
It is used to query the server for the methods that it supports. An easy way to check the methods supported by the server is by using the Netcat (nc) utility that is built into all Linux distributions. Here, we are connecting to ebay.com on port 80 and then using the OPTIONS method to query the server for the supported methods. As shown in the following screenshot, we are sending the request to the server using HTTP/1.1. The response identifies the methods the server supports along with some additional information:

Understanding the layout in the HTTP packet is really important, as it contains useful information and several of those fields can be controlled from the user-end, giving the attacker a chance to inject malicious data.
HTTP is a stateless client-server protocol, where a client makes a request and the server responds with the data. The next request that comes is an entirely new request, unrelated to the previous request. The design of HTTP requests is such that they are all independent of each other. When you add an item in your shopping cart while doing online shopping, the application needs a mechanism to tie the items to your account. Each application may us a different way to identify each session.
The most widely used technique to track sessions is through a session ID set by the server. As soon as a user authenticates with a valid username and password a unique random session ID is assigned to that user. On every request sent by the client, it should include the unique session ID that would tie the request to the authenticated user. The ID could be shared using the GET method or the POST method. When using the GET method, the session ID would become a part of the URL; when using the POST method, the ID is shared in the body of the HTTP message. The server would maintain a table mapping usernames to the assigned session ID. The biggest advantage of assigning a session ID is that even though HTTP is stateless, the user is not required to authenticate every request; the browser would present the session ID and the server would accept it.
Session ID has a drawback too; anyone who gains access to the session ID could impersonate the user without requiring a username and password. Also, the strength of the session ID depends on the degree of randomness used to generate it, which would help defeat brute force attacks.
Cookie is the actual mechanism using which the session ID is passed back and forth between the client and the web server. When using cookies, the server assigns the client a unique ID by setting the Set-Cookie field in the HTTP response header. When the client receives the header, it will store the value of the cookie, that is, the session ID within the browser and associates it to the website URL that sent it. When a user revisits the original website, the browser will send the cookie value across identifying the user.
Besides saving critical authentication information, cookie can also be used to set preference information for the end client such as language. The cookie storing the language preference for the user is then used by the server to display the web page in the user preferred language.
As shown in the following figure, the cookie is always set and controlled by the server. The web browser is only responsible for sending it across to the server with every request. In the following image, we can see that a GET request is made to the server, and the web application on the server chooses to set some cookies to identify the user and the language selected by the user in previous requests. In subsequent requests made by the client, the cookie becomes the part of the request:

Cookies are divided into two main categories. Persistent cookies are the ones that are stored on the hard drive as text files. Since the cookie is stored on the hard drive it would survive a browser crash. A cookie, as mentioned previously, can be used to pass the sensitive authorization information in the form of session ID. If it's stored on the hard drive, you cannot protect it from modification by a malicious user. You can find the cookies stored on the hard drive when using Internet Explorer at the following location in Windows 7. The folder will contain many small text files that store the cookies:
C:\Users\username\AppData\Roaming\Microsoft\Windows\Cookies
Chrome does not store cookies in text files like Internet Explorer. It stores them in a single SQLlite3 database. The path to that file is C:\Users\Juned\AppData\Local\Google\Chrome\User Data\Default\cookies
The cookies stored in the Chrome browser can be viewed by typing in chrome://settings/cookies in the browser.
To solve the security issues faced by persistent cookies, programmers came up with another kind of cookie that is more often used today known as non-persistent cookie, which is stored in the memory of the web browser, leaves no traces on the hard drive, and is passed between the web browser and server via the request and response header. A non-persistent cookie is only valid for a predefined time which is appended to the cookie as shown in the screenshot given in the following section.
In addition to name and the value of the cookie, there are several other parameters set by the web server that defines the reach and availability of the cookie as shown in the following screenshot:

Following are the details of some of the parameters:
Domain: This specifies the domain to which the cookie would be sent.
Path: To further lock down the cookie, the
Pathparameter can be specified. If the domain specified isemail.comand the path is set to/mail, the cookie would only be sent to the pages insideemail.com/mail.HttpOnly: This is a parameter that is set to mitigate the risk posed by cross-site scripting attacks, as JavaScript won't be able to access the cookie.
Secure: If this is set, the cookie is only sent over SSL.
Expires: The cookie will be stored until the time specified in this parameter.
Now that the header information has been shared between the client and the server, both the parties agree on it and move on to the transfer of actual data. The data in the body of the response is the information that is of use to the end user. It contains HTML formatted data. Information on the web was originally only plain text. This text-based data needs to be formatted so that it can be interpreted by the web browser in the correct way. HTML is similar to a word processor, wherein you can write out text and then format it with different fonts, sizes, and colors. As the name suggests, it's a markup language. Data is formatted using tags. It's only used for formatting data so that it could be displayed correctly in different browsers.
HTML is not a programming language.
If you need to make your web page interactive and perform some functions on the server, pull information from a database, and then display the results to the client, you will have to use a server side programming languages such as PHP, ASP.Net, and JSP, which produces an output that can then be formatted using HTML. When you see a URL ending with a .php extension, it indicates that the page may contain PHP code and it must run through the server's PHP engine which allows dynamic content to be generated when the web page is loaded.
HTML and HTTP are not the same thing: HTTP is the communication mechanism used to transfer HTML formatted pages.
As more complex web applications are being used today, the traditional way of deploying web application on a single system is a story of the past. All eggs in one basket is not a clever way to deploy a business-critical application, as it severely affects the performance, security, and availability of the application. The simple design of a single server hosting the application as well as data works well only for small web applications with not much traffic. The three-tier way of designing the application is the way forward.
In a three-tier web application, there is a physical separation between the presentation, application, and data layer described as follows:
Presentation layer: This is the server where the client connections hit and the exit point through which the response is sent back to the client. It is the frontend of the application. The presentation layer is critical to the web application, as it is the interface between the user and rest of the application. The data received at the presentation layer is passed to the components in the application layer for processing. The output received is formatted using HTML and displayed on the web client of the user. Apache and Nginx are open source software and Microsoft IIS is commercial software that is deployed in the presentation layer.
Application layer: The processor-intensive processing is taken care of in the application layer. Once the presentation layer collects the required data from the client and passes it to the application layer, the components working at this layer can apply business logic to the data. The output is then returned to the presentation layer to be sent back to the client. If the client requests some data, it is extracted from the data layer, processed into a form that can be of use to client, and passed to the presentation layer. PHP and ASP are programming languages that work at the application layer.
Data access layer: The actual storage and the data repository works at the data access layer. When a client requires data or sends data for storage, it is passed down by the application layer to the data access layer for persistent storage. The components working at this layer are responsible for the access control of the data. They are also responsible for managing concurrent connection from the application layer. MySQL and Microsoft SQL are two technologies that work at this layer. When you create a website that reads and writes data to a database it uses the structured query language (SQL) statements that query the database for the required information. SQL is a programming language that many database products support as a standard to retrieve and update data from it.
Following is a diagram showing the working of presentation, application, and the data access layers working together:
