
The Windows version of Orchestrator requires slightly more work to set it up.
To get the Windows install working, we need the following:
We assume that you are installing Orchestrator on a freshly installed Windows VM.
Insert the ISO image into the VM (for example, mount it via vCenter).
Use Explorer to browse to the
[CDROM]:\vCenter-Server\vCOdirectory.Execute the install file. The install wizard starts.
Skip the introduction by clicking on Next.
Accept the EULA and click on Next.
Select the path where you want to install Orchestrator and click on Next.
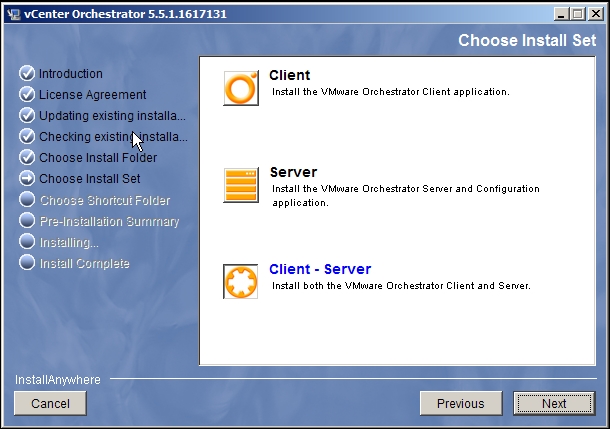
Click on Client - Server and then on Next.
Leave the icon selection alone and just click on Next.
We now need to make sure that Orchestrator's Windows services are starting and are configured correctly:
In Windows, open Services, for example, Win 2008 R2, and navigate to Start | Administrative Tools | Services.
Look for the service named VMware vCenter Orchestrator Server. Make sure it has started and is set to Automatic.
Setting the Orchestrator Configuration service to Automatic or starting it now is not really needed; we will start and stop it when required.
To access the vCenter Orchestrator home page, follow these steps:
Open a web browser and enter the
https://[ip of the vCO VM]:8281/vco/URL.To open up the Orchestrator Client, click on Start Orchestrator Client.
Enter
vcoadminas the user with the passwordvcoadmin.
Alternatively, you can access the web page from the VM itself by clicking on Start | VMware | vCenter Orchestrator Home Page.
The Windows Orchestrator version now also comes with embedded LDAP and database, making the first steps much easier.
The embedded database and LDAP can't be as easily accessed as with the appliance because there isn't really a need to do so. If you want to be serious about Orchestrator, you should use an external database and you will want to use at least your Active Directory (AD), if not SSO, as an authentication source.
The Windows installation also comes with a 90-day evaluation license.