Book Image

Cisco UCS Cookbook

By : Victor Wu
Book Image

Cisco UCS Cookbook

By: Victor Wu

Overview of this book

Cisco Unified Computing System (UCS) is a data center server platform that is used for computing, deploying, and storing resources in data center environments. This cookbook aims to teach you about various tasks you can implement to improve your existing method of configuring and deploying UCS. You will start by learning how to upgrade your firmware on Brocade and Cisco Fibre Channel Switch and will move on to enhance your knowledge of LAN connectivity. We will then discuss how to configure Windows 2008 and 2012 local boot in Cisco UCS. Next, you will learn how to install the operating system on Cisco UCS and use Cisco UCS Power Calculator to calculate the UCS consumption. Finally, we’ll take a look at backup solutions. By the end of the book, you will know several ways to build and compute in data center environment using Cisco UCS.
Table of Contents (14 chapters)
Cisco UCS Cookbook
Credits
About the Author
About the Reviewer
www.PacktPub.com
Preface
Index

Backup and restoration of Cisco UCS configuration


In this recipe, we will learn how to backup and restore Cisco UCS configuration on Cisco UCS.

Getting ready

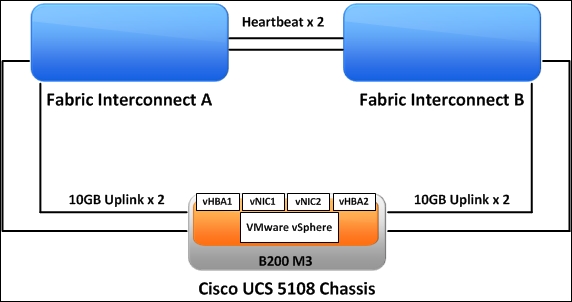
Assume that two Cisco UCS Fabric Interconnects are running in a Cluster mode and are connected to a Cisco UCS 5108 Chassis. A Cisco UCS B200 M3 is installed into this chassis. You have already installed the VMware ESXi on the Cisco UCS B200. There are two ports that are configured as Server ports on both Fabric Interconnects for the uplink connection between each Fabric Interconnect and each IO Module on chassis. The following diagram shows the details:

How to do it…

In this recipe, we will learn how to backup Cisco UCS configuration on a Cisco UCS Manager:

Perform these steps for backing up the Cisco UCS configuration on the Cisco UCS Manager:

  1. Open the Web browser and input the IP address of the Cisco UCS Manager. Go to the Admin tab in the navigation pane and click on Backup Configuration, as shown in the following screenshot:

  2. Click on Create...