
With the introduction of Windows 10, there was also a change to the installation mantra. Earlier, it was recommended you create a golden image and always perform a wipe and load sequence. Now with Windows 10, it is recommended you perform an in-place upgrade. Also, a new option with provisioning is now possible. We will look at the different new possibilities.
New deployment methods
Why in-place upgrades?
With the improvement of the Windows servicing stack, the possibilities of in-place upgrades got faster and more robust. In-place upgrades aren't the go-to solution, but will do well for a large number of scenarios. Performing an in-place upgrade will preserve all data, settings, apps, and drivers so, it will reduce a huge part of the complexity of migration, transfer of user profile, and (re-)installation of programs.
A big benefit of performing an in-place upgrade is 100% rollback in case of failure. With a classic wipe and load, if there is something wrong after installation, the user ends up with nothing, putting a high time pressure on IT to solve the problem. Mostly, this pressure results in a fast workaround of reinstalling the client a second time and losing all data, settings, apps, and so on.
When something goes wrong during an in-place upgrade, it will completely roll back to its original OS and the user will still be able to work with their client. This gives IT some time to inspect what went wrong and try again later when they have a fix. Even after a successful upgrade, IT has the ability to roll back to the old OS for 10 days if something else is not working as expected.
The current in-place upgrade process is divided into four phases, with multiple reboots in between:
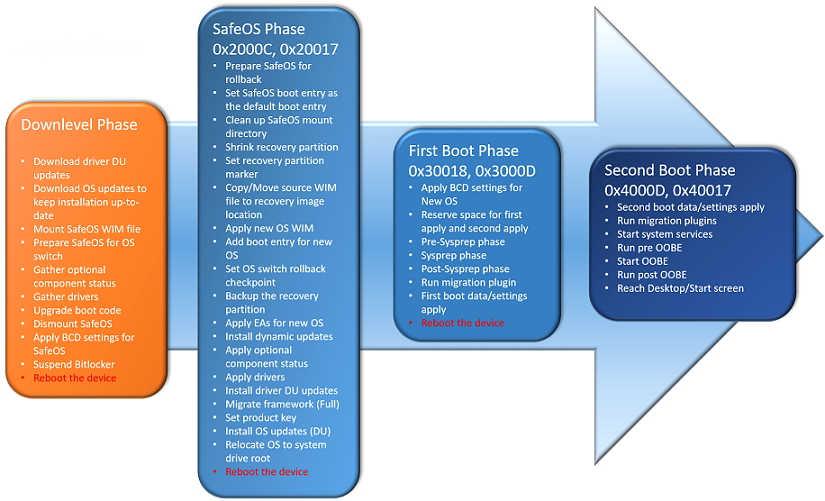
- The Downlevel Phase: Depending on whether you are executing setup.exe or executing this phase by upgrading via Windows Update or WSUS, the GUI will be different. But technically, the following steps always need to be done:
- Build a $Windows.~BT folder, analyzing the system and downloading required cumulative updates (if not restricted by setup flags)
- Extract required drivers from the running system or (if not prohibited by setup flags) download drivers from Windows Update
- Prepare the system and the sources, place a SafeOS Windows Preinstallation Environment (PE) boot environment, upgrade the boot entry, and suspend BitLocker (if running)
You will see this phase as Windows Update preparing your system, counting from 0% to 100%. The system will reboot after this phase. Setup result error codes (the second code after the 0xC19xxxxx code) in this phase typically start with 0x100.
- The SafeOS Phase: In this phase, a Windows PE instance is running, which is why it is called so. The recovery partition will be prepared and updated, the old OS will move offline to Windows.old, a new Windows folder will be built, and the new OS WIM will be applied to the drive. Dynamic updates and OS updates will now be installed. After that, the required drivers will be integrated so the system can boot from the new Windows version next time. You will see this phase in older Windows 10 releases as a black screen with a grey ring, like doing a setup installation and in releases since 1607 as a blue screen, like installing Windows Updates, with a message stating part 1 of 3 and counting from 0% to around 30%. The system will reboot after this phase. Setup result error codes (the second code after the 0xC19xxxxx code) in this phase typically start with 0x2000C or 0x20017.
- The First Boot Phase: Now the new system will boot up for the first time and run through the sysprep phase. Device drivers are getting ready and the migration plugin is running to extract all required data from the old OS. Already, the first boot data and settings have been applied. You will see this phase as part 2 of 3 and counting from 30% to 60%. The system will reboot after this phase. Setup result error codes (the second code after the 0xC19xxxxx code) in this phase typically start with 0x30018 or 0x3000D.
- The Second Boot Phase: In this last phase, the system runs the migration plugin one last time, applies the last migrated settings, starts the system services, and runs the Out of Box Experience (OOBE) phase. You will see this phase as part 3 of 3 and counting from 60% to 100%. The system will present you with the login screen after this phase. Setup result error codes (the second code after the 0xC19xxxxx code) in this phase typically start with 0x4000D or 0x40017.
The in-place upgrade process can only exchange your OS files. Therefore, it is only allowed to use a base ISO/WIM including only the operating system. The use of a sysprepped or so-called golden system with additional apps included in the WIM is not supported. Microsoft could have designed a way around it to handle other Microsoft products such as Office. But this would end up in a two-class citizen system. So the decision was made to only support the pure base OS upgrade.
Only use an original WIM from MSDN or VLSC center. You are allowed to and it is recommended you service these WIMs with the newest cumulative update offline. To reduce unnecessary growth of the WIM file, start over each time with the original WIM.
Only use an original WIM from MSDN or VLSC center. You are allowed to and it is recommended you service these WIMs with the newest cumulative update offline. To reduce unnecessary growth of the WIM file, start over each time with the original WIM.
A very detailed TechNet article for information and guidance on various setup error codes can be found at https://technet.microsoft.com/itpro/windows/deploy/resolve-windows-10-upgrade-errors#analyze-log-files.
With this move of Windows to Windows.old and a complete rebuild of the new OS, only migrating the required settings, apps, and drivers, the whole process is now very robust and prevents too much waste from older OSes. Even so, Microsoft does not provide detailed numbers. We could observe only very low numbers of rollback at approximately 2%-5% in huge national and international customers. And even if a rollback occurs, the system is still usable.
This in-place upgrade process runs smooth and fast on modern hardware. We clocked approximately 17 minutes on a Surface Book i7 with 256 GB NVMe and 60-70 apps installed. Even on a 3 or 4-year-old i5-class system with an SSD, times of approximately 25 minutes were possible. On very old hardware with low-RPM HDDs and a low amount of RAM, installation times can grow up to 1 hour 30 minutes and more.
Limitations and blocker of the in-place upgrade
With all the big benefits of the in-place upgrade, it still has some limitations and caveats. We will try to identify all blockers and limitations and try to formulate possible workarounds.
Changing from BIOS/legacy mode to UEFI mode
The main blocker, especially for releases up to 1607, is installations done in BIOS or legacy mode. You can perform an in-place upgrade in BIOS mode, but you will end up in BIOS mode again. A lot of enterprise customers want the benefits of the new UEFI mode, especially the new security features, which require the secure boot feature, which itself requires UEFI mode. So you end up having to decide between doing a smooth and fast in-place upgrade and not being able to use UEFI, secure boot and dependent services such as Credential Guard and Device Guard, or you can perform a classic wipe and load with all its problems of losing settings, needing to store user data, and so on.
Beginning with release 1703, there is now a method supported by Microsoft to change from BIOS mode to UEFI mode without installing an OS. The required tool, MBR2GPT.exe, is now included in the OS sources. MBR2GPT needs to be executed in offline mode, so run it from within Windows PE or attach the disk as a data disk to a running OS and execute it from there. If you are already on release 1703 or higher, you can convert it before upgrading to a new OS. If you are on a lower release, you first need to upgrade to 1703 at least. The tool can only prepare the disk, convert the MBR to GPT, and update the boot entry. To change the firmware itself from BIOS to UEFI mode, you need to use the manufacturer tools or do it manually.
Changing from Windows 32-bit/x86 to 64-bit/x64
A blocker that still exists and will persist in the future is trying to perform an in-place upgrade from an x86 to an x64 OS. In fact, you will be able to perform an in-place upgrade, but you will only be able to keep your documents and not your apps. There are too many changes with different paths, dual structures in the registry, and so on to keep this blocker going into future releases. So if you need to upgrade to x64--and trust me, you want to upgrade to x64 as new hardware will no longer provide x86 drivers and a lot of features are not available in x86--you can keep your files or go with a wipe and load. Microsoft will still support a 32-bit version of its client OS, but features requiring Hyper-V, such as Virtual Based Security, Credential Guard, and so on, will only be supported on the 64-bit version.
Changing the base OS language
You can't change the base OS language on the fly during an in-place upgrade. If your current base OS is for example en-US with language packs installed for de-DE, you are not able to upgrade your system with a new base OS with de-DE as the base language. If you try to do so, the in-place upgrade process will not migrate your applications. There are some hacks on the internet to install all the language content of the new base language you want to change to, booting into Windows PE and setting the new international settings, and getting an OS that looks like it is specific to this changed language and will be accepted by the in-place update routine. But be warned: this is not officially supported in terms of not being tested by Microsoft, and therefore, you could run into trouble and not be able to get official help.
Changing primary disk partitioning
With 1703, the partition type problem of MBR to GPT is solved, but all changes are still not possible out of the box. The included tools like diskpart only support shrinking or expanding a partition, but not merging or moving a partition or converting it from logical to extended or vice versa. So if you opted for a different disk layout involving such kinds of changes together with the new OS, you need to create the new structure before or after the upgrade with third-party tools or go with the classic wipe and load option.
Using the Windows To Go or boot from VHD features
Since Windows 8.1, there have been no major improvements done to the Windows To Go feature. Since 8.0, there were problems in performing an in-place upgrade, and these limitations still persist. So if you go with Windows 10 CB/CBB in a Windows To Go scenario, you will end up in a wipe and load one to two times a year for your USB media. The only way to circumvent this problem is to use the LTSB version on Windows To Go media, but with all the limitations and problems of LTSB.
Boot from VHD in terms of saving space was replaced by a better feature called Compact OS. So if you have been doing boot from VHD only for space savings, you should do a wipe and load and go with Compact OS in future, which is fully in-place capable. If you've used boot from VHD for separating different (test) installations and want to use this feature in future versions, you need to do a wipe and load every time.
Image creation process (sysprep after upgrade not supported)
In short, you cannot in-place upgrade your golden image and then do a sysprep. The process will detect it and present you with an error message: Sysprep will not run on a upgraded OS. The long version is that it is recommended you always build your golden image from scratch with a base ISO of the new Windows version. As your running systems will be able to upgrade in place, you will need your golden image in the future only for break fixes and installation of new hardware. And in the case of new hardware, the new process of making provisioning packages will be replaced in some years. Don't try any dirty hacks to remove certain regkeys used by sysprep to detect such an upgrade. You do not want to install an unsupported solution to thousands of clients. Invest the time to create a new golden image.
Certain third-party disk encryption products
Even though there were improvements in the 1607 and the 1703 releases with setup.exe command lines to support more third-party encryption systems, you can still end up in a situation where an in-place upgrade is not possible or runs into a severe error. To prevent this problem, you need to upgrade to the newest version of your product. If this still does not help, you can only decrypt your drive (which is time consuming) or use a classic wipe and load without retaining your apps, data, and settings.
Changing too many apps (bulk application swap)
Too much changing of applications is not a major blocker but could limit your installation times. As in-place upgrade only supports the swapping of the base OS, all application changes needs to be done before or after the upgrade inside some task sequences. This could be very time consuming, and when your top priority goal is deployment time, especially if there are no or low user data amounts and settings which need to be converted, the classic wipe and load could be a better option.
Changing the environment
Change of domain is not supported inside the in-place upgrade as the corresponding sections inside your sysprep XML will be ignored. If you need to change domain, local admins, and so on, you need to do this before or after the upgrade. If it is not possible to run the new OS in the old environment or the old OS in the new environment, you could be limited to the classic wipe and load method.
Traditional wipe and load
The well-known process of creating a golden image, syspreping it and deploying it to your clients, also known as wipe and load, will still be available with Windows 10 and still be supported in the near future.
To adapt your existing wipe and load process to the new Windows 10 OS, you just need to exchange your Windows Automated Installation Kit (WAIK) or Assessment and Deployment Kit (ADK) with the newest ADK provided by the latest Windows 10 release. This implies that your deployment solution is capable of handling the newest ADK version. Carefully check every modification to the golden image to see if it is still a supported setting or has been deprecated. Also see if the feature you are (re-)enabling is perhaps now disabled by default (for example, SMB1 support). This could be a hint for support in future versions.
Do not modify binary registry keys, also known as binary blobs, and use only documented registry keys, as with every new version, undocumented registry keys can change behavior or vanish, even with cumulative updates. As they are not officially documented, there needs to be no official warning or announcement.
If you want to provide an experience similar to in-place upgrades, you need more steps, more tools (for example, the User State Migration Tool), and possibly more external storage. In some rare cases, such as bulk app changes, you may need more time.
A down-level OS with lots of security mitigations like excessive use of ICACLS and other rights management tools to bend the security of the OS to comply with outdated or suboptimally programmed applications may also qualify for a wipe and load instead of an in-place upgrade, which will possibly carry on these changes.
An alternative: provisioning
The new Windows Configuration Designer (WCD) is part of the Windows 10 ADK. It will be updated/enhanced with each release of the ADK. With the release of Windows 10 ADK 1703, it was renamed from Windows Imaging and Configuration Designer (WICD) to WCD.
Not only does it have the ability to create configuration packages, but it is also able to switch the SKU of your Windows 10 installation. This was previously not possible. You still cannot move to LTSB via this mechanism, as this is a completely different build. At this stage of the process, you cannot downgrade. Currently, only an upgrade from Pro to Enterprise is possible (except for the Education SKU, which allows an upgrade from Home to Education).
The WICD can be used to create packages that implement any MDM-based setting. Alternatively, you can run external scripts to set most MDM settings.
For some actions, such as pre-provisioning Windows 10 Mobile or switching to Windows 10 Mobile Enterprise, WCD is the only tool available to the enterprise.
WICD has a wide range of functionality in addition to script support. All in all, it sounds like a mighty and powerful tool. However, it is currently not directly supported inside the Microsoft Deployment Toolkit GUI and inside SCCM 1702; this is subject to change in future releases. You can integrate a command line as a workaround, but this has a major drawback.
Currently, there is no way to fully automate or silently install the provisioning package. You can sign the package to remove some prompts, but not in all circumstances. You also need to embed it in an image so that it gets installed during the OOBE process to get no prompts. However, this takes away a lot of flexibility.
If you hit the Windows key five times during OOBE, you can put in a provisioning package!
It has been our field experience that certain functions that WCD can perform or try will break the Microsoft Deployment Toolkit (MDT) and System Center Configuration Manager (SCCM) deployment process. Therefore, it should be tested and care should be taken while including this tool in your work (at the time of writing this).
Also it still lacks the ability to remove crapware and bloatware preinstalled onto vendor OS images. As long as a Windows 10 signed edition is not available worldwide and from all vendors, the tool definitely needs improvements in this section.
This tool is likely to be improved in future releases of the ADK. Also, future releases of MDT and SCMM will likely support WCD directly in the GUI, so keep an eye out for release note changes and an improvement in the tool's capabilities. More information on WCD will be covered in the next chapter.