Book Image

DevOps for Web Development

By : Mitesh Soni
Book Image

DevOps for Web Development

By: Mitesh Soni

Overview of this book

The DevOps culture is growing at a massive rate, as many organizations are adopting it. However, implementing it for web applications is one of the biggest challenges experienced by many developers and admins, which this book will help you overcome using various tools, such as Chef, Docker, and Jenkins. On the basis of the functionality of these tools, the book is divided into three parts. The first part shows you how to use Jenkins 2.0 for Continuous Integration of a sample JEE application. The second part explains the Chef configuration management tool, and provides an overview of Docker containers, resource provisioning in cloud environments using Chef, and Configuration Management in a cloud environment. The third part explores Continuous Delivery and Continuous Deployment in AWS, Microsoft Azure, and Docker, all using Jenkins 2.0. This book combines the skills of both web application deployment and system configuration as each chapter contains one or more practical hands-on projects. You will be exposed to real-world project scenarios that are progressively presented from easy to complex solutions. We will teach you concepts such as hosting web applications, configuring a runtime environment, monitoring and hosting on various cloud platforms, and managing them. This book will show you how to essentially host and manage web applications along with Continuous Integration, Cloud Computing, Configuration Management, Continuous Monitoring, Continuous Delivery, and Deployment.
Table of Contents (16 chapters)
DevOps for Web Development
Credits
About the Author
Acknowledgments
About the Reviewer
www.PacktPub.com
Preface

Overview of hosted Chef


We can use Chef server either by installing and managing Chef server on our own or we can use hosted Chef - SaaS offering to utilize in configuration management.

  1. Click on MANAGEMENT CONSOLE or navigate to https://manage.chef.io/login . We are going to start from scratch, so click on Click here to get started!

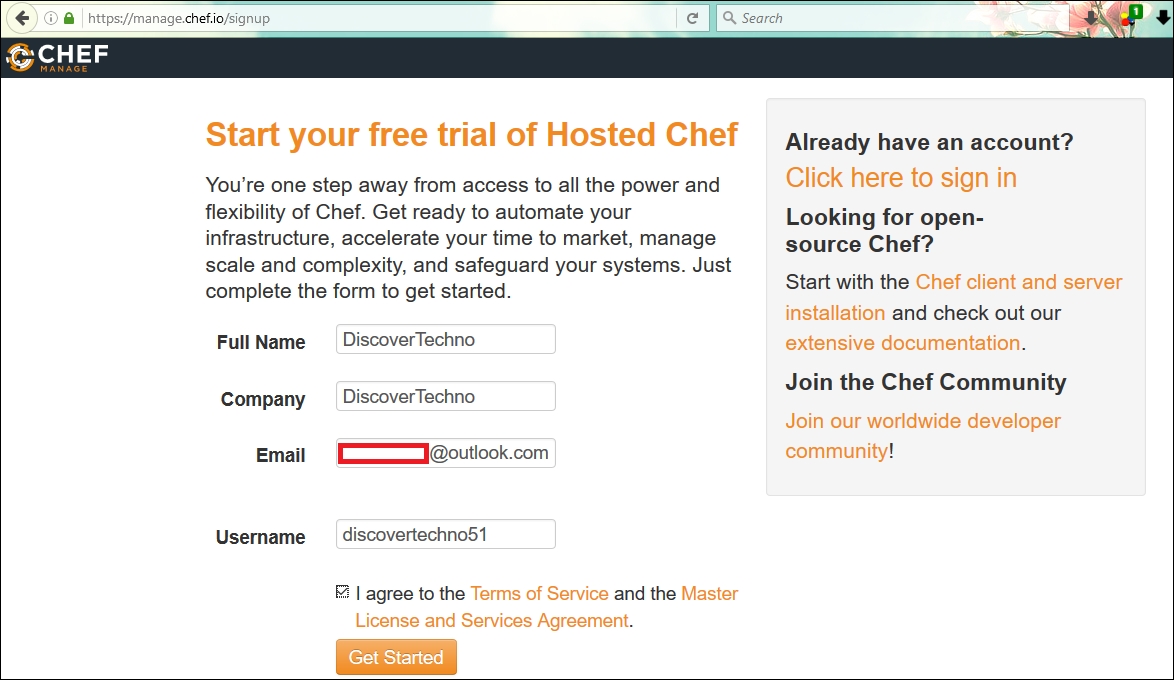
  2. Enter your Full Name, Company name, Email address, and Username in the respective text boxes and check the box that says I agree to the Terms of Service and the Master License and Services Agreement. Then, click on the Get Started button:

  3. You will then see this message:

  4. Open your e-mail inbox and click on the verification link to complete the creation of your hosted Chef account. You will get an Email Verification Successful message. After typing your password, click on Create User button:

  5. The next task is to create an organization. Click on Create New Organization:

  6. Provide the Full Name and Short Name of the organization, and click on the Create Organization...