
When using CentOS, system administration or applications development tasks are performed using either the command-line interface (CLI), such as the Bash shell, or with the help of a GUI, such as GNOME, KDE, and so on. In this section, we will learn how to enter commands in the Bash shell at the Linux console.
Accessing the command line using the console
Starting a Terminal
When you log in to a Linux system in CLI mode or open a Terminal, it displays a string where it waits for user input (a command). This is known as a shell prompt.
To access a shell prompt in the GUI environment, you have to start a Terminal application, such as GNOME Terminal. There are multiple ways to launch a Terminal. The most frequently used ways to access a Terminal are as follows:
- Select Applications | System Tools | Terminal
- Right-click anywhere on your Terminal and select Open in Terminal from the context menu that pops up
- From the activities overview, select Terminal
If you have started the Terminal application as a normal user, then the default prompt ends with a $ character, as shown in the following screenshot:

A normal shell prompt lists the following three details:
- The login name of the current user
- A short hostname of the machine, also known as the machine name
- The name of the current working directory
The tilde (~) sign in the shell prompt represents the user's home directory. We will learn more about this in the following chapter.
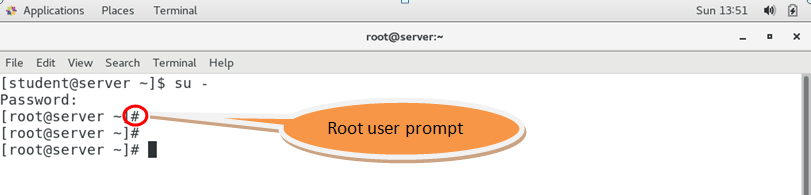
If you have started or switched to the shell as a root user, also known as a superuser or administrator, then the prompt ends with a # character, as shown in the following screenshot:
The default shell of CentOS 7 is Bash, which provides a scripting facility for the automation of repeated tasks. The main functionality of any shell is to interpret the commands entered by the user at the prompt, and to provide a platform to launch any other program.
The default shell of Unix distributions is generally set as the Bourne shell. It is similar to the Microsoft Windows's Command Prompt application, cmd.exe. Windows 7 and Windows Server 2008 R2 onwards include Microsoft PowerShell, which is very similar in functionality to Bash.
There are two ways to access the shell. The first method is via the Terminal. When you install Linux without a GUI (as in a text-based installation), this can be the Linux machine's physical console, consisting of a keyboard for user input and a display to show output.
The second method is by using the shell from a virtual console. The Linux machine's physical console supports multiple virtual consoles, which act as separate Terminals with independent login sessions. If the GUI is installed, then the first virtual console is the GUI in CentOS/RHEL. In addition to the first graphical environment, five pure text-based environments are also available on a virtual console with which you can access a login shell. Ctrl + Alt + (F2 through F6) are text-based and Ctrl + Alt + F1 is the graphical desktop.
Command-line syntax and structure
Any command entered at the shell prompt can be broken down into three parts:
|
Part |
Description |
|
Command |
The name of the application to be executed |
|
Options |
This modifies the behavior of the command; options are generally prefixed with one or two hyphens |
|
Arguments |
These generally indicate the target on which the command is be applied |
A command can consist of one or more options and can take one or more arguments, depending upon its syntax. Understanding the syntax of commands will tell you all about the options and arguments it can take, and in what order. To view the syntax of a command, we can use the --help option or view the manual page. The usage of the mkdir command with its options is shown in the following screenshot:
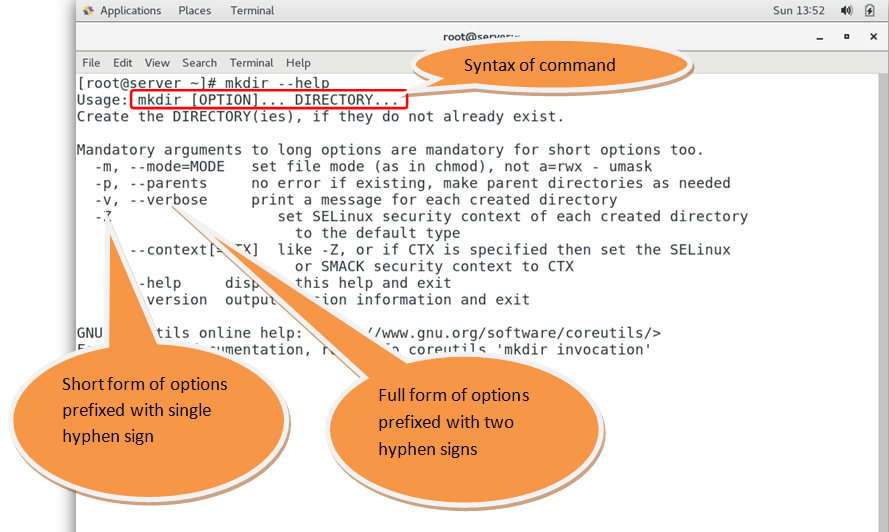
Initially, you may find the output of the --help option a bit confusing. However, it becomes much simpler once you understand the basic conventions used in the syntax, discussed as follows:
- Square brackets, [ ], enclose optional items. For example, it is not mandatory to execute the mkdir command with any option, as shown in the following command line:
$ mkdir mydirectory
- Ellipses, …, represent a list of more than one item of a given type. For example, we can use multiple options, such as -m and -p or -v, together with the mkdir command as shown in the following command line:
$ mkdir -p -v demo/linux/centos
- Text given in angled brackets, <>, represents variable data. Sometimes, variable data is also written in capital letters. For example, DIRECTORY.. in mkdir means we have to insert the directory name we want to use with the mkdir command.
- Multiple items separated by pipes (|), mean that only one of those items can be specified.
Exiting the shell
There are multiple ways to quit the shell, when you have finished using it and you want to end your session. Some of the most popular options to exit the shell are as follows:
- Typing the exit command anytime on the console terminates the current session.
- Pressing the Ctrl + D keys together is also a shortcut quite often used to terminate the current session.