
Working with your new Linux OS using its Terminal window through the VirtualBox user interface will get you started and can be used for configuring the most basic settings of your new server. A more convenient, efficient, and professional way of accessing your server's command line is by using a terminal emulator program and SSH. A terminal emulator is an external program running outside VirtualBox in a separate window on your OS. It can be used exactly the same way as your server's main black and white Terminal:
It has a lot of convenient features, such as easy copy and paste in clipboards from your OS window and customizing font size and colors. Also, it uses tabs for better navigation, but how can you communicate with such a terminal emulator from your server? This is done using a client-server connection. The terminal emulator running on your host machine will be declined; we will connect to the CentOS 7 server to execute commands on it. Such a connection can be done using SSH. This is a system for remotely accessing and using Linux servers. It uses strong encryption for secure connections. As SSH is one of the most fundamental core services for communication on any Linux server, it is already installed and enabled on CentOS 7. All we need to do is run an SSH client within our terminal emulator program, which can connect and communicate with any server running the SSH service on Linux and macOS, a terminal emulator program, and an open source, as a stage client is already installed by default and ready to use.
On Windows, you need to install the program PuTTY, which contains not only the SSH client program, but is also a fully operational terminal emulator. Before we can access the CentOS 7 SSH service, we need to make its correct network address available to the host system where our terminal emulator is running. A correct network connection for communicating between a client and server always consists of an IP address, or domain name, bundled together with a specific port number. The domain name or IP is like a house number, whereas the port number is like the exact apartment number in that house. We always need both values for the correct delivery of network packages. By default, the ports of any guest VM are not available to the outside host system, so we first need to create the link between the host and the guest by using a feature that is called port forwarding. SSH, by default, is running on port 22, but this low port number cannot be used for forwarding to by non admin users or route users. As we are running VirtualBox as a normal user, we need to forward port 22 to a user port higher than 1024.
In our example, we use port 2222. To do this, perform the following steps:
- Select your VM of choice and navigate to the Settings option. Click on the Network tab.
- Explore the Advanced option. Now, click on the Port Forwarding button to create a new port forwarding rule.
- In the Port Forwarding Rules window, click on the Adds new port forwarding rule button. Now, use the 127.0.0.1 IP for the Host IP section, which is the IP of the localhost, then the Host Port, 2222. For the Guest IP section, type 10.0.2.15 and Guest Port 22, as illustrated in the following screenshot:
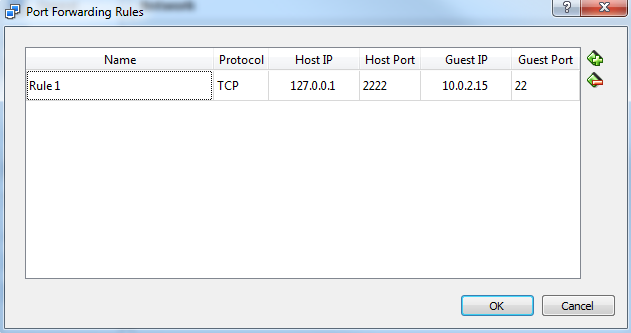
- Click on OK to create this rule.
- Repeat the same for the other two CentOS 7 VMs we cloned earlier. Make sure to use different host ports so that we can create distinct network endpoint connections for every host.
- The first CentOS 7 VM server can now be accessed using the IP 127.0.0.1 with port 2222, the second at port 2223, and the third at port 2224. Now, start all three of your CentOS 7 VMs.
- Open your favorite terminal emulator, for example, xterm, GNOME Terminal, or (as is in my example) the Xfce4 Terminal.
- To log in to your first CentOS 7 server using the terminal emulator, use the root credentials. Type the following command in the Terminal window:
ssh -p space 2222 [email protected].
- Press the Enter key. This command will connect your local SSH client to the SSH server running at the IP address 127.0.0.1 on port 2222, which gets redirected to your VM's network address 10.0.2.15 at port 22.
- When prompted, type yes in the Terminal, if you are logging into the server for the first time.
- Now, enter the credentials of the root user you set during installation.
- Here, we can now work and type commands as we would on the real Terminal screen. We can also log into the other two CentOS 7 VMs using the other two ports.
- To exit the SSH session, type in exit and press Enter.
- On a Windows system, you can use the free program named PuTTY to do exactly the same operations.
- Just open the PuTTY graphical user interface, type in the SSH server's IP address, 127.0.0.1, and use port 2222 for connection. Now, use the root account to access the VM.
- After setting up port forwarding, the easiest way is to use the free SCP program available on Mac or Linux. On Windows, you need to download PSCP.
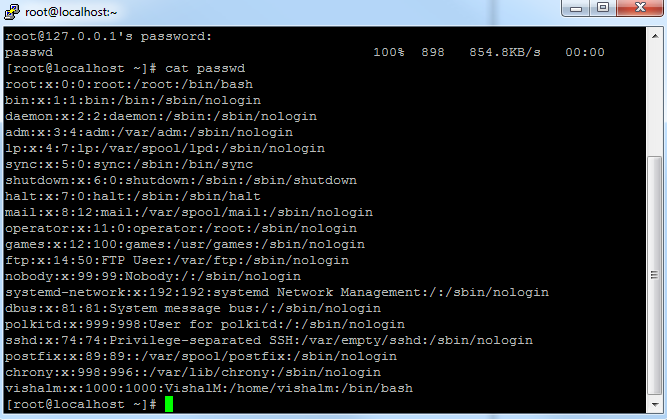
- To download a file called /etc/passwd from the CentOS 7 VM guest to the host using the root user in the current directory, type the following command:
scp -P 2222 [email protected]:/etc/passwd .
- When asked, type in your root password. Now we can view the file locally:
- The other way around to upload a local file called my-local-file, filled with some random data to the server, and type scp -P 2222 my-local-file [email protected]:~.
- Press Enter, and type your root's password. The file has now been uploaded to the server into the /home folder, which is specified by the ~.