
This recipe describes how to configure optional interfaces (for example, a DMZ network) to pfSense.
The optional network you will create in this network will be a DMZ, which is short for the DeMilitarized Zone. The idea of a DMZ is to have a network where some traffic is allowed to pass and some traffic is not. Typically, traffic in the DMZ is allowed to pass to and from the internet but not to other internal networks. Traffic is allowed to pass from internal networks to the DMZ. Thus, the flow of traffic looks like this:
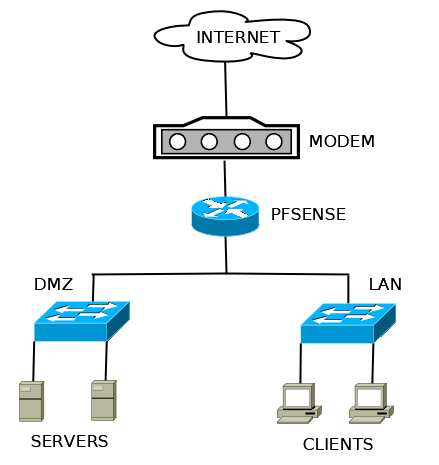
Internet <<>> DMZ << Internal networks
Unsafe internet traffic, for example, is allowed to enter a web server in the DMZ. LAN traffic is allowed to enter the DMZ as well, for example, if someone on the LAN wants to access the web server as well. However, the key lies in the fact that no DMZ traffic is allowed to access the internal networks.
To configure a DMZ, you will need at least one spare interface, and you will have to have added it using the procedure outlined in theIdentifying and assigning interfacesrecipe. We will assume that you have added at least one such interface (named OPT1).
- Navigate to
Interfaces|OPT1. - Check the
Enable Interfacecheckbox:

- Set
Descriptionto DMZ. - Set
IPv4 Configuration TypetoStatic IPv4. - Enter an
IPv4 Addressand the CIDR. In our case, we will use192.168.2.1and select 24 from the CIDR dropdown list. - Leave
IPv4 Upstream gatewayset to None. - Leave the
Block private networksandBlock bogon networkscheckboxes unchecked (they should be unchecked by default). - When you are done making changes, click on the
Savebutton. When the page reloads, click on theApply Changesbutton.
Your DMZ network will now allow external (WAN) access. Your LAN network will now be able to access the DMZ, but the DMZ will not be able to access the LAN.
You can now attach a switch to your DMZ port to allow you to attach multiple nodes to your DMZ network. If you have been following the recipes in this chapter in order, your network will now look like this: