Book Image

Microsoft Windows Intune 2.0: Quickstart Administration

By : David Overton
Book Image

Microsoft Windows Intune 2.0: Quickstart Administration

By: David Overton

Overview of this book

Microsoft Windows Intune is a cloud service solution that simplifies how small and mid-sized businesses manage and secure PCs using Microsoft cloud services and Windows 7óso your computers and users can operate at peak performance all the time.This step-by-step guide will show you how to plan, set up and maintain Windows Intune, showing you how to manage a group of PCs (either 1 business or several if a partner) from the base operating system, through to the patches, anti-malware solution and deployed software and policies from a central console, using the Windows Intune service. This book takes you through all the steps to plan, set up and maintain Windows Intune and how to manage a group of PCs. The book starts by providing an overview of Cloud Computing and PC Management. The book then dives into topics such as Windows Intune features, signing up for Windows Intune and installing the client software, configuring Windows Intune, proactive management, and monitoring and dealing with alerts, including remote assistance amongst others. As Windows 7 is part of Windows Intune, the book will also cover the minimum steps required to move from Windows XP to Windows 7 while keeping user settings and preferences.
Table of Contents (19 chapters)
Microsoft Windows Intune 2.0: Quickstart Administration
Credits
About the Author
Acknowledgement
About the Reviewers
www.PacktPub.com
Preface

Restoring user settings and installing applications


We now need to make this look and feel like the user's computer again. This is done by using Windows Easy Transfer wizard again. Follow these steps to complete the process:

  1. 1. Go to the Start menu and search for Easy Transfer. We will see Windows Easy Transfer show on the list of programs. Start this.

  2. 2. We will again see the welcome screen. Press Next to pass through this as before.

  3. 3. As previously, select the same transfer mechanism, such as An external hard disk or USB flash drive.

  4. 4. We are now asked if this computer is the new or old one. Select This is my new computer.

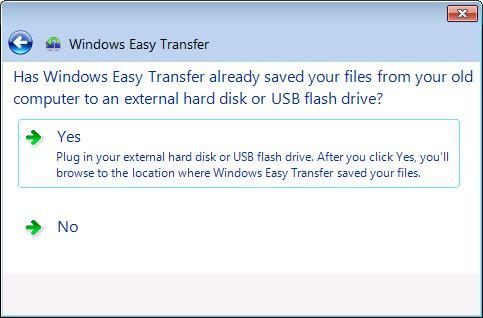
  5. 5. We need to confirm that the settings have already been saved to the storage device, so select Yes.

  6. 6. We need to find the file that we previously created. Navigate to the location and select the file, and then press Open.

  7. 7. Enter the password and press Next.

  8. 8. We can modify the information that will be restored, although I rarely need to. Once we are happy, press Transfer...