
The Import and Export Wizard will be our first stop at SSIS. This wizard provides a simple ETL and is easy to use for basic data transfer operations. With this wizard you can choose a source, a destination, and map columns with few constraints on data transfer options. We will take a brief look at this wizard in our first experience with SSIS.
Install SQL Server 2012. SQL Server 2012 comes with three editions: Standard, Business Intelligence, and Enterprise. The Business Intelligence edition covers all requirements for this book that you'll need to install. With this edition you will have all SQL Server Integration Services features.
For many recipes in this book, you need to have the AdventureWorks2012 and AdventureWorksLT2012 sample databases installed. Information about installing these databases can be found in the book introduction.
To install sample databases, first download the database files from http://msftdbprodsamples.codeplex.com and then open SSMS to execute this statement (download AdventureWorks2012 Data File and AdventureWorksLT2012_Data):
"" CREATE DATABASE AdventureWorks2012 ON (FILENAME = '<drive>:\<file path>\AdventureWorks2012_Data.mdf') FOR ATTACH_REBUILD_LOG ;""
CREATE DATABASE AdventureWorksLT2012 ON (FILENAME = '<drive>:\<file
path>\AdventureWorksLT2012_Data.mdf') FOR ATTACH_REBUILD_LOG ;
Note that you should replace the path of the file here with the path of the file downloaded on your machine.
Create a new database in SQL Server. Open SQL Server Management Studio (SSMS) from Start Menu | Microsoft SQL Server 2012 | SQL Server Management Studio. In the SSMS, connect to local computer instance and create a new database. Name this database as PacktPub_SSISbook.
Note that you should run SSMS as administrator, to do this just right click on SQL Server Management Studio from path above and right click on it and choose Run as Administrator.
Open the Import and Export Wizard; there are three ways you could do it:
In the Run window, enter
DtsWizard.Open the wizard from the following address: Start Menu | All Programs | Microsoft SQL Server 2012 | Import and Export Data.
In SSMS, right-click on any database and then under Tasks, select Import Data or Export Data.
At the first step in the Import and Export Wizard, a welcome page will appear. Click on Next to enter the Choose a Data Source step, in this step you should choose where the Data Source comes from. The Data Source can be any source; from an Oracle database or SQL Server to any other database, flat files (such as
.txtand.csv) or even Excel files, the range of source and destinations is based on data providers installed on the machine. For this sample, leave the Data Source option as its default option which is SQL Server Native Client 11.0.We want to export two tables from the
AdventureWorks2012database to another database. Therefore, leave the Server name as (local) or a single dot ( . ) or if you have a named instance you could use.\<Instance-Name>, and in the Authentication section leave the Authentication Type as Windows Authentication. This option will use your Windows account for connecting to the database, so obviously the Windows account should have read access to the underlying database.In the Database drop-down box, select AdventureWorks2012 from the list. Then click on Next and go to the next step.

The next step is required to choose a Destination, therefore, provide the connection details of the data's destination (types of destinations can differ from databases to flat files). For this sample leave the destination as default value which is SQL Server Native Client 11.0.
Set the Server Name to (local) or dot ( . ) to connect default instance of current machine. Set the Authentication as Windows Authentication. Select R1.1 in the Database drop-down list . Then click on Next to follow the wizard's steps.

In the Specify Table Copy or Query step you can choose between selecting a table or view name for a source database or writing a query to fetch data from a source. For this example, choose the Copy data from one or more tables or views option .
Next, a list of tables and views from the source database will appear. For this example, select HumanResource.Department, Person.Address, and Production.Product. Then click on Next.
The Save and Run Package step is next; it provides the ability to save all the settings and configurations that you've set for an SSIS Package. We are going to save this package to see what the SSIS Package looks like. There are a lot of concepts and options associated with saving SSIS Packages which will be discussed in upcoming chapters, so don't worry about some terminologies here, all of them will be explored later. Check the Save SSIS Package option and click on the Next button .

In the next step which is the Save SSIS Package dialog , type the name as
R01_ImportExportWizard, and choose a location for the package file. Then click on Next.
Now a summary of all settings that you've done appears here; after reviewing the summary click on Finish.
After clicking on the Finish button , the Import and Export Wizard will show up and we can see all the messages generated during the package's execution. The number of rows copied are displayed, or any other information such as the number of rows transferred, validated, and any other actions.
Open and see the execution's report by clicking on the Report button .

Close the Wizard and open SSMS to check the destination database, you can see transferred tables there with data.
In this recipe, we created the first SSIS Package with the Import and Export Wizard, this simple scenario exports some tables from the AdventureWorks database to an empty database. In the last few steps, we saved the whole data transfer scenario to an SSIS Package on a file system that we'll be able to open with SQL Server Data Tools (SSDT) in later recipes.
With the Import and Export Wizard you can import or export data from a source to a destination, this is the most simplistic ETL scenario. In the Select a Data Source step you perform the Extract part of ETL and fetch data from SQL server database (data source). The second step, which was the Destination Select, was configured during the Load part of ETL. Load indicates where data should be exported; we export data to a SQL Server database. In this first example scenario we don't have any specific Transform stage. We will see this part of the ETL later, during the Data Flow chapters of this book.
When you choose table(s) from the AdventureWorks database in the Select Source Tables or Views section
, tables that don't already exist in the destination database will first be created.
After matching the columns and metadata, data will be transferred and a summary of all logs will show what happened during execution.
We saved this package to the file system; we can also save packages to an SQL Server. The difference between the different storage options for SSIS Packages with their pros and cons will be explored later in Deployment chapters.
As you've seen so far, the Import and Export Wizard is a simple way to transfer data that covers our most basic requirements. But in real-world scenarios, you need some additional features, which we'll now discuss.
In the Select Source Tables and Views step, when you select a table or view to transfer, an Edit Mappings button will be enabled. Note that you need to select a row in order to enable this button.
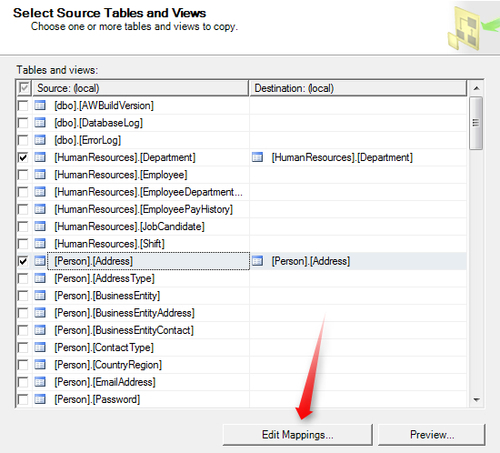
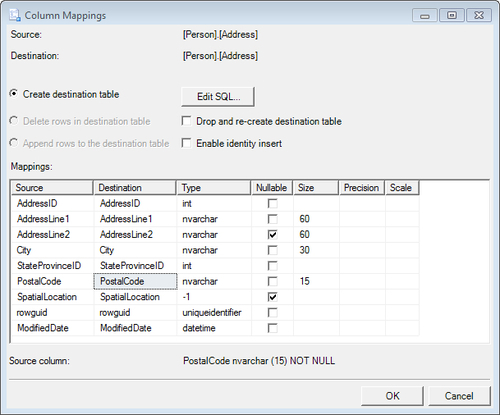
When you click on Edit Mappings, the Column Mappings window will appear. As you see, there are some options here for mapping Source and Destination columns.
When the destination table doesn't exist in the destination database, the Create Destination Table step will flag it. This means that the missing table will be created in the destination database; you can click on the Edit SQL button to see what the exact create table statement is; you can change the script as you want here.
When the destination table already exists in the destination database, the Delete Rows and Append Rows options in Destination Table will be selectable. You can select between deleting rows in a destination table before data transfer or appending new rows to existing records with these options.
The Drop and re-create destination table option
will be selectable when the destination table already exists. Another important option is Enable identity insert
, which should be checked if you load data into an IDENTITY column. The last part of the Column Mappings window is the Mappings section, which shows Source and Destination columns
, as well as some additional column information. By default, all columns with the same name in Source and Destination will be mapped automatically. However, if the column names are different you should select columns by selecting the correct column name in the drop-down box. If you want to remove a column from data transfer you can simply choose the <ignore> option
.
In real-world scenarios, you need to configure transfer settings for all tables at once. Select multiple rows in the Select Source Tables or Views Wizard step by holding the Ctrl key and clicking on every row that you need, and then click on the Edit Mappings button. The Transfer Settings dialog box will open; all configurations that you set here will be applied to all selected tables.
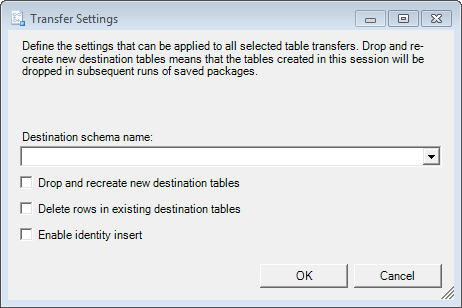
In the Destination schema name you can choose a schema name from the destination database and use this schema for all selected tables. You can also type a schema name there; if that schema doesn't exist in the destination database it will be created and all tables will be created under this new schema. The Drop and recreate new destination tables option will be applied to all new tables, and the Delete rows in existing destination tables option will be applied to all existing tables. Enable identity insert is also applicable to all tables that have Identity columns.
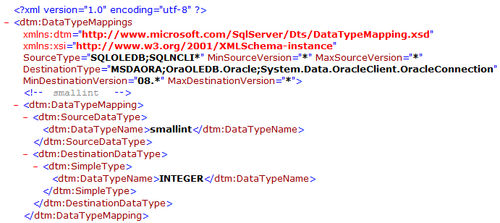
Data types which are automatically mapped through the Column Mappings window of the Import and Export Wizard are defined in XML files based on source and destination type. A list of all these XML files is available here:
<system drive>:\Program Files\Microsoft SQL Server\110\DTS\MappingFiles
There is a mapping file for each source or destination, and details of data type mappings can be found there. The next screenshot shows a portion of the MSSql8toOracle8 mapping file: